
Erudite Squad Guide
Preface
Section titled “Preface”I’ll start by saying that this won’t be a conventional guide, the information provided here is just what I’ve experienced and learned while playing only this specific strategy. As a consequence of it, its scope will be very narrow and there might be more optimal strategies to approach different decisions throughout the run. The main purpose of the guide is to introduce a working strategy for this squad and the reasoning behind most of the decisions behind a standard run until someone writes a better guide, but I encourage the reader to experiment and learn past what this guide will provide.
I’m completely unware of the base knowledge of the average IS5 player reading this, the assumptions I made about someone following this guide while it was being written are:
- Basic D18 ED245 experience to transition more smoothly into a different squad.
- Decent understanding of all or most stages, both stage and enemy mechanics within, as this doesn’t go in depth with any of them.
- While this requires the player to be able to play in a more adaptive way, compared to the standard Lamp playstyle, it is aknowledged that this may not be the case.
- Decent understanding of most mechanics within this IS theme, when Epochs can spawn, basic knowledge about thoughts combination pools (1+1, 2+2, etc), knowledge of most relics available in the theme and their effects.
If you don’t feel like you meet any of these expectations, I would still encourage you to at least give it a brief read as you may still be able to learn something new, focused more on the logic and thought process of approaching different parts of a run, that will hopefully help you improve not only for this squad or IS theme, but for other IS themes as well.
Introduction
Section titled “Introduction”This guide will focus only on the Fatedless variant of this squad with Exusiai the New Covenant start for d18, forcing endings 2, 4 and 5 T3 egg within the same run. While there might be better starting squads, this is simply what I prefer playing with, although it also has its own advantages (more on this later). The guide is structured by presenting next the advantages of the squad, along with the reasoning of what makes this squad good, followed by a general breakdown of a run, containing the way I try to approach my runs, along with draft options, the advantages and disadvantages of each, as well as a general guideline of the type of draft required to clear the endings, finishing with the general strategies for each of them.
Mandatory Glaze Section
Section titled “Mandatory Glaze Section”
Allow me to introduce the greatest discovery of IS5: Erudite Squad, or how it is commonly known as, Tree Squad. After the Historical Reconstruction is fully upgraded, this squad starts with +10 Toil Limit, +2 Hope and 6 Shrivel and Sprouts.
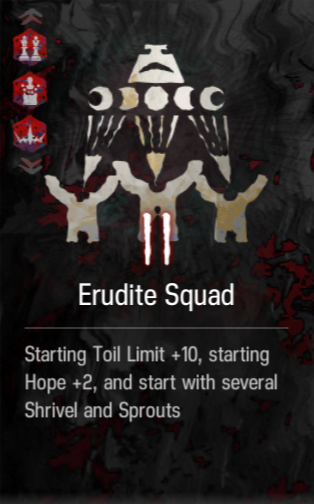
Shrivel and Sprout (Trees)
Section titled “Shrivel and Sprout (Trees)”
The general idea of this squad is to play around Shrivel and Sprouts. Shrivel and Sprout is a lingerer of rarity 2 and weight 2 that duplicates itself when entering a new floor (boskies/possibilities do not count). Paired with the initial extra Toil Limit, this results in a reliable source of collectibles.
When combining lingerers in the False to Truth node there are 4 pools of collectibles:
- 1+1
- 2+2
- 3+3
- Eureka
The pool depends on the sum (a total sum of 5 would count as 4 for example) of the rarity of the lingerers that are being combined, for the 3+3 pool, combining a lingerer of rarity 2 with one of rarity 4 would also be able to access it. If we look at each pool, we can observe the following:
- 3+3 contains strong relics such as King’s Crown, CE, Chivalric Commandments, Hand of Rumble, Hand of Mystery, Soul Binding Bone, SP regen, Clotheskaz, Glory Pack, hope and squad size relics, Revenant Remnant, Song to Make a Tenacious Mind, Transceiver, to name the most important ones
- 2+2 contains a well balanced pool with survivability, damage, hope, squad size, deployment limit, and a few really strong economy relics such as Anchor For Five Seconds Ago and Cursed War Chronicles
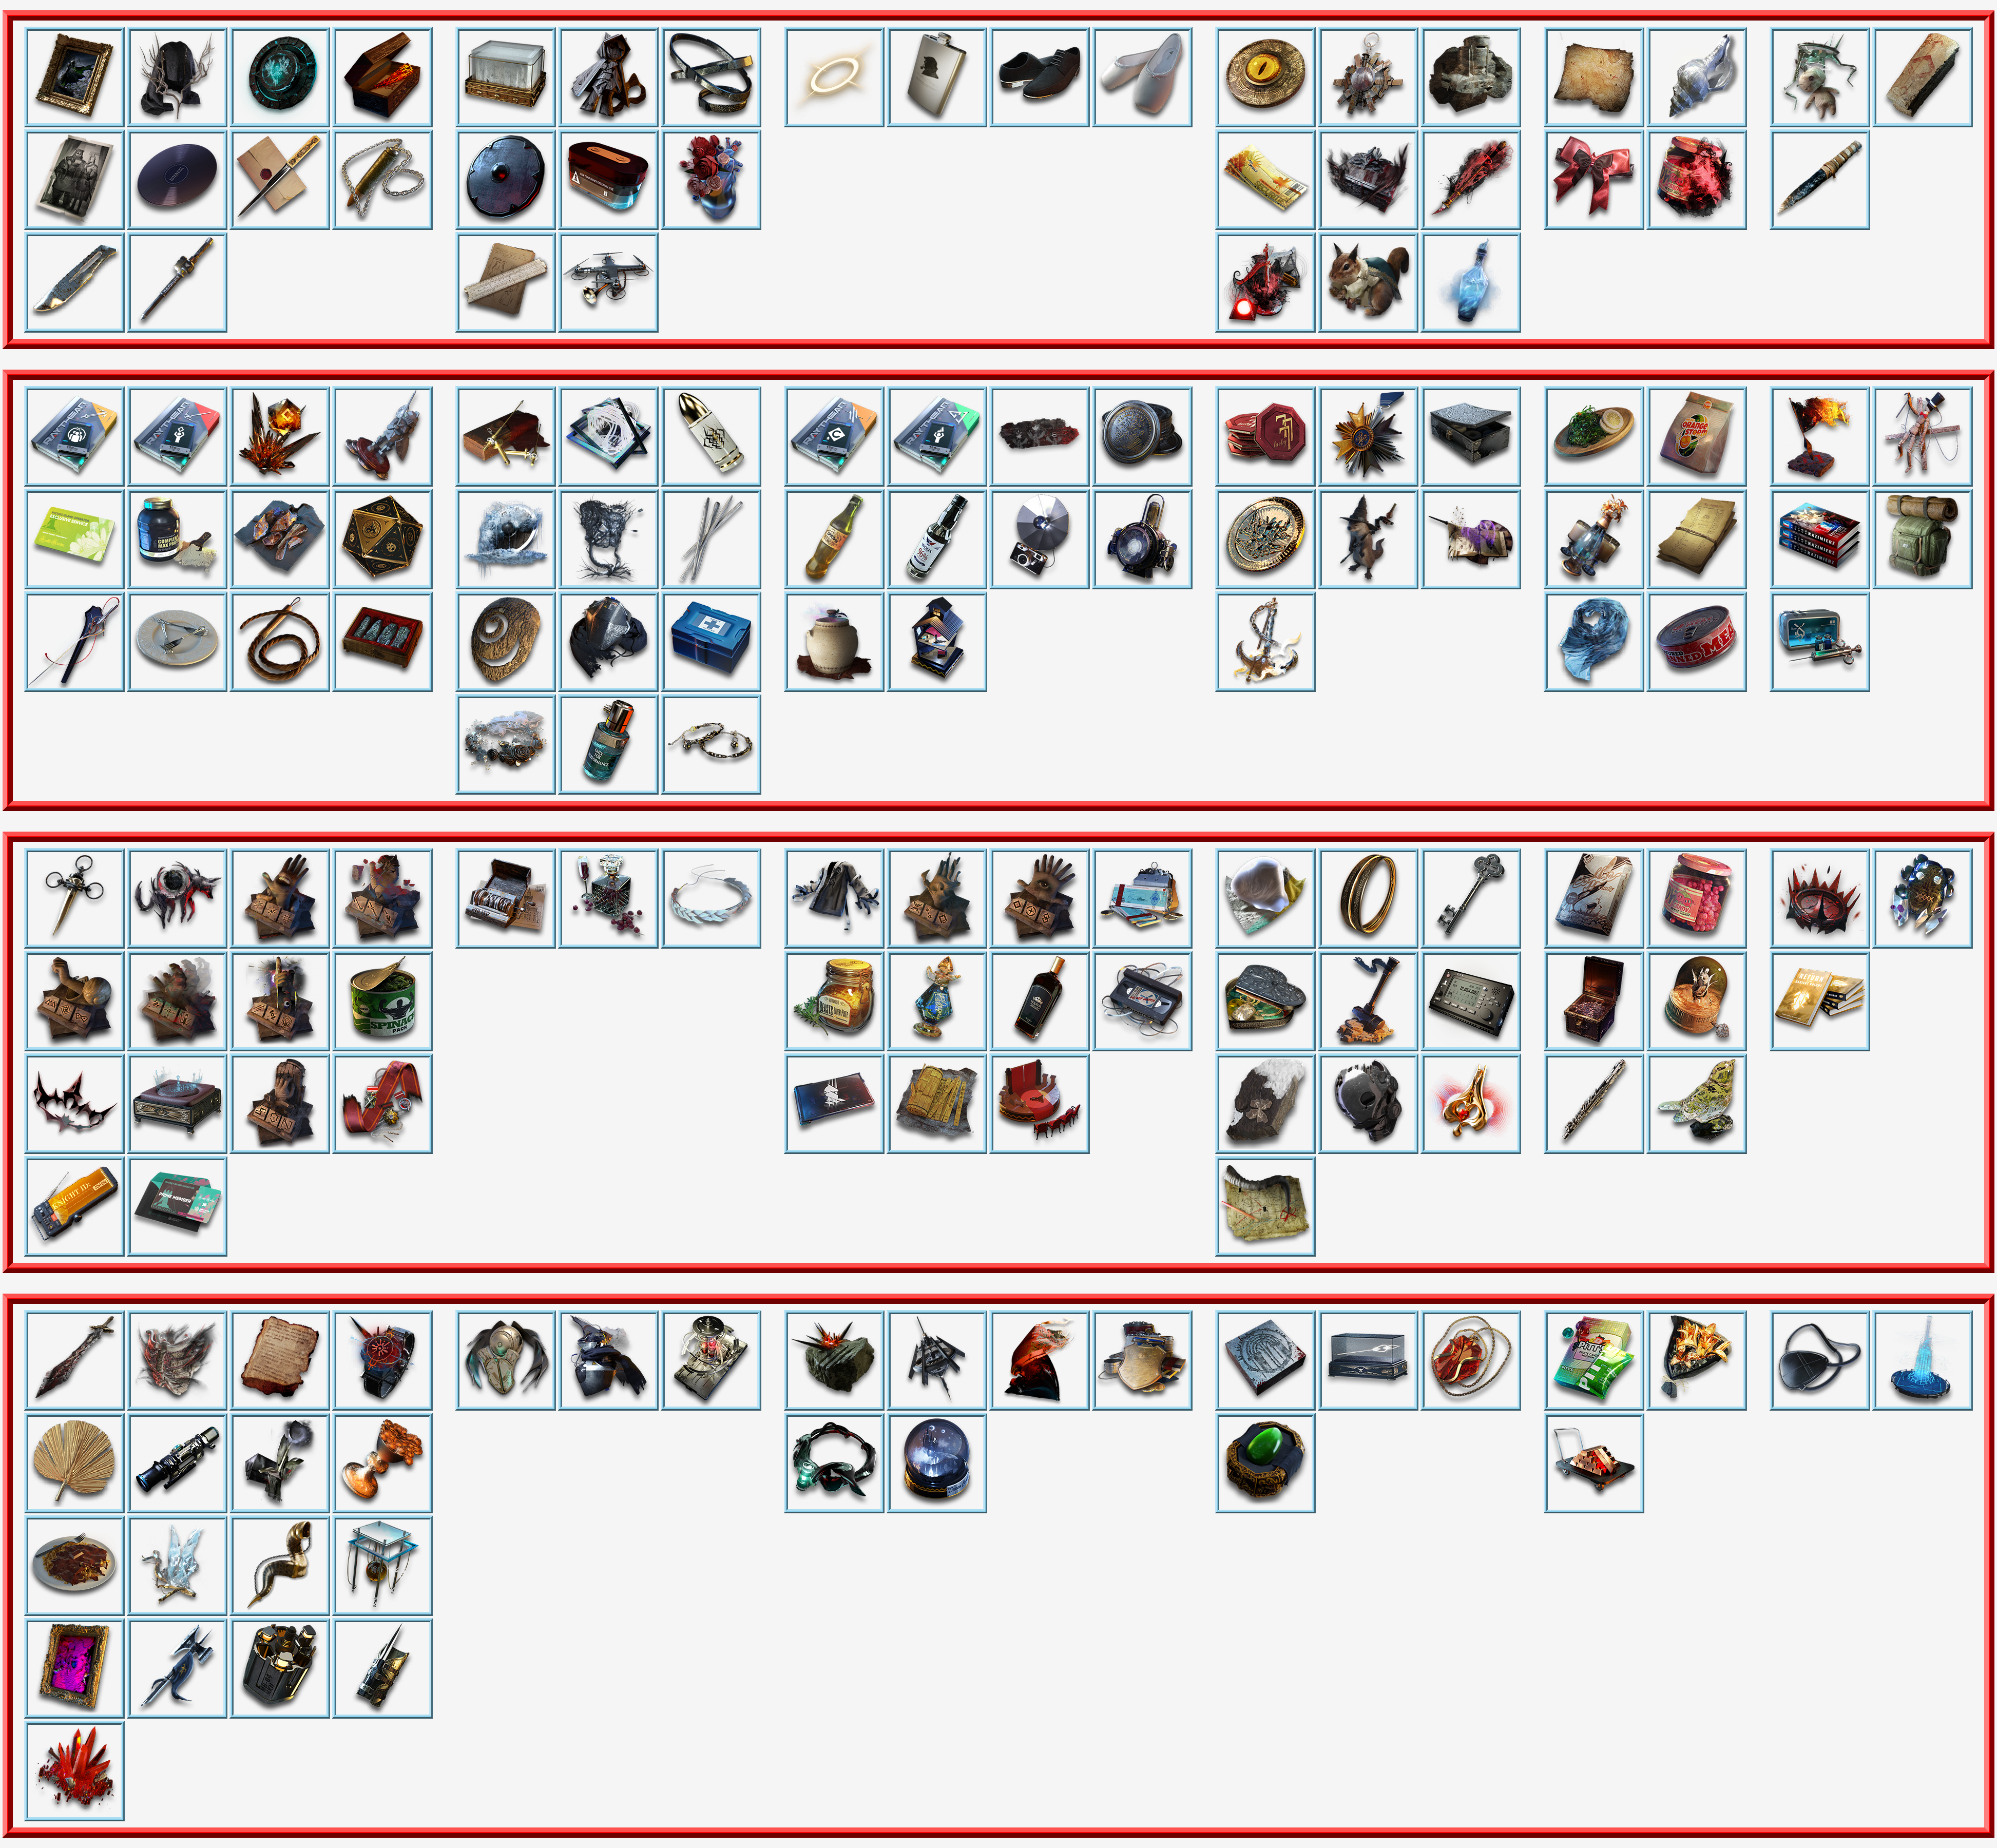
Cursed War Chronicles is a significantly impactful relic when obtained early on, this increases the toil limit to be able to carry more thoughts and scale further throughout the run.
Anchor For Five Seconds Ago might be a more underrated relic, when an inspirer is used on a battle (standard/em/recreation node/encounter stage, face off, boss stage), one additional inspirer will be obtained as a reward, this inspirer obtained is from a specific pool of higher quality inspirers and can basically be treated as a way to trade bad inspirers for good ones. The pool of inspirers is conformed by:
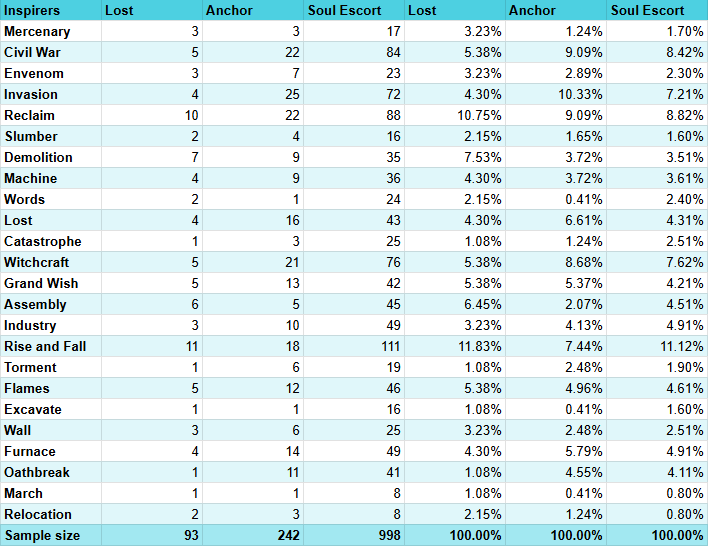
The notable ones here to highlight are:
- Witchcraft
- Grand Wish
- Industry and Machine
- Assmebly and Words
- Rise and Fall (and its components)
- Wall and Relocation
While Lucky Coin and Thoughts Catcher aren’t as good economy relics as the 2 that were just mentioned, and generally damage/utility/hope/squad size relics would be prioritized over them, they can still provide extra ingots that will increase the value of shop nodes and eventually translate into more relics.
My prefered way to approach combining thoughts goes as follows. Given the aboundancy of trees we will get throughout the run, it will be inevitable to get the survivability required for ED5, while this pool has good economy relics, that are better the earlier they are obtained, it doesn’t have as much damage as it is required for ED4, because of this, I prefer to combine 3+3 thoughts on any opportunity given and use the rest on the 2+2 pool, to try to obtain at least 1 or 2 strong damage relics and Hand of Mystery for Tragodia. The compensation relics would be SP regen, utility, squad size, hope, all of which are great to get. Around half of the relics from this pool don’t provide much but we get to pick 1 out of 2 relics which makes it easier to obtain the better relics. Rarity 1 thoughts are often discarded to make space to continue, along with bad inspirers. It is worth mentioning that getting lucky in the 1+1 pool isn’t too bad, Cannot’s Mark, Squirrel, Avarice, and White Shoes are also really strong relics.
In general, a few additional relics to highlight are the following:
- Soul Binding Bone/Soul Furnance’s Fuel: these 2 scale based on the number of thoughts you are carrying, trees are relatively light and really easy to stack, these 2 can easily give you the extra damage needed to do both ED4 and ED5 Fractured.
- Clotheskaz: Really good relic for Exu, some agents, and casters that have longer skill cycles; by having 2 quick skill activations, they can solve the early stage of some combats or simply provide a longer damage uptime.
- Revenant Remnant: this relic makes it significantly more likely to not miss out on a F4 LnF or F6 2nd ED5 encounter, given that we have enough plans to refresh nodes.
- Glory Pack: very strong CC relic paired with Tragodia S3 (also works with S2), Red and Gravel in ED4, as well as Mon3tr also outside of ED4.
- Therapy Tape/Flash Camera: very strong relics paired with Glory Pack or any other reliable source of CC.
- Pure White Dance Shoes: it can sometimes be hard to fully take advantage of them but they can often open up new strategies that will let you solve stages you would otherwise struggle a lot more with. Additionally, with a draft consisting of mostly range units, their value noticeably increases.
- Access/Premium Card: ASPD is often what will determine if you have enough damage for either of the endings. While ASPD boosts your damage, it is just as important, if not more, for your agents to generate DP, specially for ED5 and fractured. These 2 relics make a massive difference to generate DP and synergize very well with Mon3tr as she gets the ASPD on every S3 activation.
- Civilight Eterna: it should be very well known how good this relic is, but something that might be underrated is that its effect works on all True damage taken, this includes sources of True damage from stages (like Carless Magic and Crimson Corridor) or from the enemies themselves (Chalice of Regret absorbs damage by damaging itself with True damage). This is very impactful in ED4, specially in fractured.
+2 Hope
Section titled “+2 Hope”The base amount of hope we get when starting a run is 6, some squads have +1 hope that allows them to start with a 6 star, this squad gets 1 more on top of that. This could either allow you to start with a 6 star and Tin Man, but because this strategy involves Exu start specifically, we will have 1 extra hope left when starting the run.
When leveling up we get +4 hope on level 2 and +4 hope on level 3, this results in hope on level 2. This strategy involves 3 fights on F1 which is a guaranteed level 3 which would then be hope on level 3. Here is when the debate of which F3 buff would be better to pick comes in; between +2 hope and +2 plans. +2 plans is generally a great option, it can allow you to take more vertical paths on F2 or even to upgrade the F1 shop (this is usually not worth its cost). Often through F1 we get so many thoughts that we have to discard them, while plans have the highest value and should often avoid discarding them, in a situation where we get too many plans on F1 that toil limit will be a concern starting F2, this leaves other lingerers to be discarded, which takes away from the value of the squad. The other option would be starting with +2 hope, this puts you at 7 hope immeadiately after the first combat, which essentially gives you 2 extra vouchers to potentially draft a strong 6 star that will carry through F2. At level 3 (1 voucher from the 3rd combat and 2 remaining from the shop) we would have 4 hope, this is also enough to promote either of the 2 6 stars and get Tin Man if we see a specialist voucher before getting to level 4.
General overview
Section titled “General overview”
The 2 squads whose playstyles are the most similar to this are Ingots and Collection squads. The first one generally plays with Talons while the 2nd one generally plays fatedless. Ingots squad has more freedom on its draft, compared to standard Lamp squads, but has a big advantage from the Rogue Trader refreshes and extra Plans income, it can have an easier time with pathing because of this. I have no experience playing collection but based on what I’ve heard about the general way the squad approaches runs, this squad in particular would be the most similar to tree squad. The differences are that there is no Avarice or Squirrel start, there is also no “filtering” for high rarity relics but there is a higher consistency for survivability relics from the 2+2 pool. This squad also manages to combine more thoughts in the False to Truth node which increases the likelihood of rolling Eureka for a really good relic.
The difference that might be more noticeable against standard Lamp squads is that the power throughout a run can vary significantly more. Lamp squads play with the expectation of getting triple kings and chalice by F6, most of the decision making revolves around being strong enough to shop rob early and not throw on difficult stages. This squad is focused more about getting relics from a wider pool to get power, draft operators that synergize better with the relics you have or are planning to get and solving stages utilizing the relics you get over learning one specific way on how to clear them with x amount of kings relics. Because of this, most runs will likely feel very different from each other, we might often be starting F3, F4 or F5 with different operators and the strategy we use to approach the same stage will likely be different, which means learning how to pilot different carries will help you improve in this kind of gameplay. Something really important that can be slow to learn, is to be able to look at your relics and measure how strong you are; learn and be aware of small interactions or tricks some relics have; what stages those relics allow you to do with your drafted operators; based on this information, understand what operator you should try to draft next to complement what you are missing to survive throughout a floor without messing up your solve for the endings.
The higher variability across runs causes some stages to sometimes be very difficult to solve while other times they become easily solvable, for example, E2 Tragodia with Hand of Mystery is really good in Frequent Dispute and Regular Army but some runs we may simply not find a supporter voucher until F5 or had no hope to recruit and promote him which drastically changes the way we approach solving these and other stages.
Toil management
Section titled “Toil management”Because the squad revolves around farming relics from trees, it is important to manage the toil limit accordingly. A few things to look out for within this topic will be mentioned at the end of the Floor 1 section, but the important thing to keep in mind here is that we want to get as many relics as we can. To achieve this we need to reach an equilibrium between the relics we would craft from the thoughts we currently have and the relics we would craft in the next False to Truth node from the thoughts we would get in the next floor, being aware there is a slightly low chance of getting philosophy right before the False to Truth node.
This mainly comes with experience and depends on the floor layout and the amount of plans we exit the floor with, as some layouts would allow us to path into more combats to get more lingerers. Something to constantly pay attention to is when we are forced to discard thoughts in the middle of a floor to be able to move, as this would be feedback for future runs.
Another thing to have in consideration early on is the loadbearing capability of the operators we currently have, while promoting a 4 star early on isn’t often something we want to do, just the increase in loadbearing capability could be the difference to make this the better decision to take, or for an insta promotion book to buy in the shop for a 4 star.
Node value
Section titled “Node value”Given the endings constraints posed, these nodes (used specifically for the endings) will always be the top priorities but we can risk delaying them to gain more power throughout the run.
- In general, EM combats will always be better than standard combats, but number of spines heavily overrides this priority.
- Rogue Traders value depends on the amount of ingots we have and how many ingots we are willing to withdraw (something to have in consideration here is the low chance of rolling for the chests variant in Aquapit if the stage happens to be on its path or using an Industry we may have), given that we have a decent amount of ingots (~30) this node has a really high value as it is an immedate source of power and vouchers.
- Lost and Found (LnF) nodes’ value depends on how bad the cursed relic we have is (more on this in the Floor 3 section later), as well as if we have Hibernating Kin or Baby Djall.
- Recreation nodes are the worst nodes and often better to refresh before F5, on F5 there is a 50/50 (assuming both options are weighted equally) of getting either the duck variant or the rat variant, the duck variant is a really good fight we can always do as long as we have 5 ingots, the rat variant costs hope and there is RNG to even get it, generally we don’t have much hope to spare as the draft is very expensive.
- Encounter nodes gain value as we progress throughout the run, there are a few good encounters on F3, such as Legacy, King’s encounter, and Illusory Heist, F4 has more options, one of them being the Shifting City encounter which takes us into a pseudo floor 4 bosky that has no natural vertical paths and as far as I know you cannot get the ED5 encounter inside of it. Regardless of this, we are forced into taking encounters either way to get ED5, but taking paths with multiple encounters may not be so bad as it maximizes the chances of getting the ending as well as possibly getting a high value encounter.
- Wish nodes are relatively rare to spawn naturally outside of the fixed Wish nodes in F4 and inside of boskies, in F4 we often want to refresh into a higher value node, although this can be scary if we don’t have much power or we really need to save the plans, inside of a bosky it can be really scary to refresh as we are often path locked and under one or multiple debuffs, the node itself isn’t always that bad, as it is a guaranteed relic out of 2 options.
- Face-Offs’ value is somewhere in between a regular stage and an EM variant, they give a guaranteed plan which is really good, specially inside of boskies, they reward a similar amount of combat EXP to the floors they appear in, they guarantee a relic and the 2 harder variants (Narrow Path and Twin Gargoyles) reward you with 1 voucher to pick out of 2 options.
Run breakdown, Drafts, and Cursed collectibles
Section titled “Run breakdown, Drafts, and Cursed collectibles”With the objective of always completing an ED245 T3 Egg clear, the run can be broken down into a set of tasks:
- Craft Pledge
- Path into LnF
- Path into Face-Off and clear the boats fight
- Path into an Encounter and get Prophetic Image
- Kill Cadence
- Avoid Encounters until Stasis is crafted
- Path into a 2nd Encounter and get Reality of The End
This puts a lot of constraints into the pathing and decision making, and we have to achieve all of these tasks while gaining enough power to clear the endings. We can sometimes choose to delay some of these to continue scaling further but this will put more presure later on in the pathing we must take.
Starting squad
Section titled “Starting squad”As mentioned earlier, this focuses only on the variant of Fatedless Exu start. Exu on her own is a strong operator that can carry and get spines through F1 and F2 (with E2 or the help of a 2nd 6 star), she takes a specialist voucher given for free (one of the most contested ones), leaving the rest with strong carry options as the 2nd 6 star to draft. Exu is not generally drafted outside of picking her as a starter because of how contested the specialist voucher is, which might make some think that she is a bad draft but that is not the case at all.
Throughout the entire run she can very comfortably solve a big portion of most stages (mainly relies on a blocker early on, such as Humus or Gummy, later on there is not much of a need for it, Gravel ends up sufficing this role and provides more value). She helps opening most stages due to her low DP cost, and is a versatile operator that provides survivability, damage, and some utility with her S3 redeploy ability.
The other 2 opeartors paired with Exu when starting are Beanstalk and May. May is simply the strongest 4 star sniper, S1 scales greatly with ASPD and can help solve stalling Theresis in some situations, S2 can stun which is very useful to get chests when there is not enough damage to kill them or operators can simply not be allocated to get them (Past the Aquapit for example). There could be a debate between Beanstalk, Myrtle, and Sneg for the 4 star vanguard pick, Myrtle can heal chests on F1 which translates into more relics from F1 shop, Sneg scales better overall, Beanstalk provides a significantly more reliable solution for Dense Jungle on F2 which is the reason I open with her.
Floor 1
Section titled “Floor 1”Throughout F1 there is nothing too interesting with its pathing to talk about, the objective is to do 3 combats, for which we path into 2 natural combats (prioritizing spines over EMs) and refresh the encounter for the 3rd combat. If there are no combats and we don’t have plans to refresh for a 3rd combat we wiggle throughout the run.
F2 can arguably be the hardest floor of the entire run, we can encounter situations where we are not very strong, we also want to scout Exu to F3 and because we have so many shrivel and sprouts, we will end up doing all combats with a Fractured Mind. Because of this, we must get as much power as we can through F1, that is recruiting a 2nd 6 star and buying good relics from the shop. If machine or industry are obtained on F1, I usually aim to use them to get more ingots for this first shop, however, if Witchcraft is obtained, promoting Exu to E2 for F2 is significantly more important.
For voucher draft choices we have (listed by preference from top to bottom):
- Support: Tragodia is the best option to take here, he’s a very strong operator to survive through F2, provides utility and CC throughout the entire run and endings.
- Specialist: On a specialist voucher there are 3 options:
- Tin Man is the “greedy” option to scale better throughout the run, he’s specially good to get in F1 as we often have to sell thoughts on the F1 shop to be able to move starting F2. This only comes at the consequences of sacrificing the 2nd voucher for a 6 star if this was obtained from the first combat in F1, which can make situations where no other good 6 star is found for F2 more likely.
- E2 Exu is the safe option for F2 consistency, if this comes as the first voucher on F1, we would sacrifice the 2nd voucher for a 2nd 6 star, while E2 Exu is enough to survive through the entire F2, we still ideally want a second 6 star to scout into F3.
- Gravel is the option where this comes as a 3rd voucher.
- Guard (4 star): Humus
- Defender (4 star): Gummy
- Vanguard (4 star): Sneg/Myrtle, I prefer Sneg simply because she scales better, is useful in all endings and is better to open maps but Myrtle can heal chests.
- Sniper:
- Rosmontis provides more “control” throughout the run, stalling options and generally enough damage. She is also the better option to shop rob as Wisadel stuns cannot.
- Wisadel has way more damage (which can be good for the endings on low damage/ASPD runs) but is the bruteforce option when trying to survive enroute over a playstyle that can comfortably stall enemies for any reason needed.
- Caster: There are 2 options here:
- Pramanix the Prerita is relatively weak on F2 but gets stronger when there is enough DP generation to open stages (specially paired with SA2), she doesn’t perform that well in endings but paired with SA2 can provide high survivability by just stalling and freezing enemies enroute.
- Logos is just strong for all endings and enroute.
- Vanguard: SilverAsh the Reignfrost is not a great option for a 2nd 6 star carry to leave alone if Exu is scouted but if a strong VG must be picked this early it would be him.
- Guard: Leizi the Thunderbringer, simialrly to SA2, relatively weak this early on as a F2 carry but has good synergy with Exu later on.
- Medic (4star): Myrrh
- Medic: Mon3tr won’t really do anything on F2 but can be scouted to F3.
During the F1 shop, knowledge of which relics are good would be needed to make the right decisions of what to buy and when to save ingots for the refresh, this will come eventually with time and experience. Apart from the obvious choices such as Arch Glyph, Song, King’s Armor, Squirrel, Avarice, etc, damage, utility, and economy should be prioritized over survivability, as this comes naturally from combining 2+2 lingerers. Additionally, promotion books are really good as they save hope, a voucher, and improve F2 survivability. When there aren’t that many good options, considering a support kit can increase the way multiple stages can be solved. Escape Crane and Mr. Boom impact combat greatly, the former having more impact enroute while the 2nd can also have very impactful uses in ED5. Fog Machine can help buying time in low DP generation scenarios or throughout a stage when things go wrong, but is also good in ED4 as it buys more time to DPS Quilon down on the 2nd map.
Last thing to do on F1 is getting rid of some thoughts. Given that we start with 6 shrivel and sprouts, we are gaining 12 toil at the start of F2, we are also picking the ED2 thoughts which adds 10 more to a total of +22 (if we picked up home’s dust and sold it, it is important to not forget about it here), this means we would forcefully have to get rid of anything that puts us above our toil limit (x1.5 of the base amount, rounded down) by selling the thoughts and getting some use out of these ingots. If we picked up a higher tier operator that is not set as a loadbearing operator, it would be good to account for it too.
Floor 2
Section titled “Floor 2”Depending on the state of the run after F1, the objective in F2 can vary slightly. The worst state to encounter yourself in when starting F2 is to only have E1 Exu and a bunch of 4 star defenders/medics with a scout node in the first column of F2, we want to scout Exu but would be unable to clear any combats. To avoid this situation, picking even Amiya from the last voucher in the F1 shop would help or Hoshi alter as a 6 star defender pick to stabilize.
In a not so dire situation, we would have Exu and a 2nd 6 star, my way to approach F2 is to scout Exu and clear the rest of F2 with the 2nd 6 star as we save a spec voucher but either option is generally fine, the difference is on what is more comfortable to play with throughout F3 and F4 as the carry in case the 2nd one does not manage to get promoted any time soon. It is also not unlikely that we start F2 with alredy an E2 6 star but also no other 6 star to promote in the scout node, this can result in a situation where we could gamble on possibly 1 or 2 combats for a good voucher to scout, or completely skipping the scout node to get more value out of combat nodes before taking Petal, additionally, if we happen to have Tin Man but no other 6 star to promote, he is still a good candidate worth pathing into the scout for, while it doesn’t save as much hope as a 6 star, getting a free specialist voucher and a guaranteed E2 Tin Man for F3 is already good to stack more sprouts. Ultimately, this type of decision is what we learn to evaluate over time, it is not something that provides immediate feedback, while it has a great impact throughout the run, and we should stop at some point in the run or at the end of it to think about the impact of this type of decisions.
In F2 we have the first opportunity to progress through the endings by pathing into an encounter to try getting cadence. While it is good to progress through the endings as much as we can early on, this isn’t generally realistic, we would likely be unable to kill cadence quickly, opening stages with a Fractured Mind can often be challenging without any vanguards and Gummy, we only have 2 shields and not enough inspirers to secure an amount of shields enough to leak through F3 (specially if we take the bosky). Only if we either get a shields relic for +3/4/6 shields, Song, or King’s Armor, and likely at least Sneg, it would be a good idea to pick cadence this early.
Ending F2 we absolutely want to combine the Pledge of Babel lingerers, this will free up more space for trees. Additionally, we want to calculate how many trees we are getting starting next floor and leave a decent amount of space so that we maximize the amount of relics we can get, considering the relics we would get from the lingerers obtained from combats in the next floor.
Floor 3
Section titled “Floor 3”Starting F3 we obtain a cursed relic out of:
- Gul’dul’s Silence (+3000 DEF)
- Yliš’s Ravings (-20 SP)
- Balor’sača’s Arrogance (ballsack)
- Qui’sartuštaj’s Promise (+1 Hope)
- Shard of the Untold Kings (a breeze of air on your 3 worst operators)
Between these, Gul’dul’s and Yliš’s are the most annoying ones for Exu, both make opening stages more difficult. While the first one loses impact throughout the run and can be played around by simply drafting a caster, the second one never stops being annoying to play with. -20 SP means Exu has a more difficult time opening stages, makes most SP relics useless on Mon3tr and makes Ines, which otherwise is generally good draft, worse. If given the chance, both of these are good relics to trade away.
Balor’sača’s Arrogance can sometimes pose a threat on EM stages, specially with oddities but it becomes more scary on F6 and F7 where the damage and HP increase on bosses is more noticeable. While this is often a good relic to trade away on a LnF, I personally like keeping it when I have Hibernating Kin just to make the endings more difficult (and gamble for Soul Furnance’s Fuel).
Qui’sartuštaj’s Promise has its impact in the way you approach drafting, while you would sometimes just draft a strong enroute operator, here you try to rely on 2 carries to survive through F3-4, sitting at 8+ hope to guarantee getting Mon3tr (the most important draft for the endings). Non-lamp squads rely more on the raw strength of the operators, they take more combats, have more freedom on their draft and have a better hope curve but this takes away part of that advantage by limiting the draft options. Prioritizing hope relics becomes way more important here. Trading this away is also bad, when given the chance to be traded away it already did most of its damage and trading it away won’t reverse it, between trading this relic and Baby Djall, Baby Djall instantly gives +8 hope, this is enough to recruit a 6 star early on, front loaded hope is generally better than more hope backloaded unless the run is stabilized enough where recruiting the operator early won’t have any relevant impact for consistency.
Shard of the Untold Kings makes Tin Man deal less damage, the debuff is also an internal modifier (additive with conditional/in stage atk buffs), meaning that for an operator that has an innate high ATK bonus (Mlynar, Leizi, Logos), this becomes less impactful in comparison to other operators that scale mainly off ATK Scale (Exu, Pram).
In F3 we also have a guaranteed LnF, required to take ending 4, this takes away all your ingots and halves the EXP and ingots gain from combats. Because of this, trading any of these away in F3 is never an option I would take. However, in F3 there is also a ~76% chance for a bosky to appear in the layout, boskies are really valuable nodes, they can contain stages from F4 which give better rewards, standard combats in F3 drop 1 voucher, compared to F4 that drop 2 pick 1, as well as more EXP.
Not often both the LnF and bosky nodes will be connected and there will be a decision to be made. This decision is if it’s worth to delay taking Petal to get full EXP to scale more in the bosky, the F3 boss fight and taking more fights which would result in more thoughts to combine in the False to Truth node, as well as possibly more plans to have a better pathing in F4. A way to weight these options down is if the bosky path has an encounter to get Cadence, if that is not the case, the question then becomes if forcing yourself to get both Cadence and LnF on F4 would stabilize the run more than not taking the bosky, knowing that there is around 47% chance of F4 having an Encounter and 76% chance of having a LnF.
Something else to consider is that by playing fatedless, the chances of rolling for an encounter and LnF are slightly higher than refreshing with Talons/Lamp, around 18.3% and 14% respectively. From my own experience, unless the LnF path is bad enough where I would be concerned about losing the run on F4 due to not having enough power, taking the LnF path is better, but we can always gamble for fun to make the run more interesting.
F3 is also the ideal place to take cadence, F4 has slightly below 50% chance to get an encounter, it may be on a bad path and there is no guarantee that it will even be cadence. In practice, this isn’t often the case and I end up taking cadence on F4 or more often F5, but given the option to take it on F3 and survive with it I would always take it.
Floors 4 and 5
Section titled “Floors 4 and 5”Given the constraints posed by the endings, the remaining floors’ pathing is usually “forced” but can often still vary a lot depending on the decisions taken in F3 but the general idea is the same, prioritizing guaranteeing the endings.
Here it is also as important to start thinking about finilizing the draft required for the endings and any way to take advantage of relics/thoughts we have obtained until this point.
Because of how much F4 and onwards decision making can vary across different runs, I’ll go through an example of a run I played instead to hopefully help building some kind of intuition on how to approach this part.
Example
Section titled “Example”In this example (1:02:52 timer in the video) we start F4 in the following state:
- Economy state:

We have 10 hope, enough to recruit and promote a 6 star and we are at 1 stage away from leveling and obtaining 6 more hope, which in total would be enough to recruit 2 6 stars and having 2 hope left (with a scout ahead of us this would be 3 hope, enough to promote the remaining of them that isn’t scouted).
- Relics:
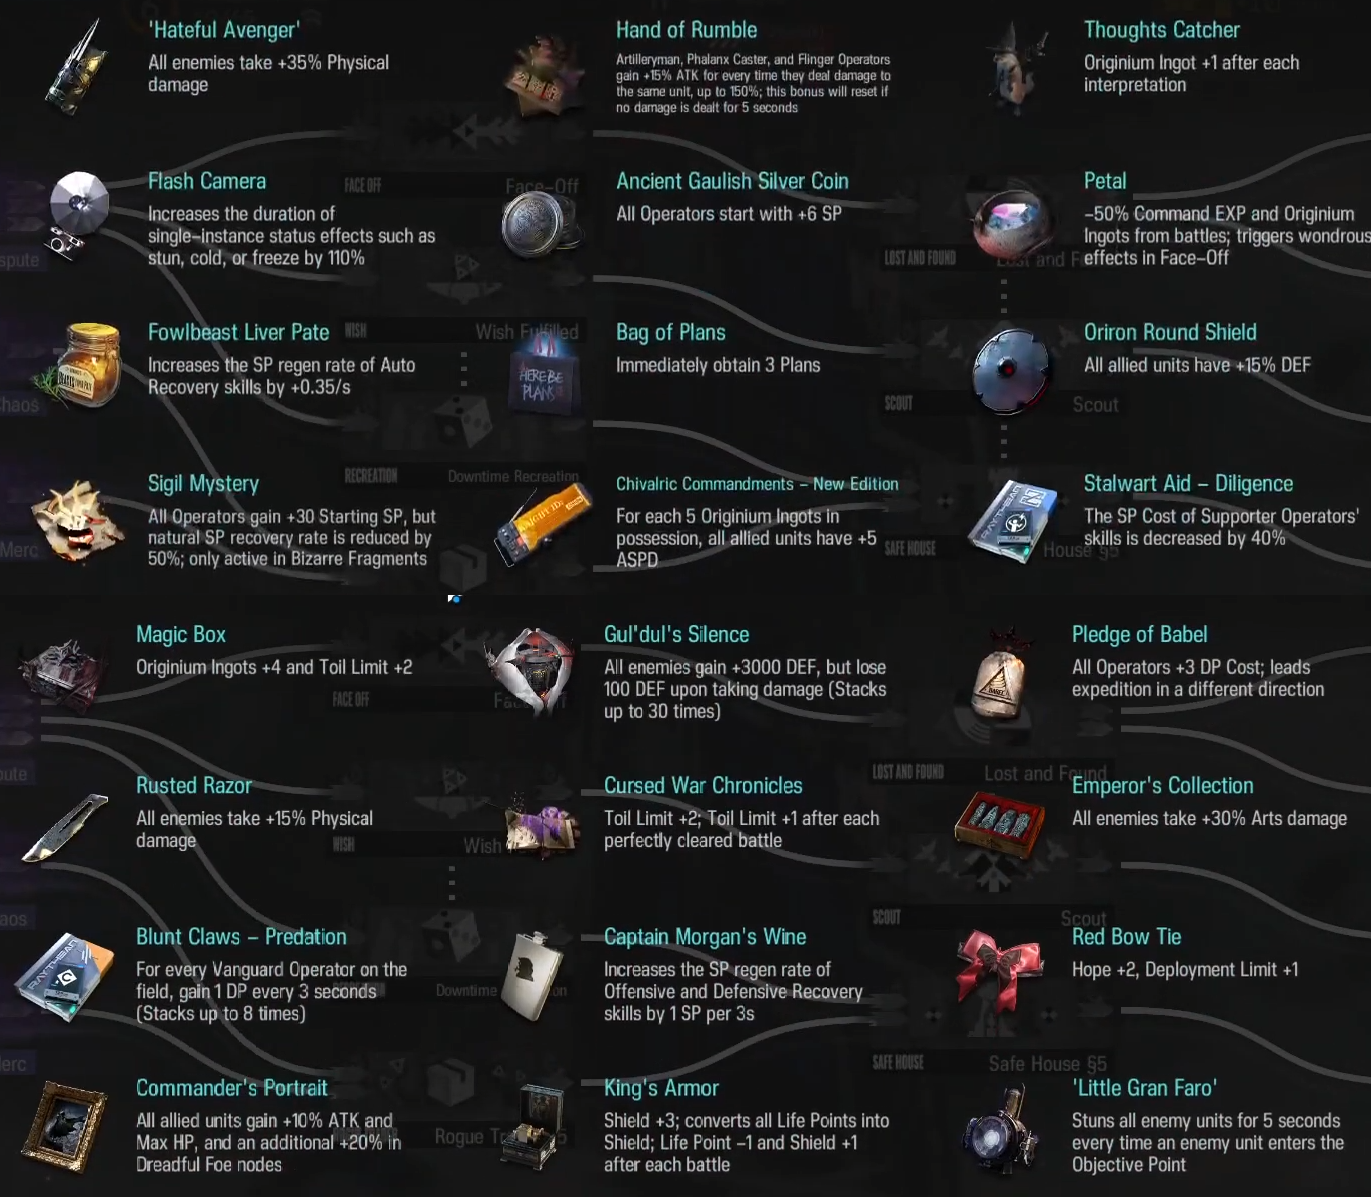
There are some strong relics in here, such as Hand of Rumble, Avenger, and Stalwart Aid - Diligence. Chivalric Commandments is a really strong relic but we only have 4 ingots so it doesn’t do anything here, Commander’s Portrait is a strong relic but mainly for endings, Ancient Gulish Silver Coin makes it so Exu can activate any of her skills immediately as she is deployed, Blunt Claws - Predation is somewhat helpful to generate DP but because we have SA2 and Surfer it’s not noticeably impactful, as these 2 are enough to cover any DP needs.
- Operators:
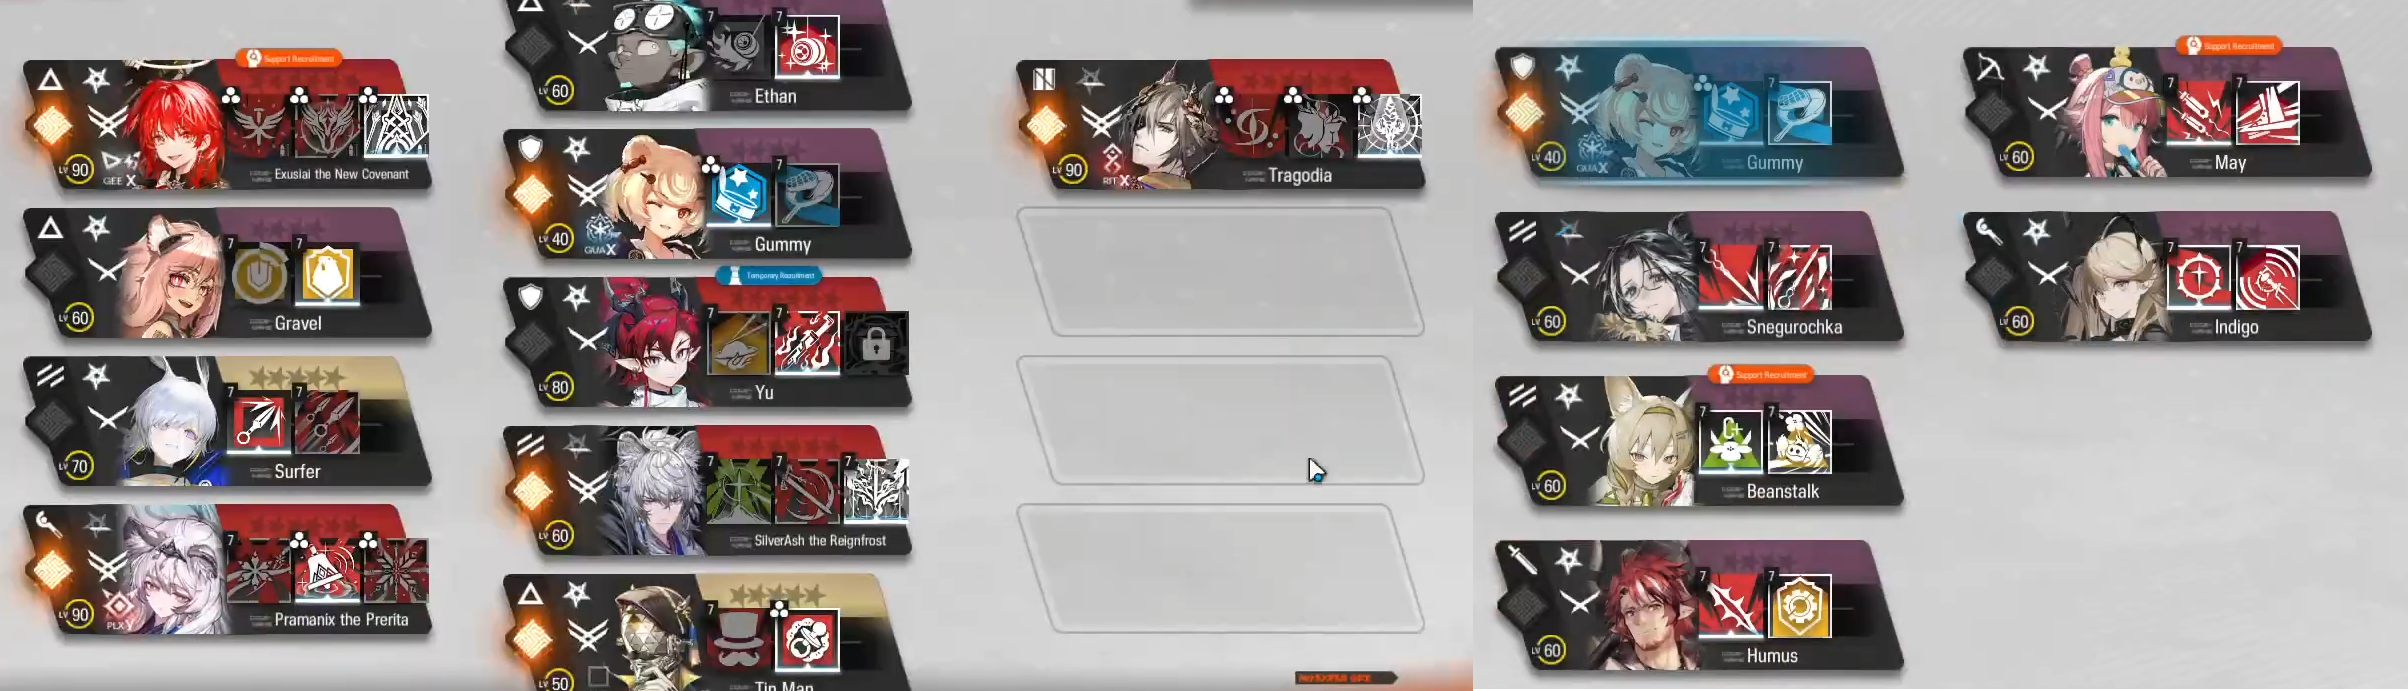
- Thoughts:
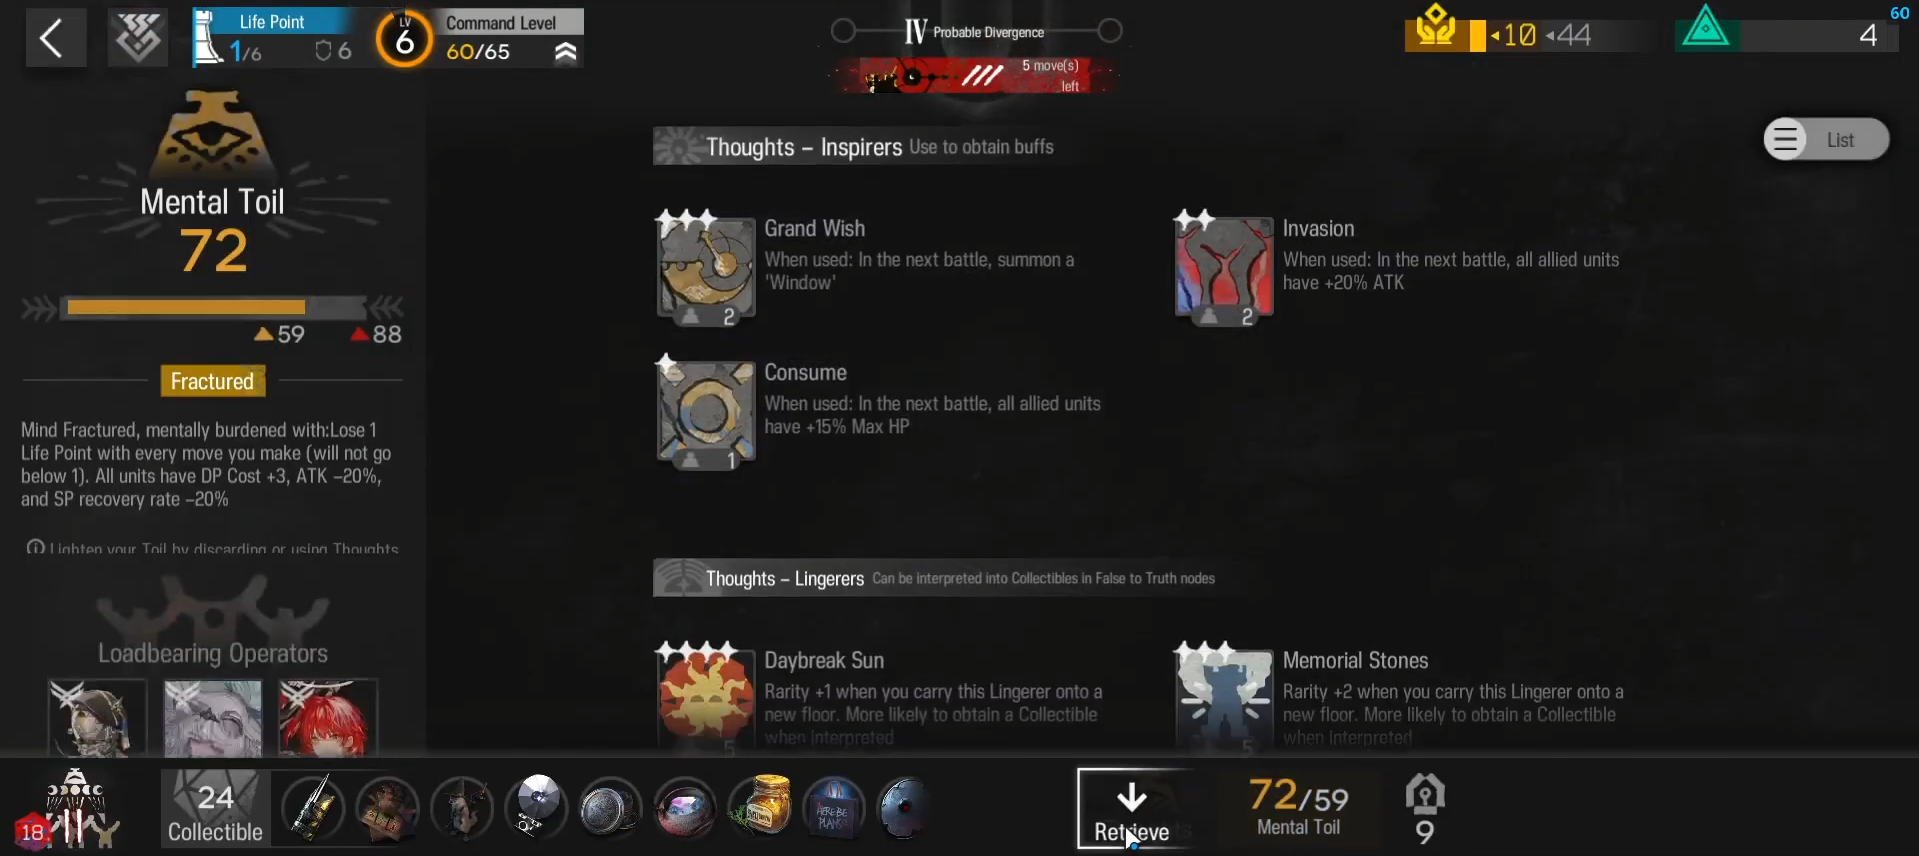
For inspirers we don’t have anything worth paying attention throughout the floor, we have Grand Wish which will be helpful for ED4 and 5 to avoid getting a bad epoch. We have 9 plans which is an unusual high amount to start F4 with and gives a lot of freedom for the pathing which we should aim to abuse.
- Layout:
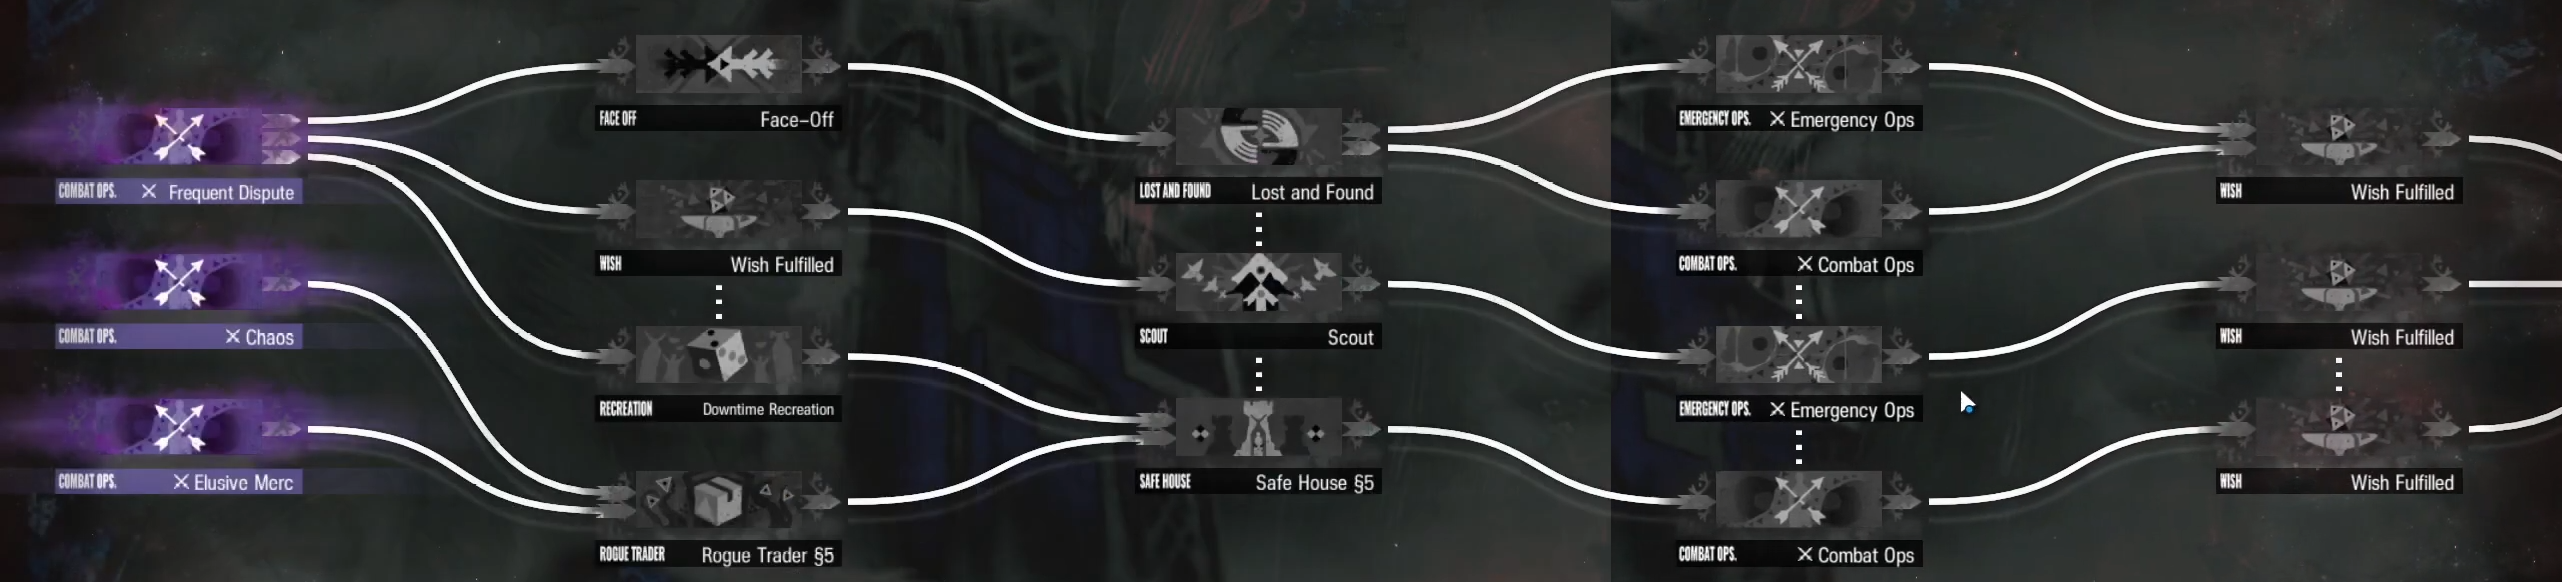
Now, the most important part is to plan the path we want to take throughout the entire floor. From the relics list we can see that Petal was already obtained, we are missing cadence and the floor does not have any encounters but does have a Face-Off from which we can progress towards the endings tasks. This is also connected into a LnF, which isn’t that bad of a node, specially having Gul’dul’s which is a relic we would want to trade away. This node is then connected into a scout vertically and opens into 2 more combats, while EMs have a high value, we have 9 plans we want to spend so we want to abuse vertical paths as much as we can, still while saving a few plans for F5, but given that we can clear the Face-Off requirement in this floor, this will free F5 pathing significantly and allow us to spend plans on either floor more freely.
There is also an EM combat next to the scout, something important to keep in mind here is that there are a few deadly stages in F4 to be worried about when we don’t have too much power to clear them, specially after obtaining Anasa’s Karma, pathing into the scout that will be solely connected into an EM that won’t be revealed until we have already commited into the path can be dangerous, in this case we have a good amount of plans that would allow us to either reroll or go down to avoid it in case that is necessary, however, the state of this run so far looks strong enough to be able to clear most stages in here.
Now going back to the start of the path, this path is great but is locked behind Frequent Dispute, the hardest stage of F4. In this specific run I’m experimenting with SA2 and Pramanix alter, which I don’t have much experience playing with so I spend a good amount of time thinking if I can even clear the stage and how, even if I take some leaks it would be worth, any of the other 2 paths force me to miss out on the Face-Off and into a Rogue Trader with no ingots. While standard Lamp squads are used to doing shop rob in F4, this isn’t the conventional strategy here, first we won’t get the same power spike from the ingots as there is no Toy or Chalice guaranteed from a Wish node, and we want to delay robbing until F6 to maximize any shop we may find either here, on F5 or if we happen to get Arch Glyph.
A valid option would be to refresh Frequent Dispute hoping to get an encounter for cadence, however, as we saw from the operators list, I don’t have anyone worth scouting and there is a scout node right ahead of me, and with how much hope I have, I’m able to recruit another 6 star and will get even more hope right after the next stage, so I definitely want to get a good voucher, ideally getting Mon3tr to scout her into F5. Both the stage and the face off give me a pick 1 out of 2 options voucher.
Now commited to go into Frequent Dispute, I’m somewhat confident it is possible to clear the stage with the squad I have but I’m not sure exactly how. Before continuing, generally the stage clearing part is somewhat trivial as experience comes by but there are still some stages you will encounter with a different draft or relics or in low roll situations that you won’t know how to approach. Previously knowing how the stage works heavily helps figuring out the rest but that only comes with time and experience, in my case I have a decent idea of how this stage works, the standard way to open and how to transition from the opening into clearing the stage. As an example of how I generally approach this kind of situation, and for those that may not have that much experience, I’ll go through my entire thought process I went through against this stage that I had no idea how to clear at the time with the given draft.
I have Diligence Tragodia which is a really good combo, essentially similar to Hand of Mystery Tragodia, and with 0.35 sp/s. In this stage in particular, Tragodia is great at stalling the enemies to give enough time for another carry to kill them, the only thing to worry about here is of Tragodia getting necrosed. I have Hand of Rumble Pramanix which is strong, but I don’t know what is the best way to get value out of her in this stage. I also have Exu which her S3 is often paired with Mlynar/Leizi, the liberator can clear the 3 crushers in the top lane, as well as the incoming wave of enemies from the middle, to then be quickly redeployed back on the right, closer to the blue boxes, but I don’t have any liberator here. I have SA2 which is my first time ever using him (and I decided to jump into this run to figure out what he does instead of just reading his kit) so I figured I could try to use his S3 in a similar way to Leizi with Exu S3, this is me being unaware of how little damage it actually does. I’m also aware that he can significantly reduce Pramanix deployment cost, which can help deploying her significantly earlier. I also don’t have cadence yet which makes opening the stage much more comfortable.
My first idea to try to approach this stage was to use Pram as a heli drop to burst the waves of enemies to protect Tragodia towards the end, as I also have +6 initial SP for her, but given how earlier I would be able to deploy her paired with SA2 I opted to go for S2 instead, hoping her skill would be ready in time to clear the first wave of enemies.
At this point I know how I can somewhat survive through the end of the stage, Pramanix S2 with Hand of Rumble would ideally clear most of the enemies with some help from Exu, as Tragodia stalls them. The placement I have in mind is something like this:
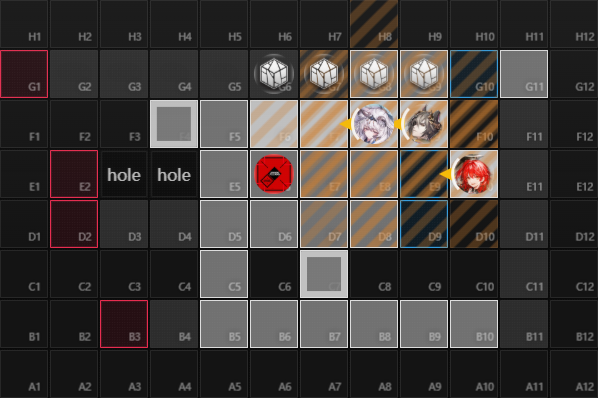
So the next part is to figure out how to get there. I need to wait for the first crusher to clear the top side and I need to clear the spine, Tragodia just doesn’t have damage to clear it on his own, Exu would be the more reliable option. I’m also unable to place any operator until the rocks are cleared, otherwise they will simply die to the AOE from the crushers, only after a rock is cleared I can place an operator in its column. As soon as F8 is cleared I can place Pramanix immediately to start charging her skill, also because I need to clear the spine, I would require to place Exu, either right in front of her or behind, if I place Exu in front of Pram I would have to quickly retreat her. Something I didn’t think at that time was to place her right next to the spine but facing Pramanix instead, to then redeploy her on the back as I initially wanted, this could be a good possibility so far, but I also want to redeploy SA2 back and there are 2 possible decent placements, in the middle to help holding or in the top side. In top side would be significantly better due to his invis reveal (that I dont even remember if I was aware at the time), and I could redeploy him back later with Exu again to have a 3rd skill ready, because of this, having Exu behind Pram would be better and this leaves Tragodia to be placed in F7. This would expose him to a higher threat of getting necrosed or simply just dying, but he should be able to acomplish most of his job by then. There would also be some healing required, for which Tin Man from the back can likely suffice. This would result in a placement like this:
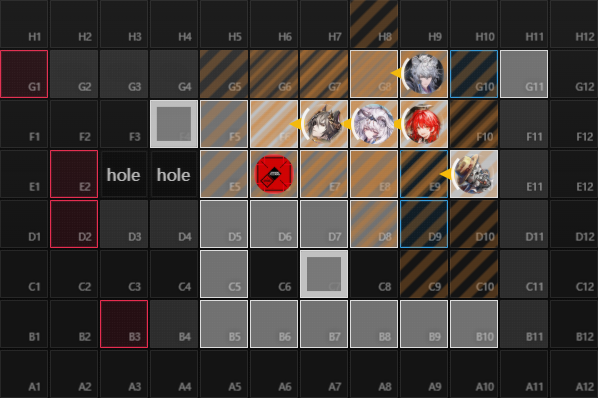
Next was to play out in my head each inidividual placement as it would go through inside the stage to make sure the general idea of it works out. SA2 and surfer would open and generate some DP for the following placements. The crusher in the top lane would start clearing the rocks and there would be 2 low hovering enemies in the middle lane that would likely leak but I’m fine with taking those leaks given how good the path I want to take is and that I have King’s Armor. Pram would then be deployed as soon as her rock gets cleared, followed by Exu, also when her rock gets cleared, to kill the spine and redeploy SA2 quickly afterwards. I could likely avoid the 2nd crusher leaking by deploying Tragodia in front of Pram and immediately activating his skill, I have 6 initial SP which would leave his S3 at 4s away to be activated from deployment, this is enough time to be activated even if deployed under a necrosis field. Something I completely missed at the time was that I had ‘Little Gran Faro’, this makes it so the crusher in the top lane gets stunned and is delayed from destroying the rocks when the first low hovering enemy leaks (which was expected to happen), luckily this didn’t mess anything up and actually ended up helping not leaking the first crusher, the stun was long enough for Exu to clear the spine through Gul’dul’s and deal enough damage to the crusher with the help of SA2 after redeploying him.
After finishing clearing the stage (1:14:20 timer in the video) we actually managed to get the medic voucher to recruit and scout Mon3tr, and we got lucky enough with a duck that gave us the 3 shields lost back. The next part consists of the boat fight.
Boat fight
Section titled “Boat fight”This is a critical point in every run that we must always try to be prepared for, clearing this as early as possible will free up the pathing to take in F5 (maybe even F4 in rare scenarios where we are just too strong in F3 to be confident on an early Ansasa’s Karma, although this is very unconventional, it is a way where given the opportunity, we should take advantage of it).
There can be situations where we aren’t actually strong enough simply because we didn’t draft any operator able to help Exu clear the stage under suboptimal conditions and we never got good damage relics until this point. First, it is important to recognize when we are strong enough or we aren’t, while it is often good to experiment and limit test to learn more, once being aware of when we aren’t strong enough to clear the fight, planning around this will be significantly better than trying it, wasting resources and failing it.
The most important trick with Exu when clearing this fight is that we can abuse her S3 redeployment mechanic that bailouts an operator from being kidnapped, with this, we can feed one operator into both boats when they overlap to then redeploy this operator to help with damage while the boats remain slowed down. Good operators to do this with are Mlynar and Leizi, but it can be used with range operators as well if we have White Dance Shoes.
Another option to clear the fight is with Tragodia, at E2 with S1M3, Tragodia can permastall with only +42 ASPD (or so I was told), while we may not generally have this much ASPD this early in the run, we can save any deathmatch inspirer we get and even E1 Tragodia is enough, the idea would be to focus one boat with Exu so that tragodia can permastall the 2nd one.
Casters like Logos or Pram are both good against boats, they simply provide good AOE damage at their base E2 level without relying on relics too much, boats only have 50 RES and early in the run physical damage dealers may struggle more to penetrate 2000 DEF.
Example
Section titled “Example”Going back to the previous example run (1:18:48), we managed to reach the scout node with Mon3tr to promote, then the EM is revealed to be Sordid. This stage is great as it gives us 3 plans, which would take us back to 9, in the position of the scout node, the only other option would be to path down into the safe house before going back up to Sordid but this provides no value at all, at best we get the 3 plans back for the possibility to take 3 vertical combats afterwards, or we can simply just take Sordid and save plans for a better pathing in F5.
After clearing Sordid (1:22:25) we have Elusive Merc on the top side and Past the Aquapit bottom side, with a total of 9 plans. Between the 2, Aquapit is the best option, it has a plan and a chance to roll for the 6 chests variant. We at least want to take 1 more combat and reroll a wish node into potentially ED5 encounter or another decent combat. Because we have 9 plans, after going down and refreshing we would have 6 plans left, here I consider worth spending a plan to refresh the wish node to the right of me in case I get lucky with Epochal Gaps or another Sordid, unfortunately it was Crimson Corridor, a stage with no plans, so we just continue doing Past the Aquapit. After clearing Aquapit and refreshing the wish node it results on a scout node, this basically gives me the plan back, I don’t have any 6 star to scout but it saves me from having to find another specialist voucher which is not the worst. Lastly, I go directly into the False to Truth and don’t spend plans for Crimson Corridor as it is not worth it.
Being now on F5 (1:29:51), we already cleared all the ED4 requirements but we have yet to find cadence, because we are forcing T3 egg, we must take cadence, kill it, avoid taking any other encounters after cadence dies, save plans to upgrade into Stasis and hope we find the 2nd encounter in F6. While it is ideal to craft Stasis at the end of F4 to maximize our chances of getting the 2nd ED5 encounter, this won’t always be the case and we will have to take this gamble, luckily, this 2nd encounter is not too rare to find in one try on F6.
With the layout presented here, having encounters connected into the bosky makes it easier to path into it, given that we already cleared the boats fight, we can skip the Face-Off here. We start here with 8 plans, we would get 1 Plan when entering the False to Truth node, 2 would be spent on the bosky and another 2 would be spent to upgrade into Stasis, leaving 5 left, this is enough to vertically path once, and it is convenient to save at least 1 to refresh a potentially run ending fight inside the bosky.
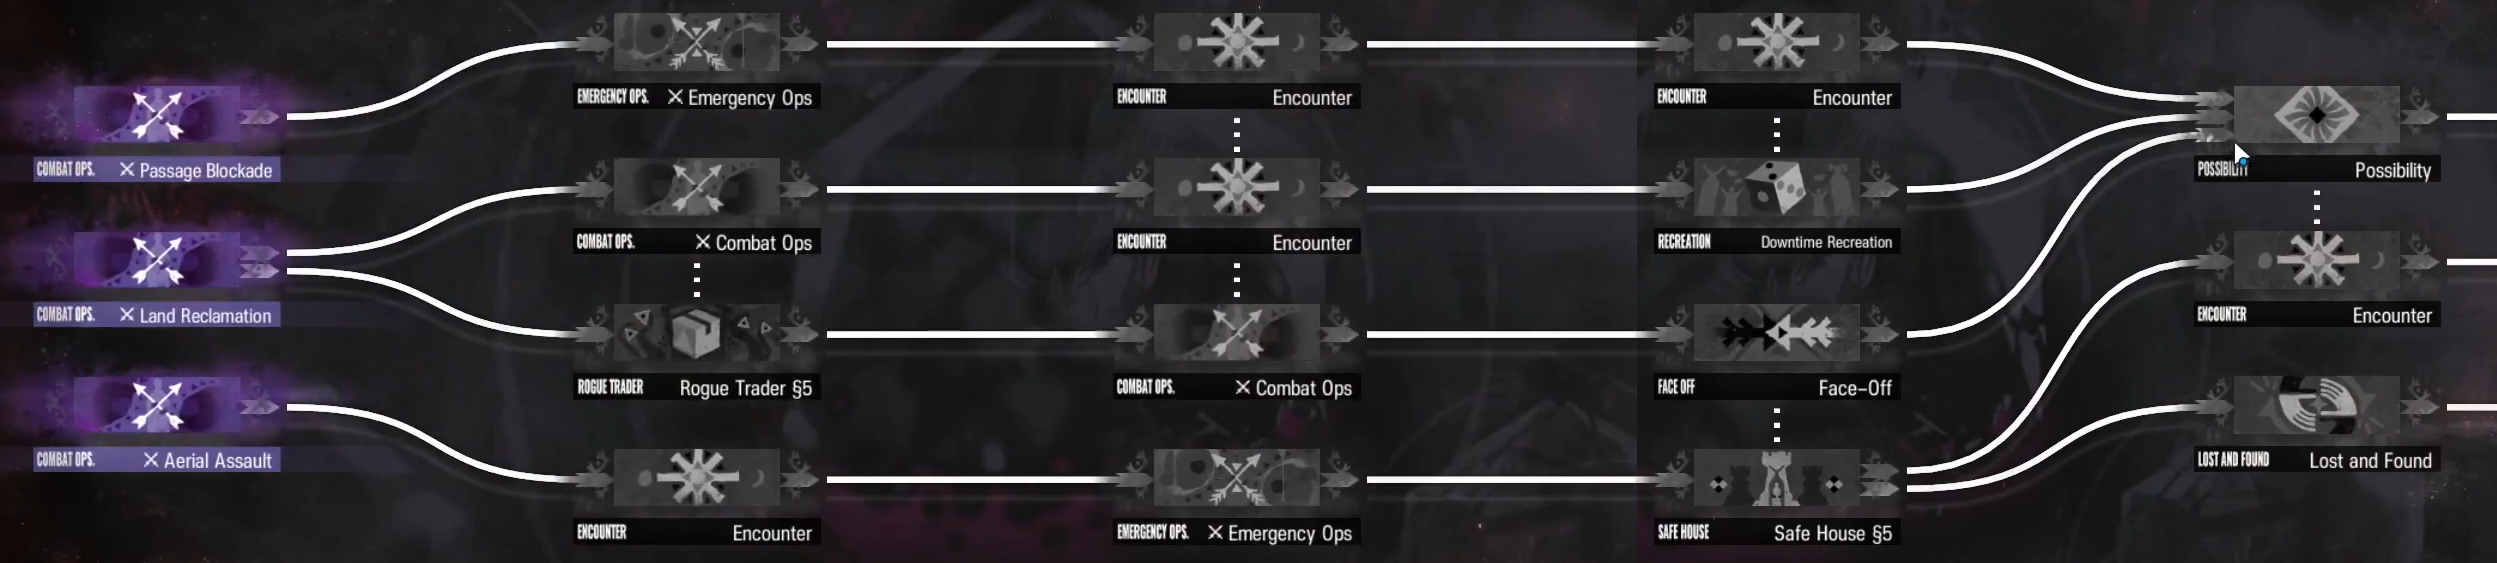
The top path in here has a stage with a plan, followed by an EM, while a Rogue Trader node is of high value, specially with ~30 ingots, we are forced to go into the top path to get cadence and kill it. The rest of the path is heavily dependent on how many encounters it takes to get cadence, as we also want to kill it. The options so far are getting it in the first encounter, refreshing the bottom encounter into a combat and kill it, a worse case would be not getting it in the first encounter, then we path into the 2nd encounter to try to get it, we would be at 6 plans left at this point and another 3 would be spent by going into the combat below it to kill it, sacrificing the bosky, this is because it would be harder to guarantee killing cadence inside the bosky if we only have 1 stage to kill it and that stage ends up being EM Heavenly Paradise or Heretics. The 3rd worse case would be not getting it in 2 encounters, we would have 6 plans left on this 2nd encounter, the options from here are going back up into the 3rd encounter, spending 2 plans to go into the bosky and kill cadence on the EM stage. Another option could be to refresh the combat below trying to get an encounter, get cadence refresh the Face-Off but this option is significantly less likely to give us cadence. For now what happens next will simply depend on how many encounters it takes to get cadence.
Luckily, here we get cadence on the first encounter (1:45:47), we can now refresh the encounter and it turns out to be a combat which is perfect to kill cadence. The combat ends up being Land Reclamation, which is a tricky stage to kill cadence in, but with Ethan and Trag S2 it’s possible to stall it long enough to kill it after finishing clearing the stage if damage is lacking. After clearing the EM stage earlier I got Witchcraft which completely changes my options in pathing and is something I missed during this run. At this point, before pathing into the stage to kill cadence, I have 8 plans, I would spend 3 plans going down, 2 plans to go into the bosky, get 1 plan from Witchcraft, resulting in 4 plans, I would then get a plan when entering the False to Truth node and spend 2 plans to craft Stasis, this leaves me with 3 unused plans that I could have spent going down another node, getting a plan back from the Face-Off to still path safely into the bosky. Because I missed this, I ended up killing cadence instead of leaking it for one extra relic which was a mistake that didn’t end up affecting the run.
The only downside of being this limited in plans would be that it would be more likely to miss the 2nd ED5 encounter in F6 as I would possibly have no plans to refresh a combat into an encounter in case I missed the first one.
Draft guideline
Section titled “Draft guideline”If you are thinking on taking a screenshot of this “tier list” to share without context, take a screenshot of the wall of text below instead.
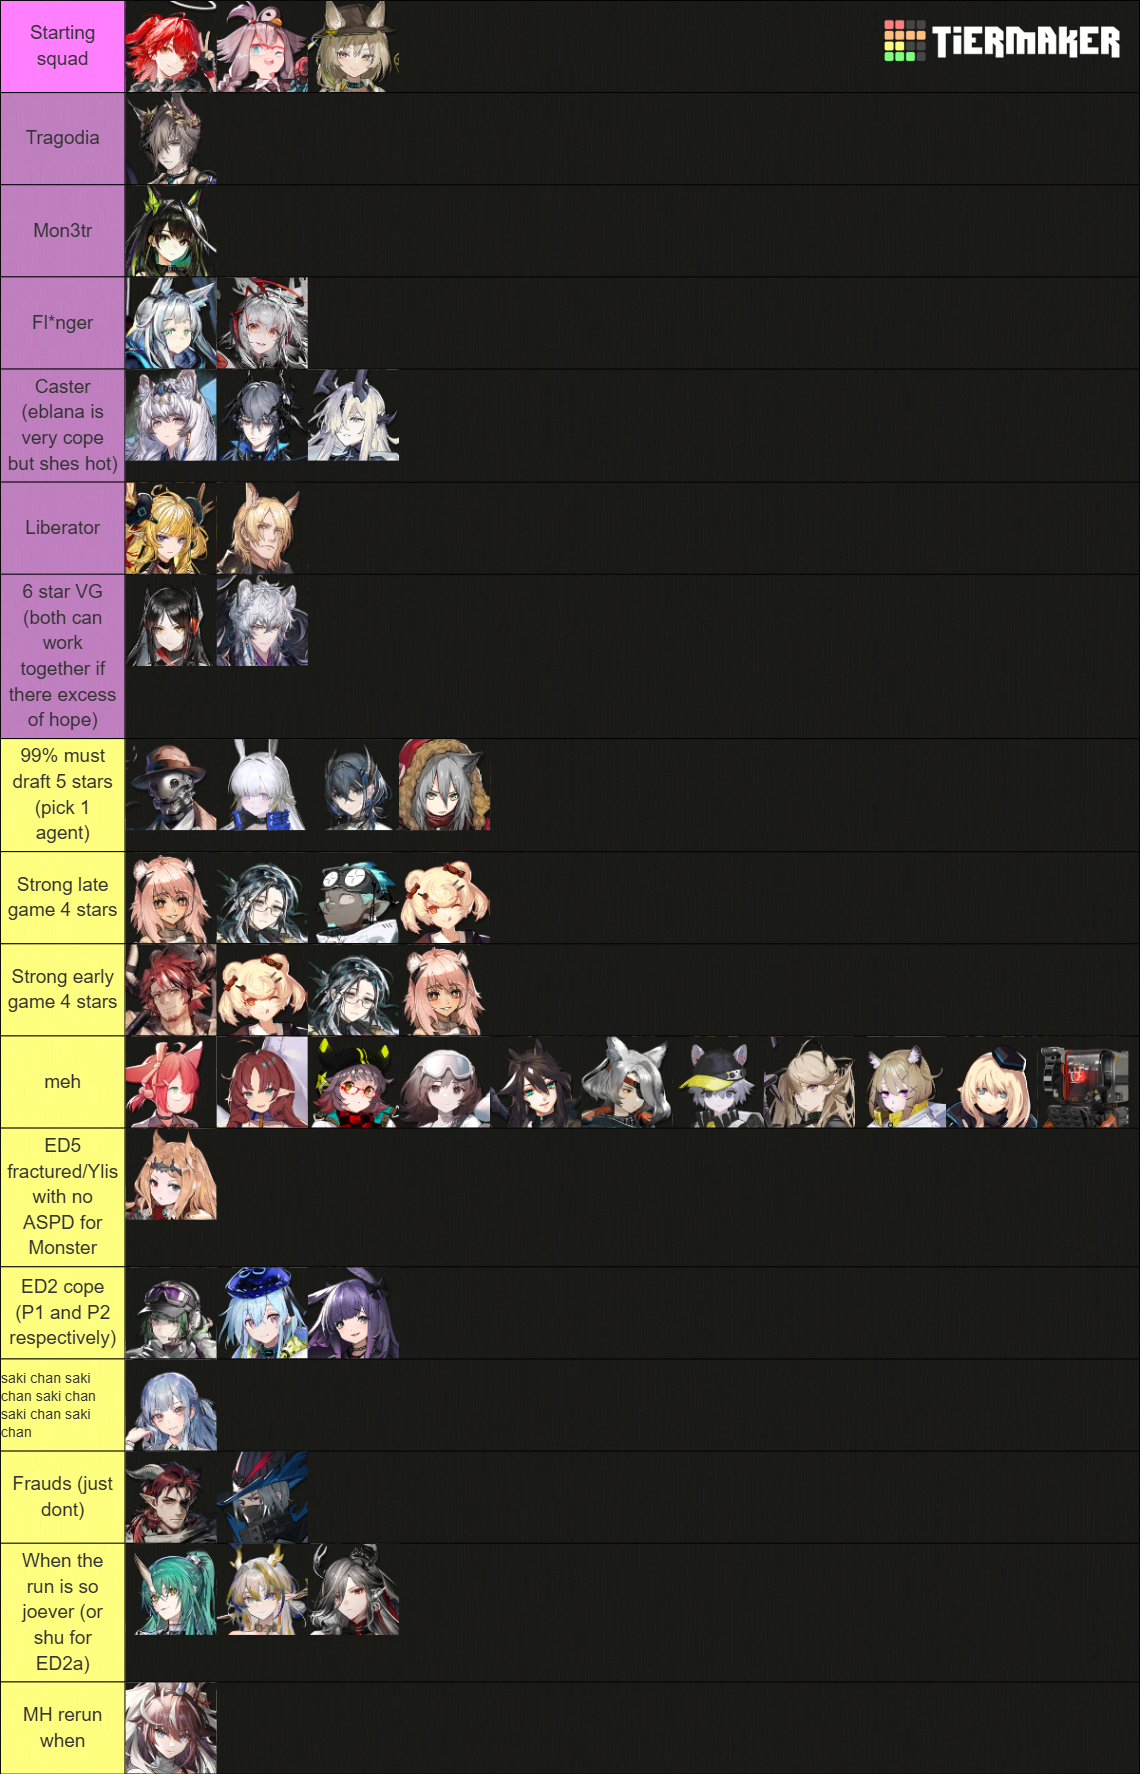
As mentioned earlier, Tragodia is really good, and so is Mon3tr.
- Mon3tr provides damage on all 3 endings, bypasses any kind of damage reduction as she deals true damage, and can work on both maps in ED4.
- Drafting one flinger generally solves one side in ED4, both Rosmontis and Wisadel are very good operators that solve a lot of stages in IS5.
- Casters in this composition mainly add extra damage towards clearing the waves in all 3 endings, and they can be boated for ED4 to help with the last phase, while Pramanix isnt great in ED4 due to her short range, her damage is often not needed on standard runs, an alternative option here would be to use S2 for the first map, paired with Relocation to avoid getting exploded by an Envy, and send a flinger with more damage, such as wisadel, to the 2nd map.
- Liberators are somewhat weak early on (F2) but they pair surprisingly well with Exu S3, both provide damage in all endings with slightly versatile uses, Leizi in particular is good against hitcount, important for fractured ED4.
- 6 star vanguards aren’t as important, Ines has better DP generation for ED4 and 5 while SA2 facilitates DP requirements on deployments in the 2nd phase of ED2 and 2nd map of ED4 (as well as the freeze utility for the waves), SA2 also provides stability enroute and is a great pair for Pramanix, as his HP regen helps both himself and Pram to tank cadence.
For 5 stars, Tin Man obviously is a great pick, he increases the toil limit, allowing us to carry more trees. Between Surfer and Canta, either works, we only need 1 agent to generate DP but drafting both can often be helpful, specially for fractured ED5. 2 FRDs are also useful to draft for T3 ED5, Red in particular is also great for her CC on ED4, she can help with survivability by interrupting Envy attacks and serving as bait when needed, additionally, when playing around SA2 freeze, more FRDs means more enemies frozen.
Between 4 stars, given that they are free it is good to have most of them raised, at least to E1 Max level. 4 in particular are more outstanding than the others as they provide good utility for the endings, while a 5th one is still worth mentioning here:
- Gravel can block Theresis balls, bounce Amiya balls and bait Envy attacks in ED4.
- Worth to E2 eventually throughout the run
- Sneg is just budget Surfer but with initial SP she turns into a real agent with S2 and her slow turns out to be sometimes useful.
- Worth to E2 with initial SP when we can immediately activate S2
- Ethan scales great with ASPD, we can’t always guarantee to have that much ASPD but he only requires to stall Quilon enough for Tragodia to activate his skill in windows where there are flames alive that would explode our operators.
- Worth to E2 eventually throughout the run
- Gummy is great overall, early on as a blocker, when opening stages with cadence, healing flames on ED4, and to help opening map 2 in ED5 to keep civilians alive.
- Worth to E2 eventually throughout the run
- Humus doesn’t do anything for the endings but provides stability throughout F2 and scales insanely well with deathmatch which we can sometimes abuse to get through early difficult stages.
The rest of the low rarity operators are not worth mentioning, they do what they do (I’m just too lazy to explain each of them).
Archetto is an interesting pick, while she has a synergy with Mon3tr, this often isn’t necessary, her biggest advantage I’ve found while fitting within this draft is simply to abuse her long range in ED5, as well as her lower DP cost compared to a flinger.
Ela is a very niche pick that can easily solve stalling Theresis with S1, she is also a strong pick enroute that scales well with ASPD as her S2 is offensive recovery but there are similar drafts in strength on less contested vouchers. Mizuki is another pick to try to solve ED2 as he can pull Theresis from the shift tile and reduce the boat spawn frequency, the main disadvantage is that he is on a specialist voucher.
Sakiko deals damage, usually there isn’t enough hope for her.
I might not be giving Hoshi alter enough credit, I simply haven’t experimented with her enough, she might be closer to a liberator in terms of the value she can provide to the draft and how she can be paired with Exu S3.
Don’t have Yato2 so I have not been able to test her within this draft but I’d assume it’s in a similar position as Ela and Mizuki, with her possibly replacing an FRD and providing more damage and hit count instead.
While the operators high on the list are those that we want to prioritize drafting, we won’t always achieve this, we may obtain them in a different order, forcing us to rely on different operators to clear F2-4. Next we will go through each individual ending, along with the general strategies and the utility of each relevant operator mentioned here.
Ending 2
Section titled “Ending 2”While ED2 is the easiest ending between the 3, it should still not be underestimated. The main requirements we need are:
- A way to stall Theresis on P1 while dealing with the slug waves
- True damage/Pulling Theresis while dealing with the devourer waves
Phase 1
Section titled “Phase 1”With this draft, Tragodia can solve the Theresis stall part if we manage to find Diligence, Hand of Mystery, or 0.35 sp/s or above. His placement is as follows, in H12. We only need to make sure the shadow in G9 is cleared before Tragodia attempts to cage Theresis. We then have to wait for Theresis to start turning and walking downwards, only then we activate Tragodia S3. This makes it so Theresis is positioned slightly downwards on the tile for the cage to block all of his balls.
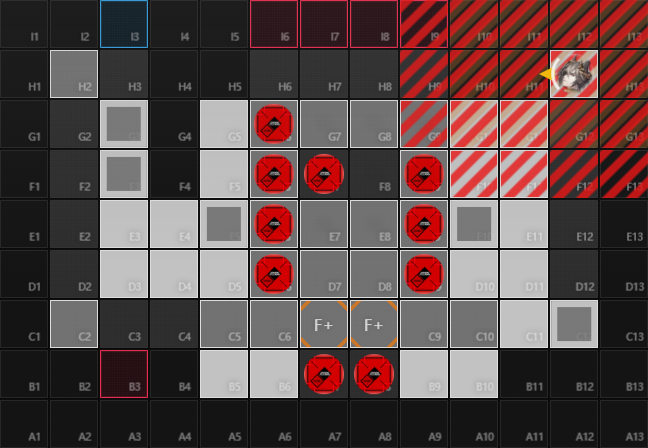
We then continue to cycle his skill, in low SP regen scenarios we would wait until the end of brandish to activate back his skill, to abuse the window where Theresis remains in place by himself.
However, this won’t always be the case, an alternative to this is by using May S1 on the top right corner paired with Gravel to block shift Theresis, this requires 136 ASPD with E1 May or 52 ASPD with a fully maxed E2 May. Another alternative is with Ela S1, this accomplishes the exact same thing as May but doesn’t require any ASPD or SP regen, I personally prefer doing this in the top left corner but it can be done in the top right as well.
Ela is an expensive draft that won’t always be necessary, sometimes you might find close enough to getting the requirements for the Tragodia or May stalls, which are cheaper in hope, hoping to E2 either of them right before ED2 for example but simply not managing to do so, in these situations there is no other option but to improvise. The core idea is to simply keep Theresis from reaching the blue box no matter what it takes while clearing all the slug waves, we can try double block shifting if there isn’t enough ASPD, maybe this fails, the stall breaks and Theresis continues walking, we then immediately retreat May to get her back as soon as possible and continue with a fallback option that could be Tragodia S1 on a safe tile in the bottom right since we were unable to get him to E2, Theresis walks relatively slow as he continously stops himself from moving when casting both of his special attacks. Before the slug waves start spawning it is relatively easier to keep him in place, generally if we manage to do this, if the stall breaks after the slugs start spawning and we continue trying to slow him down, we will likely manage to clear all the slugs before he gets too far.
Dealing with the slug waves is relatively easy, Mon3tr with +15 initial SP is an option that completely solves this, she can never get necrosed to recast her skill as the necrosis injury resets when she jumps back, as long as she doesn’t instantly die, which the slugs don’t have enough damage for this, she would be completely fine. Logos S1 is another great option, in most situations he can execute the slugs which relieves the pressure on dealing damage to them. Flingers and Pramanix (S2) are also great for this. Either of these options positioned in the bottom most row of the map work and avoid having to deal with any of Theresis’ shadows.
This first phase is mainly solved without Exu, which leaves her as a flexible operator to deal with any issues that may arise throughout the phase. If May is stalling Theresis for example, Exu can immediately clear the shadow below her that would get May distracted. If there isn’t enough damage to kill the slugs, Exu can help with it. If for any reason the operator dealing with the slugs died, Exu can help covering while they get back.
More detailed explanations of these strategies can be found in the main ED2 guide.
Phase 2
Section titled “Phase 2”Phase 1 is relatively trivial, if there would be any issues, phase 2 is where they are at. While Mon3tr is great at bypassing Theresis’ damage reduction, we won’t always have the ASPD or damage for her to deal with him on her own. Boats also start spawning and Mon3tr can’t dodge all of them by jumping even with +15 initial SP, she would eventually get boated.
Because Mon3tr is part of the core draft and is the number one priority to have for all endings, not only ED2 but all the endings will revolve around her. Having Mon3tr as the main damage dealer for phase 2, we have 2 remaining issues to solve: dealing with the devourers and the boats. Mon3tr can help clearing the devourers that pass next to Theresa but she needs help. Ethan is a common draft that, while it is not required, it can be helpful in certain places and here is one of them. He can help stalling the devourers by placing him on C6 to give more time for Mon3tr to help clearing them and holding them from pathing into the blue box, while he won’t do much with low ASPD he can still buy time for other operators to clear them in time, the only thing to be aware of here is that if too many devourers get stuck within Mon3tr’s sttack range, she will prioritize attacking them over Theresis.
Flingers will be great to clear the devourer waves but the issue is that they will eventually get boated, and as the phase continues they wont have much uptime. Generally they have enough damage to clear a big wave of devourers Ethan stalled in between boats.
This now leaves the last remaining problem, dealing with the boats. Exu will sometimes scale enough at this point in the run where she has enough damage to kill one boat with one skill activation. This is a critical point for her as this would allow Mon3tr to cycle through boats more comfortably. Mon3tr can dodge a boat with 1 skill activation, if we manage to kill every 2nd boat then Mon3tr will be able to get her skill back in time and wait for the right timing to dodge the next boat. If Exu doesn’t have enough damage we can still try to help her either with Logos, Pram, May to slow down the boat or by loading an operator into the boat.
Ines is also a very useful draft here to mange the boats timings, she can bind a boat which would make it so Mon3tr can now dodge 2 boats with 1 skill activation, although the timing might be really close.
While Logos S1 is a comfortable solve for phase 1, phase 2 will likely be the deciding factor of whether we clear the stage or not, and Logos S3 is significantly better for this phase, specially with Hand of Mystery. Because our phase 1 solve revolves around stalling Theresis, we can preemptively deploy Logos on the tile D10 and fully charge Hand of Mystery before phasing, in this position and with the help of May, he would be able to deal damage to Theresis, the right side devourers and the boats.
Pramanix hasn’t felt very useful here in my experience, S2 usually doesn’t have enough damage to kill the boats and while S3 might do even more damage than Logos, her skill cycle is horrible, at best she would work as a helidrop to kill certain boats in between cycles, which paired with Exu could give Mon3tr an easier time dodging boats.
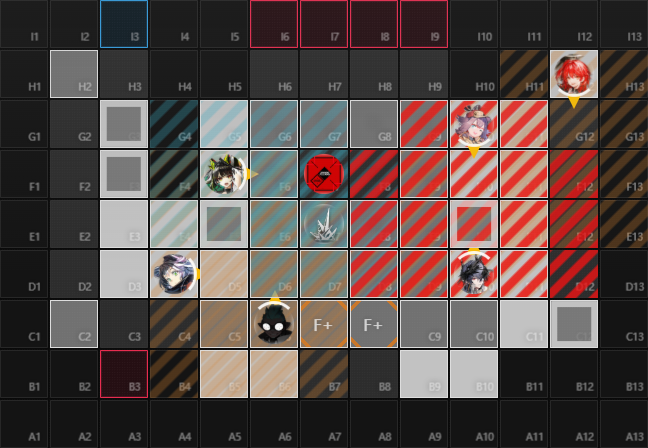
Overall, different operators have a lot of uses in this phase, things might go wrong, we might underestimate the damage we have and that forces us to make unconventional placements to kill certain devourer that is running away, or a boat that kidnapped an important operator and generally we have to improvise and think before starting the stage and on the spot about the best way to put them all together to clear the stage.
Example ED2 clears:
Ending 4
Section titled “Ending 4”This ending will likely be the biggest damage check required throughout the run. ASPD is extremely good here but it is not as consistent to get with this squad, in any opportunity given when buying or picking relics in a False to Truth node, ASPD will always be the highest priority to get (with an exception on Cursed Counterbeast).
I won’t go into any details about this ending as the strategy is very straightforward regardless of the draft. We need to DPS Quilon down while holding both sides of the blue box and boat operators. Mon3tr will always be sent into the boat by abusing the jump trick, more details about this can be found in the ED4 boat jump strategy guide, while a calculator to perform it can be found in here. Tragodia is the conventional solve for the left side while a flinger is the conventional solve for the right side.
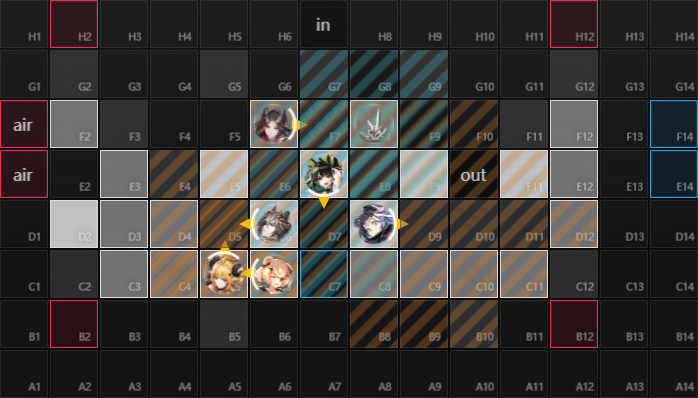
The placement order in here matters, given that we have Gummy to heal the right side flames, we would want Mon3tr heals to chain into the right side to heal the flame that would spawn to the right of the flinger (D9), and so we want to place down the flinger after Tragodia. During the 2nd boat, if phasing timings aren’t delayed or rushed too much (the standard timing would be achieved by loading the first boat with Mon3tr and the 2nd boat on G2 as it spawns, generally with an agent), the flame to the right of rosmontis will spawn a few seconds before the 2nd boat enters the blue box. At this point the tile to the left of Quilon (F6) would be empty (as the boat just passed through it), which would generally steal the healing chain away from the flinger, which means that Mon3tr will manage to chain the healing into the flame on D9. Only after this flame is healed we should deploy back whoever we are using to bind Quilon on tile F6.
To hold Quilon in place, there are a few options. Tragodia can hold him in place with S3, the only problem with this is that even if Quilon has nervous impairment, his autoattacks will still trigger the flames explosion, that can easily nuke your operators. Sometimes it will be required to wait for Mon3tr to finish healing the flames before activating Tragodia skill and for that either Ines or Ethan are great to buy time. Another thing to pay attention to is that if a flame spawns under Quilon, Tragodia will be unable to spawn a cage, which will result on Quilon simply walking away.
For the fractured version of this stage, both CC and hit count are really good, on top of more damage. Leizi S3 is particularly good to deal with the hit count requirement on the left side while the flinger can deal with the right side, possibly with the help of Red.
Logos/Pram can work as helidrops throughout the first map to help clearing either side that requires it (this is generally on the left side), Logos in particular can be boated to help with damage in the 2nd map. While Pramanix could be boated too, she just isn’t great there, there is only 1 tile that will allow her to be in range of Quilon and that is only right before he enters into the blue box. An alternative option to use Pramanix here is with S2, while the range still isn’t great as it can’t outrange the Envy, paired with relocation she should be able to deal enough damage to clear one side entierly removing the risk of dying, although the flinger could be deployed at times to help her if necessary, which would also leave the flinger to deal with the 2nd map, in which case Wisadel is significantly better than Rosmontis. Another option is to simply swap the flinger with Pramanix to deal with the last waves on S3.
Exu has an interesting use here. S3 can redeploy ground operators that were boated (if they are retreated they will remain boated), this makes it so we can send Ethan to the 2nd map and bring him back with Exu S3, we can also send a liberator and bring it back, or even a range operator and bring it back with White Shoes (although this may rarely be useful). Exu also is a great damage dealer for 2nd phase to meet the damage requirement, and can continue to abuse the redeploy mechanic to reset Ines bind or redeploy Ethan after his skill runs out, or simply any body to block Quilon from walking forward for a few more seconds.
I mentioned earlier that Red is good in the fractured variant but I want to emphasize how good she is in general. Throughout the entire first map there is a lot of small micromangement we can do to help clearing waves or help our carries survive, and Red is a big portion of that, we can constantly continue deploying agents to generate DP and spend that DP by spamming Red to stun anything that needs to be stunned, on the right side we might want to keep the Envy away from killing the flinger, paired with Glory Pack, given that we can afford the DP loss from not retreating her, we can simply leave her to die to get a 2nd stun. And while Red is the better option for an FRD here, Gravel can sometimes try to mimic her role.
Conventional map 2 placements:
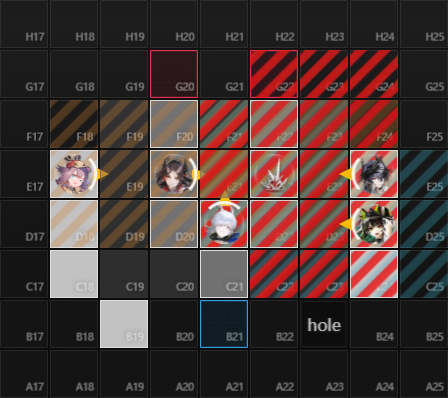
This placement chains Mon3tr heals to the flames from the left side.
Example ED4 clears:
Ending 5 T3 Egg
Section titled “Ending 5 T3 Egg”The main requirements for this ending are:
- 2 FRDs
- 1 agent (2 is more comfortable, specially for fractured if not 3)
- Mon3tr
- Tragodia
- Any form of anti-air (Exu could sometimes do this role)
For inspirers, relocation is a very comfortable option, damage is rarely lacking in the non fractured version given that we managed to beat Quilon. While this squad can consistently get survivability relics throughout the run (and makes it easier for the agents to open the stage), relocation makes it so we can be more aggresive with the range operator placements, mainly in map 2 where we won’t have to worry about anyone targeting Tragodia and in map 3 from anyone getting targeted by the bind casters, Laqeramaline, cadences or Amiya. The reality is that in most cases neither of these 2 will make a difference towards winning or losing the run here, for the non fractured version if played correctly, so it is more of a gameplay preference decision. It may not always be the case that the player has enough damage so it is left to them to evaluate the situation and make their own decision.
T3 egg is the harder variant of this stage, it adds new enemies and reduces the SP requirement on Amiya to cast Premonition of Continuation after phasing her on the 3rd map, from 280s to 120s. For new enemies, the notable ones to mention are:
- Quilon + boats on map 1
- Manfred on map 2 3rd map remains practically unchanged.
Because we now have 2 bosses to deal with at the same time on both map 1 and 2, having 2 FRDs is almost a requirement to consistently clear this stage. 2 agents could replace the role of one of the FRDs or Tragodia could also permastall one boss with his S3
The objective here is just as simple as the T1 egg variant, we bounce balls, clear enemies and kill the bosses (both ideally at the same time), after clearing all enemies in the stage.
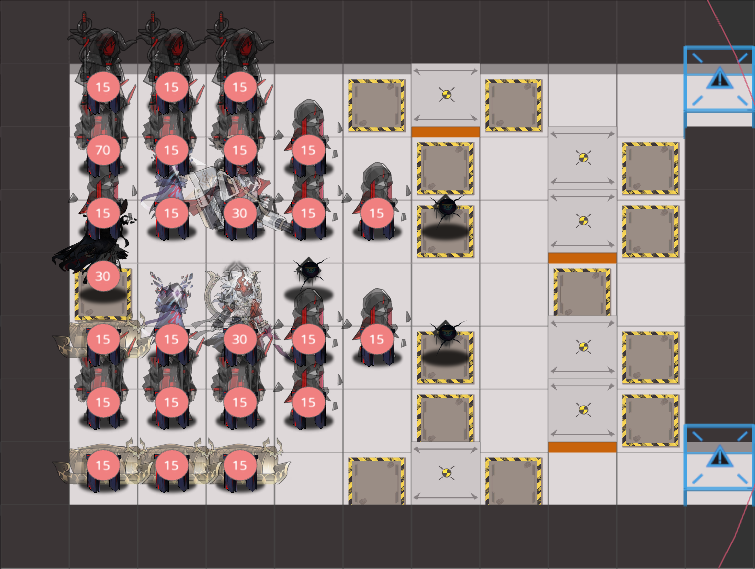
We now have boats that spawn on the bottom side, which we must try to kill, and is the reason why we need a strong anti-air operator, Archetto is great for this, provided she has some attack, Logos is another great option. Towards the end of this map, we will jump with Mon3tr forwards to kill both Patriot and Quilon, and we must make sure she won’t get boated.
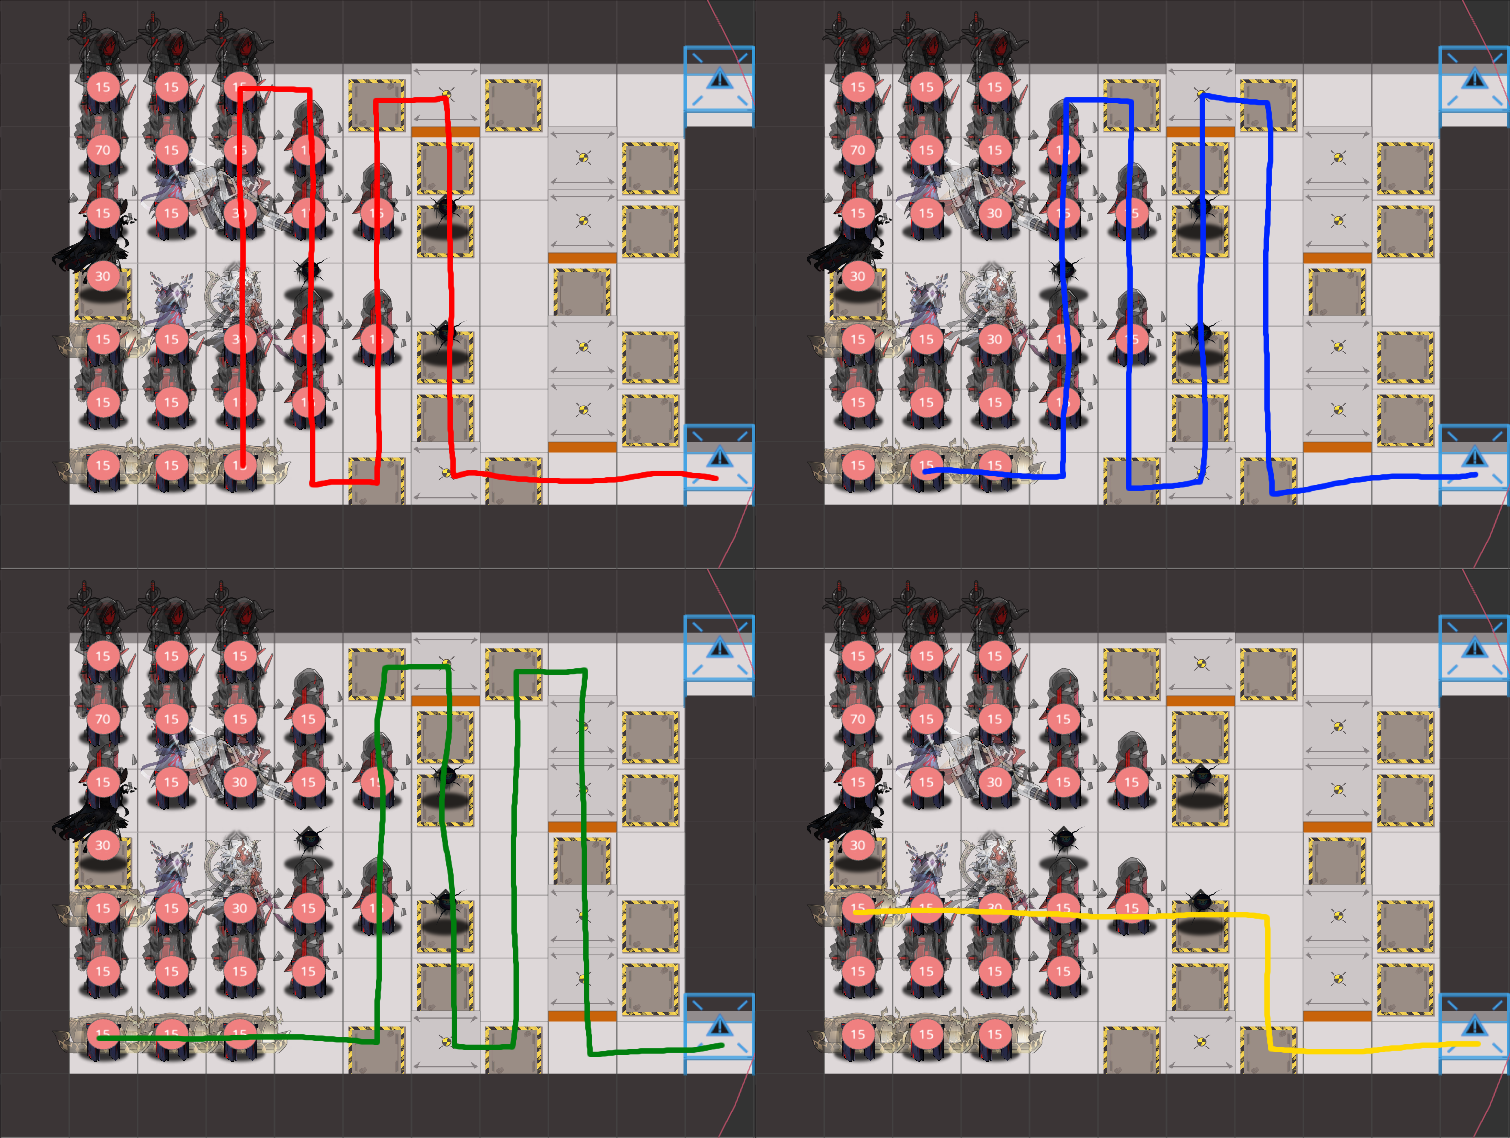
The placements can vary depending on the draft but the general approach would look something like this:
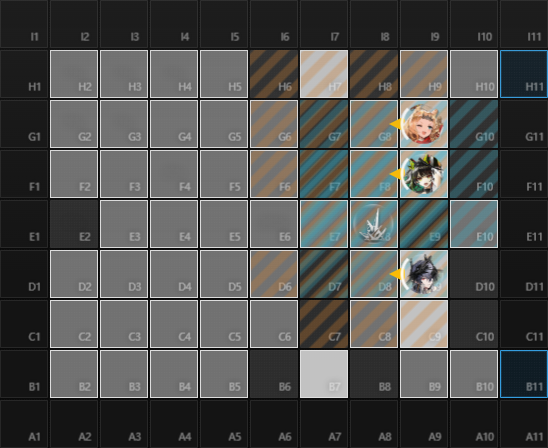
Both Archetto and Logos are good to ensure the boats die, but Rosmontis or Wisadel can replace Archetto (in this case it would be better to swap the caster and sniper positions as both Patriot and Quilon have the same amount of RES but Patriot has higher DEF). Archetto’s main job is to clear the waves in the back and the boats, while this isn’t too much of a concern in the standard T3 version, it is in fractured, while on the bottom side we would use another ground operator in the back to help clearing enemies. Mon3tr is the primary damage dealer to kill the bosses and in situations where damage is low, Ethan in F8 facing down can help stalling both of them, just need to make sure he doesn’t get bound by any bind casters.
For the standard T3 version we can simply let the enemies on the sides get freed naturally, there is no need to rush. A good queue for when to free both bosses is right after the cages in the corners are open (H2 and B2). For the fractured version, it would be around when the balls bounce before going back to open these 2 cages (on H6 and B6). These 2 rows (H and B) are often left to play out naturally (we never bounce those balls), which serve as a good visual reference for timings. In the fractured version we want to speed up the rows G and C.
After the bosses get free, we want to use the FRDs instead to open the cages right behind them, and then both agents to open the cages behind those. At this point all enemies should be free and we just need to slowly kill them along with the bosses.
This map introduces some RNG with the spawns of civilians
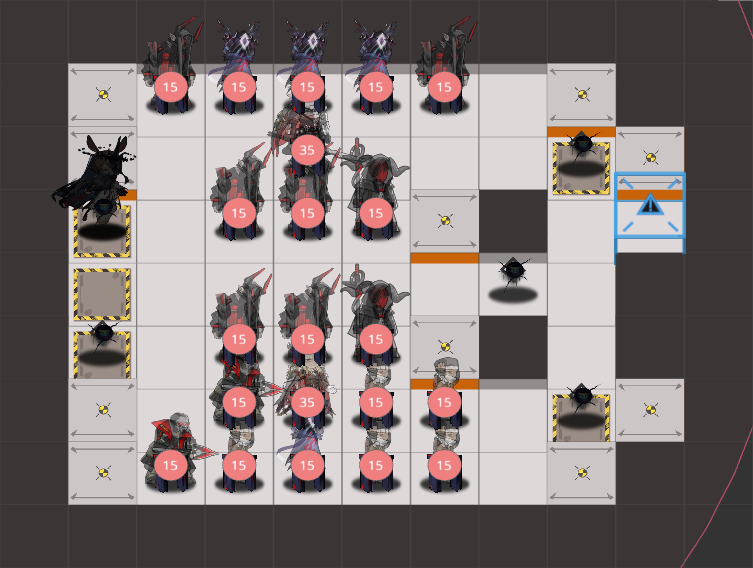
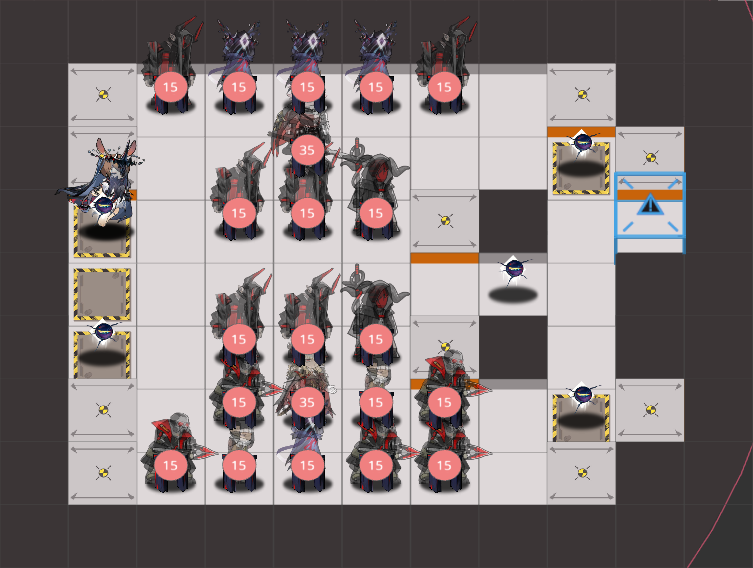
Each of the 3 imperial striker/civilian is an independent roll, meaning it is possible to get any combination of them.
The conventional way to open this map is to first deploy Tragodia as soon as possible in F20. Next, we deploy Ines in C21. Because how easy it is for this squad to get survivability relics, this is a placement we can consistently do to open this map. If we don’t have Ines, even Surfer can work there and we can preemptively deploy Gravel to bait an attack from Amiya (we won’t bounce any balls in this map). If for any reason the agent won’t live in this placement, we can instead deploy it in E20 facing down if we rolled for the striker in C20. With the Ines on row C, the objective is to rush opening Manfred’s cage for her to have a sustainable source of DP generation throughout the opening of the stage. We can also follow by deploying Gummy in front of her, only after the civilian in C19 is free, as we want Gummy to take aggro from Amiya (taunt from deployment order is based on when the operator is deployed, not when they get freed from their cage).
After Manfred is free, Gummy will be tanking both Amiya and Manfred, which will be difficult to sustain through. The objective from Gummy here is simply to keep the civilian alive, an alternative to this would be Deepcolor which we don’t even need to free her from her cage to place her summons, but Gummy also has the advantage of helping keep Ines alive.
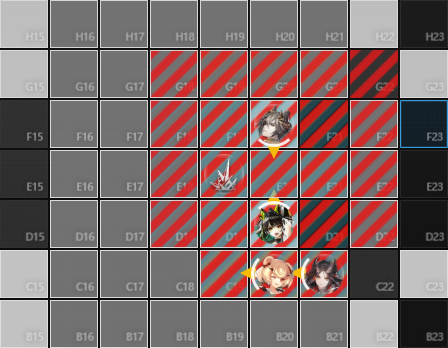
Around the time the civilian is free, Theresis will also be free, here we can throw Surfer directly at Theresis just to gain more DP, she will be back in time to start opening the top and bottom rows by the time those balls spawn.
So far the worldcursers have been freed in the center of the stage and the bind casters are about to be freed. As soon as they are free, we want to bounce the ball in F19 to free Tragodia immediately, then stun them with Red to prevent them from binding anyone. As soon as Tragodia is free we activate his skill and the stage is practically solved.
Mon3tr is placed afterwards in D20, she can jump into the center of the stage to clear all the enemies in the middle that Tragodia is stalling. Some enemies might be out of range but we can simply retreat the cages to let them walk into Mon3tr’s range. We want to activate first Mon3tr skill as soon as we can so that she is back to kill Manfred afterwards, if damage is low she might require 2 skills to kill Manfred.
Next, any range carry can be placed on H22 and B22 to start clearing the sides. Top side has 3 cadences (which have a large HP pool) while bottom side has only 1. We also have Mon3tr which can cover bottom side towards the end, leaving top side as higher priority for the range operator to help with.
In the fractured version we want to speed up rows H and B, for which 2 extra agents will help a lot, something to kill the backline will be helpful as well as there isn’t usually enough time for those enemies to walk into Mon3tr’s range. A good visual reference for when the stage ends in fractured is Manfred’s cannon. If we look at the UI where our life points are displayed, it is surrounded by 2 white lines, when the cannon charge passes the line on the right side it is very close to the timing where the stage will end.

Because this map doesn’t change significantly from the T1 egg version, I won’t go into enemies and placements details. The only difference introduced by T3 egg in here is that after phasing Amiya, instead of her having a 280 SP requirement to cast Premonition of Continuation, it is reduced to 120 SP. In T1 egg this meant that we would have a lot of time to clear all the enemies from the stage, phase Amiya and then we would still have a lot of time to clear her 2nd phase.
The SP requirement is 180 SP for all 3 maps (before phasing her), because the requirement after phasing her is reduced to 120 SP in T3 egg, now if we happen to be 120s into map 3, even if she didn’t already start casting this skill and we phase her, she will immediately cast it and we will be on an unnecessary DPS check to kill her. The safe way to deal with it is to slowly lower her HP down, wait until the 180s mark so she starts casting her skill, only then we will phase her. After Amiya casts this skill her SP will go back down to 0, after phasing her the SP requirement will change to 120 SP and she will have to spend another 120s before casting the skill again, giving us more than enough time to finish her off.
There is an auditive queue for her special attack that we can use to tell when it starts, otherwise we can look at her animation or wait for the tiles to start getting banned inside the stage (this last option makes you lose more time).
Example ED5 clears:
Conclusion
Section titled “Conclusion”This guide covered the general idea of how I personally approach playing this squad with this type of draft, it explained the strengths of the squad and how to play around them, it briefed about its differences with other squads and the way power is gained in here to complete the endings. It also broke down the main objectives that need to be completed throughout a run, some pathing options and a simplified example of the thinking process I go through for it. In practice, a big portion of the run success or failure comes from a combination of how the stages are played, the pathing decisions, and some kind of intuition built around which relics we decide to pick up, what thoughts we decide to use or discard at different points in the run and general economy decisions, but this only comes with time and experience.
While this guide focuses on Exu start specifically, you might have noticed that the guide never actually into too much detail on strategies that involved Exu specifically as the core operator, as this guide doesn’t cover any specific stage clears enroute. Regardless, the strategy evolved around this operator indirectly affects certain decisions and priorities that are taken throughout a run. If you aren’t too interested in Exu as the starting operator, I would encourage you to experiment any other operator you want, simply being aware that this may change some of the relics priorities, draft priorities and decision making choices explained here.