IS6 DLC2 Ending 5 Wage War/All Star Guide
IS6 DLC2 Ending 5 Wage War
Section titled “IS6 DLC2 Ending 5 Wage War”Source: Original Bilibili video
Original Video Creators:
- 黑蓑影卫攻略组 (bilibili)
- 飞天美琴 (bilibili)
- 曲奇-polarisssr (bilibili)
- 流火入鞘_ (bilibili)
- 糯米糍山雀 (bilibili)
- 雪樱酱_Official (bilibili)
- 飘渺-_- (bilibili)
- 欧的堵 (bilibili)
- 柊灵 (bilibili)
- 云天口赛高 (bilibili)
TL: Mouse
Abstract
Section titled “Abstract”This guide focuses on the ED5 variant of IS6 DLC2, covering the stage mechanics, key threats, and overall strategy for clearing the encounter. The rationale behind each squad composition, along with recommended operators and drafting priorities, will be discussed in the next video.
ED5 Stasis [Entire Pack] is the most difficult stage of IS6. We will first introduce the key threats in this stage.
Key Threats
Section titled “Key Threats”Vessel of Shuo
Section titled “Vessel of Shuo”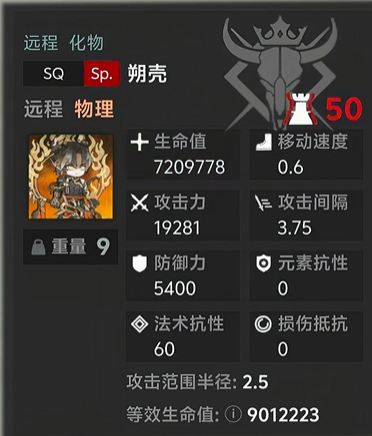
- Summons Restrained Pride onto the field.
- Summons body parts onto the field.
- Ranged auto attacks with high physical damage.
Skill 1 (Drunken Stupor)
Section titled “Skill 1 (Drunken Stupor)”- Puts 2 25-cost ‘Olden Pride’ into the deployment zone, up to a maximum of 8.
- 28.8s cooldown.
- Vessel of Shuo gains 30% ATK for each ‘Olden Pride’ in the deployment zone. Shuo has 19,281 ATK, so this can easily reach one-shot damage.
- Olden Pride in the deployment zone are counted as devices. Their DP cost is not reduced by Geist Binding Rope, but is reduced by Chamber of Geists Ledger.
- Deploying a Olden Pride spawns a Resentment, a ranged enemy.
- The player may still deploy on the tile where Resentment spawns.
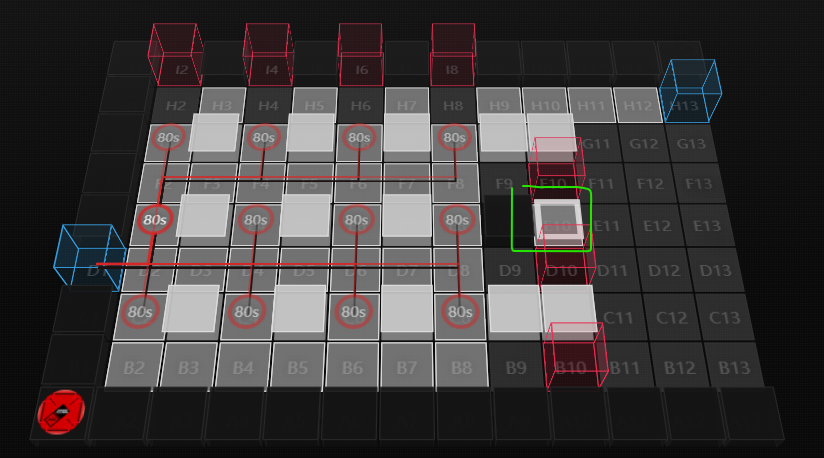
- Deploying a Olden Pride on the green-box tile shown below will not summon Resentment.
Skill 2 (Tracing the Law)
Section titled “Skill 2 (Tracing the Law)”- Summons
xRestrained Pride onto the field, with each sword targeting a unit. x = min(targetable units on field, Olden Pride in deployment zone + 1).- 24s cooldown.
Vessel of Shuo reduces 50 LP when leaked.
Arrogance Embodied
Section titled “Arrogance Embodied”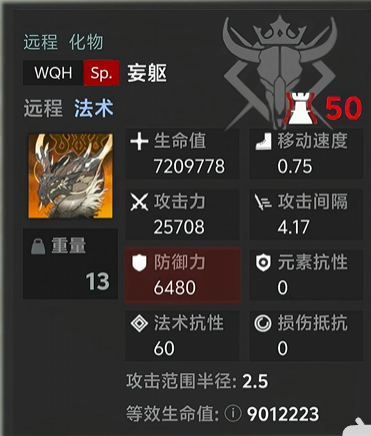
- Large enemy with a 2.95 × 2.95 size.
- Spawns ‘Fume of Anger’
- Summons body parts onto the field.
- Every 30% HP lost, summons more body parts.
- Ranged auto attacks release a Fume of Anger at the target.
Skill 1 (Flame of Intrigue)
Section titled “Skill 1 (Flame of Intrigue)”- Puts 2 25-cost Olden Grudge into the deployment zone, up to a maximum of 8.
- 24s cooldown.
- Does not summon Resentment when deployed.
Skill 2 (Purifying Flame)
Section titled “Skill 2 (Purifying Flame)”- Summons
xFume of Anger onto the field, each targeting a unit. x = min(targetable units on field, Olden Grudge in deployment zone + 1).- 9.6s cooldown.
Skill 3 (Woven Prison)
Section titled “Skill 3 (Woven Prison)”- Targets the unit with the highest taunt on the field and shoots 15 Fume of Anger.
- 2.5s charge, then 1 Fume of Anger every 0.49s for 7.5s.
- If there are no targetable units when the skill is activated, no Fume of Anger will be released.
- 32s cooldown.
Skill 4
Section titled “Skill 4”- When one body part is defeated, Arrogance Embodied is unable to attack or cast skills for 15s.
Arrogance Embodied reduces 50 LP on timeout.
Restrained Pride / Fume of Anger
Section titled “Restrained Pride / Fume of Anger”- Summoned by Vessel of Shuo and Arrogance Embodied.
- Flying enemies.
- Lock on to the highest-aggro target on the field.
- Restrained Pride deals physical damage. Fume of Anger deals Arts and burn damage.
- Restrained Pride and Fume of Anger have 432,587 HP and 32,135 ATK.
- Self-destruct after being blocked or colliding with their target.
- When a Restrained Pride or Fume of Anger loses its target through retreat, defeat, camouflage, or another untargetable state, it changes target to the nearest blue box.
- Restrained Pride and Fume of Anger are only affected by slow, movement-speed reduction, and bind.
Three Common Ways to Deal with Restrained Pride / Fume of Anger
Section titled “Three Common Ways to Deal with Restrained Pride / Fume of Anger”-
Intercept
- Common methods include Tragodia S3 and Yato with Law and Ritual.
- Units with expanded block range, such as Kal’tsit Alter, use that expanded range when determining whether a Restrained Pride or Fume of Anger is intercepted.
- Tragodia S3’s Cage of Chaos blocks all Restrained Pride and Fume of Anger at its position. Each deals 1 damage to the cage.
-
Invisible / Camouflage to lose aggro
- Examples include the Weave of Thorns and Leaves collectible and Ukusik.
-
DPS
- Anti-air options include Logos, Carnelian, Yato, and Irene.
Body Part
Section titled “Body Part”-
Summoned by Vessel of Shuo and Arrogance Embodied.
-
Has a 93-frame spawn animation.
-
Reflects 20% of received damage as unsourced true damage.
- Due to the damage reflection, use units that cannot drop below 1 HP, such as Hoshi Alter, Specter Alter, Sakiko, and Titi for Wang, or invincible units such as Yato Alter.
- Alternatively, a lower-DPS unit with good survivability can kill a Body Part with healing support from a Medic.
- Mon3tr S3 is also sufficient to sustain herself while killing Body Parts.
-
When summoned, force-retreats all allied units on its three tiles and reduces their redeployment time to 15%.
Summoning of Body Parts
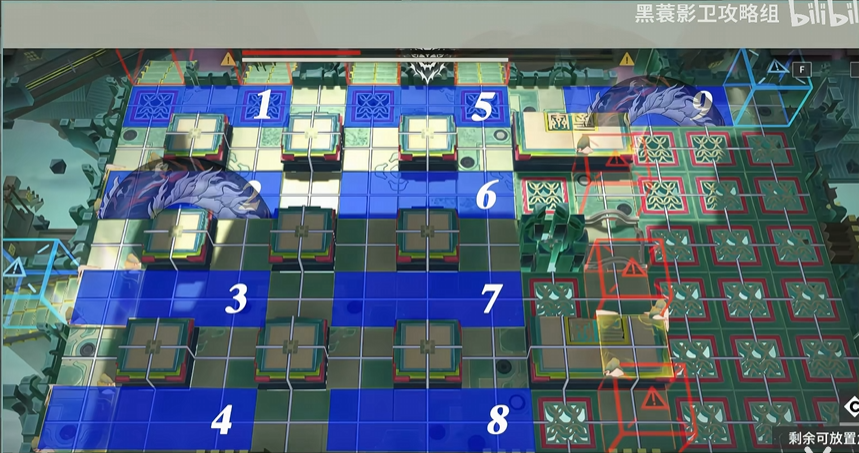
Section titled “Summoning of Body Parts”- When no Body Parts are present on the battlefield, both Vessel of Shuo and Arrogance Embodied summon a Body Part. The skill cooldown continues to progress while a Body Part is already present.
-
Vessel of Shuo alternates between summoning Body Parts at 2 and 9.
-
Arrogance Embodied alternates between summoning Body Parts at 2, 3, and 9.
-
Arrogance Embodied summons 2 Body Parts with every 30% HP lost, even while another Body Part is present, in the following order: 5+6, 1+4, 7+8.
-
Vessel of Shuo is invulnerable while a Body Part is on the battlefield.
-
Arrogance Embodied gains stacking physical and Arts damage resistance for every Body Part on the battlefield, at 50% per stack.
-
Initial Body Parts summoned on tiles 2 and 9 have 1,153,564 HP and do not summon units.
-
The initial Body Part summoned on tile 3, and all Body Parts summoned afterward, have 2,307,129 HP and summon a wave of enemies every 8 seconds. There are 24 wave variants; review the original video at 8:24 for the full order and pathing.
- These Body Parts have a fire aura.
- To prevent the boss from summoning Body Parts on these tiles, keep one of the initial Body Parts on tiles 2 or 9 alive.
General Stage Strategy
Section titled “General Stage Strategy”Phase 1
Section titled “Phase 1”- Clear the Body Part on tile 3 and keep one of the Body Parts on tile 2 or 9 alive.
- Stall Vessel of Shuo while it is invincible.
- Kill Arrogance Embodied with 50% damage resistance and clear the Body Parts spawned by Shuo every 30% HP lost.
The Three Main Checks When Opening the Stage
Section titled “The Three Main Checks When Opening the Stage”-
DP Check: The stage starts with 0 initial DP and halved DP regeneration from the ED5 debuff.
- Big Bob’s Certificate and Round Woodwheel are very important initial-DP collectibles for countering this.
-
Survivability Check: The stage starts with many Fortbreakers, pressuring your units’ survivability.
-
DPS Check: The stage starts with 3 Body Parts. The Body Part on tile 3 can summon enemies that cause massive leaks if it is not cleared.
- Units such as Hoshi Alter, Yato, Specter Alter, and other ground DPS are critical for clearing the initial Body Parts.
Boss Spawns
Section titled “Boss Spawns”-
Vessel of Shuo and Arrogance Embodied spawn within 10-15s of the stage opening.
-
Arrogance Embodied releases Skill 2 (Purifying Flame) every 9.6s. Teams unable to effectively clear Fume of Anger from the field need to quickly remove Olden Grudge from the deployment zone to reduce the number released.
-
Every 24s, Vessel of Shuo and Arrogance Embodied place 2 Olden Pride and 2 Olden Grudge into the deployment zone, for a total cost of 100 DP.
- Clearing all Olden Pride and Olden Grudge requires high DP efficiency, such as Yato Vanguard, Duo-Carrier Sedan, or the Law and Ritual combo.
- The normal strategy is therefore to choose either Olden Grudge or Olden Pride to clear from the deployment zone.
-
Vessel of Shuo walks around the battlefield, attacking nearby allied units with a fast attack animation and 19,281 base ATK.
-
Arrogance Embodied summons a Fume of Anger when attacking.
-
The key is determining how to kill Arrogance Embodied before Vessel of Shuo reaches your units, or how to stop Vessel of Shuo from reaching them.
Tragodia Placement
Section titled “Tragodia Placement”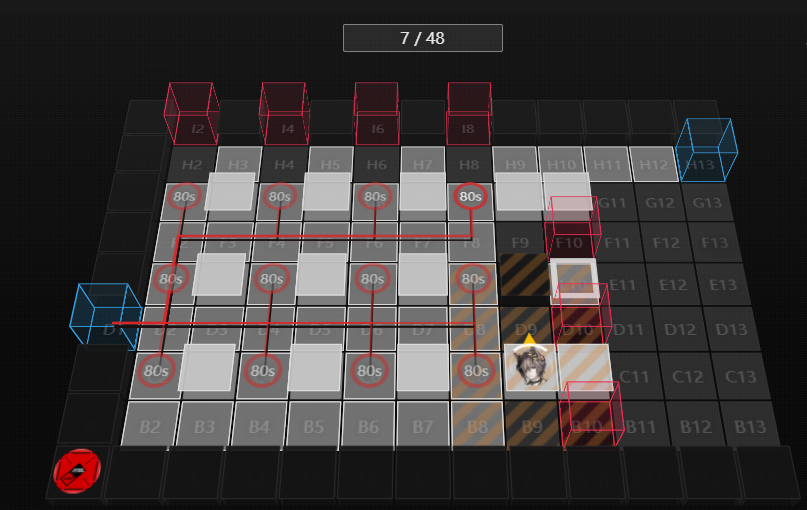
-
Placing Tragodia in this location with S3 controls Fume of Anger and Restrained Pride using cage blocks.
- Deploying Fume of Anger or Olden Pride inside Tragodia S3’s radius also spawns cages.
-
Arrogance Embodied can also be paralyzed by Tragodia from this position.
-
One issue with Tragodia is the Ceaseless debuff. If Tragodia is a Candleguest, his stats are greatly reduced:
-(50% + 10% for each floor)HP and ATK. -
Crimson Crescent Blade, who spawns at the beginning of the stage, can kill Tragodia. When blocked by a cage, Crimson Crescent Blade spins and damages Tragodia.
-
Immediately retreat the cage spawned under Crimson Crescent Blade.
Clearing Arrogance Embodied
Section titled “Clearing Arrogance Embodied”-
At 70%, 40%, and 10% HP, Shuo summons 2 Body Parts at (5,6), (1,4), and (7,8) respectively.
-
These Body Parts have higher HP and summon waves of enemies every 8 seconds.
-
The spawned waves generally do not require high stats to clear.
- Scarlet Mannequin is the exception: it has high attack and is unblockable.
-
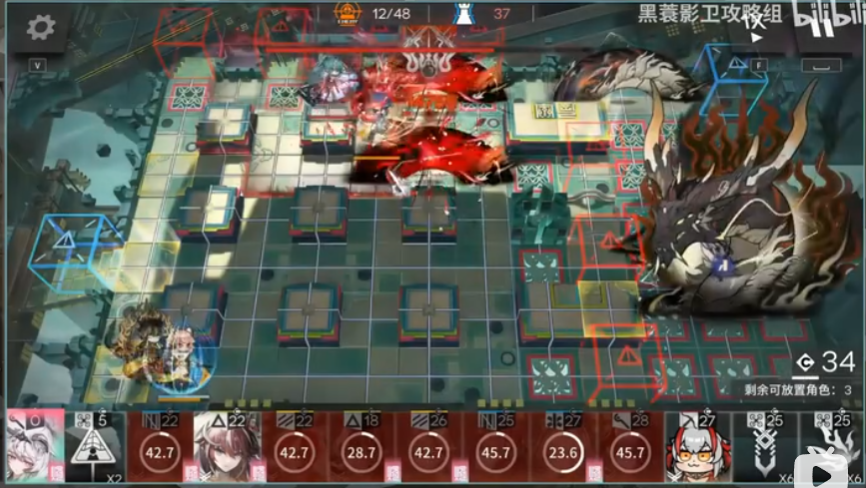
The 70% HP Body Parts at positions 5 and 6 are the easiest to clear. They spawn close together and are not obstructed by other enemy spawns. One Hoshi Alter burst cycle with AoE DPS is sufficient.
-
The 40% HP Body Parts at positions 1 and 4 spawn far apart. Almost no operator can DPS both simultaneously. Either split your attention between the two Body Parts or redeploy to bring them down one at a time.
- The redeploy method is risky because each Body Part summons waves every 8 seconds.
- Kal’tsit Alter S3 has a use case here for shifting units from one Body Part to the other.
-
Which initial Body Part at position 2 or 9 you keep alive depends on your ability to efficiently clear the Body Parts at positions 1 and 4.
- Keep position 9 alive if you struggle to clear positions 1 and 4, because the Body Part at position 2 makes it very difficult to DPS the position 1 Body Part.
- Otherwise, keep position 2 alive. This makes it easier to clear Restrained Pride and Fume of Anger moving toward the top-right blue box.
- Decide based on your squad formation and LP. The benchmark is intended to be covered in the next video.
-
At 10% HP, the Body Parts at positions 7 and 8 additionally spawn four enemies.
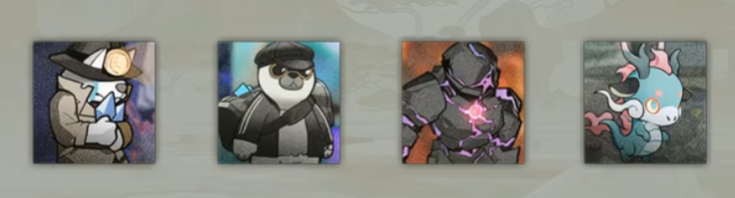
- Little Ba’jie is difficult to deal with. Each time it takes 15 instances of damage, it deals 300% ATK Arts damage to nearby friendly units within a radius of 3.5 and stuns them for 15 seconds.
- Little Ba’jie spawns close to the Body Parts at positions 7 and 8, so your Body Part DPS should be placed on the left side when possible.
- Because of Little Ba’jie’s spawn, redeploy Tragodia when he is nearby.
- If Vessel of Shuo is also nearby, Little Ba’jie’s stun is especially dangerous.
Leaking Vessel of Shuo
Section titled “Leaking Vessel of Shuo”- With more than 50 LP, leaking Vessel of Shuo trivializes Phase 1 and Phase 2.
- Only deploy units with Hoshi Alter protection to clear waves and Fume of Anger from Arrogance Embodied Skill 3.
- Once Vessel of Shuo leaks, take your time killing Arrogance Embodied and moving to Phase 3.
Pros:
- No need to draft units specifically to stall Vessel of Shuo.
- Easier to execute.
Cons:
- Requires a large HP buffer to account for possible leaks during the stage opening and Phase 3.
Once Arrogance Embodied is killed, proceed to Phase 2.
Phase 2
Section titled “Phase 2”- Clear the remaining Body Part on tile 2 or 9.
- Kill Vessel of Shuo while clearing the Body Parts it summons.
Kill Vessel of Shuo
Section titled “Kill Vessel of Shuo”-
If your squad can stall Vessel of Shuo, use that time to build DP, redeploy operators, and clear Olden Pride from the deployment zone.
-
If you have Unflinching Masterplan, the initial ED3 relic, its effect lasts only 999s, so you may stall until the effect expires.
-
Clear the remaining Body Part on tile 2 or 9. From this point onward, Vessel of Shuo alternates Body Part summons between tiles 2 → 9 → 2 → 9.
- 48s cooldown.
- 4.8s cast time.
-
These Body Parts summon enemies every 8 seconds.
-
The hardest part of Phase 2 is clearing the tile 2 and tile 9 Body Parts.
- It is difficult to deploy operators who cover both positions.
- Without Law and Ritual, operator redeployment time is generally longer than 52.8s.
- If you cannot keep up, it becomes difficult to DPS Vessel of Shuo because the boss is invulnerable while a Body Part is on the field.
-
With operators such as Kal’tsit Alter and Exu Alter, you can stall one Body Part kill for 52.8s, clear it, then immediately redeploy with Kal’tsit or Exu to clear the next Body Part. This creates a sizeable window to burst Vessel of Shuo.
-
Body Part summoning can be interrupted with push or pull effects.
- Vessel of Shuo has 9 weight.
- Feater or Mizuki require Angelina plus Gravity Defying Machine to interrupt it.
- With the
-1 weighttongbao, Weedy can interrupt it with Angelina plus Gravity Defying Machine.
-
If your damage is insufficient to clear Body Parts and still leave enough time to DPS Vessel of Shuo, leave one Body Part at 1 HP and retreat your DPS.
- Once redeployment is ready, kill that Body Part with one unit and immediately deploy your DPS to handle the next Body Part that spawns.
- This creates a large window to DPS Vessel of Shuo.
- Your squad must still be able to defend against the waves summoned by Body Parts.
-
There is also a 3.1s window between killing the first Body Part and Vessel of Shuo spawning the second Body Part. The boss is vulnerable during this window, so it can be used for additional DPS.
Damaging Vessel of Shuo
Section titled “Damaging Vessel of Shuo”Killing Vessel of Shuo is difficult because the boss has 100% physical and Arts dodge against allied units that are not blocking it.
Common solutions include:
- True damage.
- Ground DPS blocking the boss while Tragodia applies Paralysis.
- Sakiko or Hoshi blocking Shuo while in an undying state.
- Ground DPS supported by a shield from Roberta or Kal’tsit Alter when not under the Cloud & Paint effect.
- Frighten from Leizi Alter, requiring high ASPD, or Degenbrecher.
- Elemental damage from Tragodia, at 6,000 per burst.
When Vessel of Shuo dies, Shanhaizong Secret-Keeper spawns and the stage progresses to Phase 3.
Before entering Phase 3, ensure you have enough resources to deal with the upcoming spawns.
Phase 3
Section titled “Phase 3”- Kill Yi, Sui, and Wang.
- Survive.
Stage Progression
Section titled “Stage Progression”- Wang, Sui, and Yi spawn in this phase.
- After Vessel of Shuo is killed, one Body Part spawns on tile 2.
- Before entering Phase 3, deploy a carry close to tile 2 so the Body Part can be dealt with immediately.
- Try to kill the Body Part before Sui drops his foot, or the defense becomes difficult.
- Shanhaizong Secret-Keepers spawn when Vessel of Shuo is defeated.
- 3 Sand Voyagers spawn from the 3 right-side red boxes. Each carries 2 Shanhaizong Secret-Keepers and 2 Sharpedges.
- Note Sui’s accelerated stomp cooldown when there are at least 6 friendly units on the map.
- The initial stomp occurs after 30s, while the frontmost Sharpedge takes 20s to enter the blue box.
- You must decide whether to accelerate the stomp.
No Accelerate
Section titled “No Accelerate”- Deploy units to clear Sharpedges and Iron Spearheads before the first stomp, spawn-killing them when possible.
- Deploy more units to clear the remaining Iron Spearheads after the first stomp.
- Kal’tsit Alter can redeploy units between stomps.
- Some amount of initial SP, attack speed, or control is required because the DPS pressure is high.
Accelerate
Section titled “Accelerate”- Fully accelerate the first stomp, then deploy units to hold the line.
- Difficult to achieve without Raidian.
- Requires less DPS and control to hold the line. Silverash Alter, Wis’adel, Gnosis, and similar operators are recommended.
If Vessel of Shuo Was Leaked
Section titled “If Vessel of Shuo Was Leaked”- All four Sharpedges are loaded onto Sand Voyagers.
- You have ample time to clear the Sharpedges, so the acceleration decision is unnecessary.
Remaining Threats
Section titled “Remaining Threats”- For waves spawning on the top side, Arts DPS such as Pramanix Alter and Chen Alter are required to clear Scarlet Mist.
- Scarlet Mist attacks apply damage over time, so top-lane Arts DPS may require Medic support.
- Yi has 12,854 ATK and targets 2 units per attack, easily killing high-ground units in one hit. However, his pathing is similar to Vessel of Shuo and there is less urgency to defeat him immediately.
- The Liang summoned by Yi can blow up debuffed Candleguests affected by
-(50% + 10% for each floor)HP and ATK. - Wang has 8,569 ATK, but DPS positioned on the top lane can easily be Emptied because the lane is only 1 tile wide and an operator can be boxed in.
- Use operators with high survivability to bait Wang’s attacks.
- Wang sleeps for 40s, then beelines toward the blue box.
- Wang only leaks for 5 LP, so leaking him is an option when necessary.