Past The Aquapit
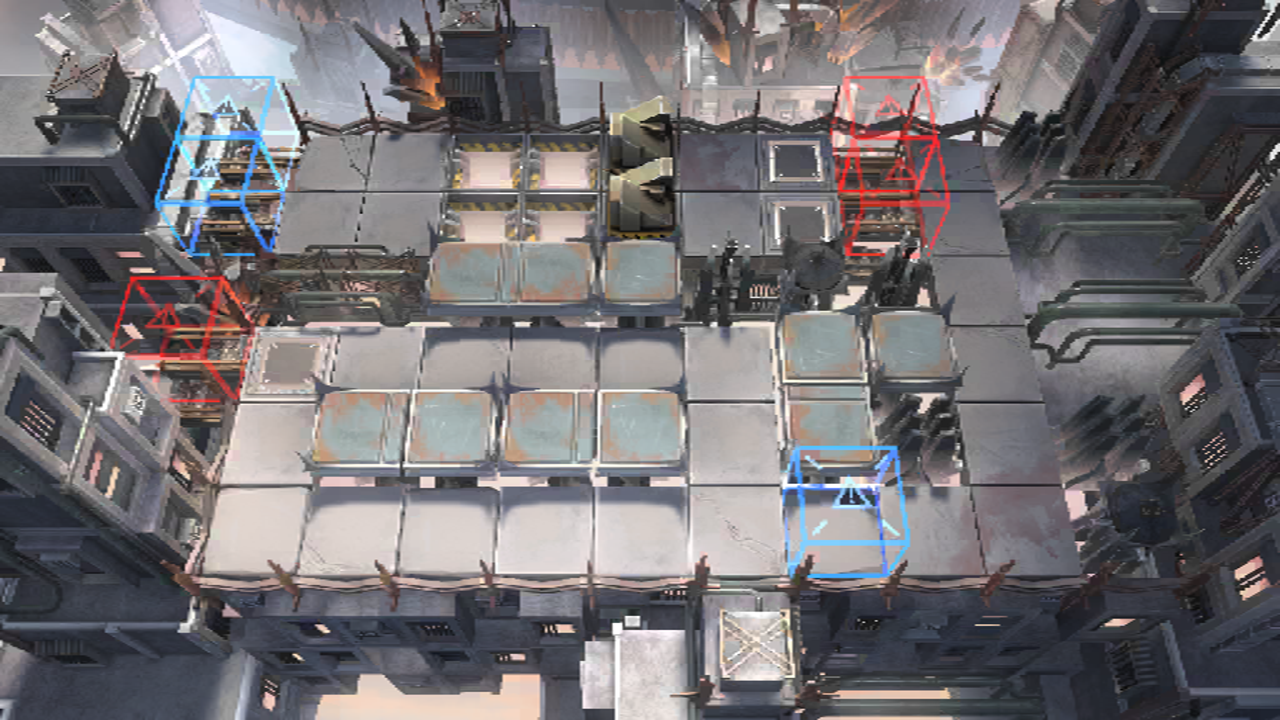
Floor: 4
Type: Combat
Spine of Epoch:
• Regular: 1
• Emergency: 1
• Catastrophes: +1
Aquapits is a stage which is easy to leak on. Though there are few active threats to your operators, enemies on the stage are fast moving and will beeline into the blue box which can easily lead to a lost run. The primary threat on the map are the Scrap Assembler (jetpack guys). It is worth discussing their properties that make them so troublesome. They are immune to many forms of crowd control (Stun, Silence, Sleep, Freeze, Levitate, Frighten, Imbalance), and upon being blocked for the first time they will fly up and enter a low hovering state for 3.7s. After coming down they become blockable and lose 1100 defence. However, even once they become blockable they hit very hard and fast (1994 physical attack on Emergency). As such, we prefer to let them fly up and then burst them once they come down without blocking them for too long.
There are 3 parts to manage in this stage. The first part of the stage is the bottom left region where jetpack guys will run around the bottom left region. Thankfully the first wave of jetpack guys will loop around the map several times before entering the blue box, taking 50 seconds to do so. Every wave after will have the jetpack guys loop around once before entering the blue box.
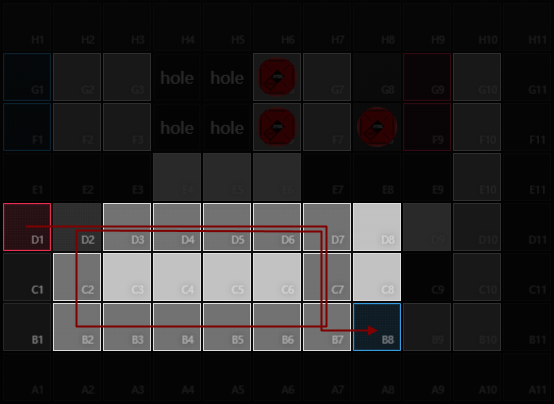
The second part of the map to manage is the top region. Here we have jetpack guys who will run towards the barricades, fly over them and then barely reach the other side before running into the blue box. On emergency, two Sarkaz Maze Returners will spawn in front of the barricades who will stand there menacingly but do nothing except stand there until the end of the map. The design of the emergency stage gives a hint as to how this stage is meant to be solved. As mentioned earlier, jetpack guys will barely reach the other side if they start flying at the barricade. However, if we slow them down or block them in the tiles to the right of the barricades then they will drop themselves into the hole! The Maze Returners exist to troll this strategy a little, since it means that you have to kill them before you can safely place operators to block jetpack guys. The first jetpack guy on the top will start to move 40 seconds in. Note that the second wave of jetpack guys will immediately run at the barricade without pausing.
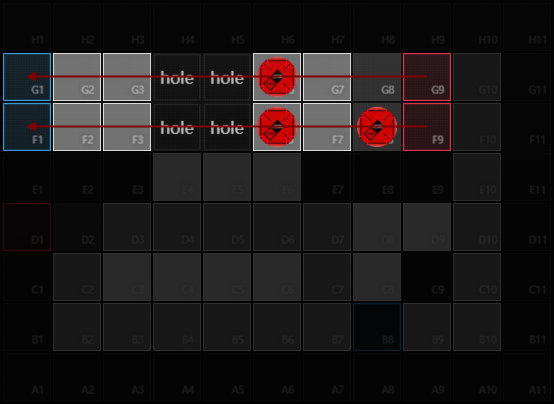
An alternative strategy is to instead break the barricades. By doing so, the jetpack guys will never be blocked and so will simply run into the hole instead of flying over them. This has several ways of being accomplished. The simplest method is to block them and then slow (such as May s1) them down. By doing so they will drop back down on top of the barricade and break them quickly. Ines s3 deserves a mention since you can simply wait for the jetpack guy to fly up on the barricade and then s3 to bind them in place.
The final part of the map is just the Maze Returners which will emerge from the right and then casually stroll down into the blue box. The first one will pause for a bit before entering the blue box, the rest will just go straight in. This is usually trivial to deal with and just needs to be dealt with by using any good damage dealer.

With the stage description done, the strategy starts to come together. In the bottom left region we will first block the jetpack guys to make them fly up so that they lose their defence. Once they come down we can burst them down with our operators and keep them in place with a tanky operator to block (who ideally won’t tank for too long). On the top, we want to block the tiles directly in front of the barricades so that the jetpack guys will fall to their deaths by themselves. In emergency, we’ll need to kill the Maze Returners first. Finally for the right side, we commit a dps (or our bottom left dps can reach them) to kill the Maze Returner that occasionally shows up.
Stage Variants
Section titled “Stage Variants”There is a 10% chance that 6 of the jetpack guys on the top will be replaced by lost hovercraft instead. This is incredibly strong since it means that if you can kill them, you get 30 ingots for free. As such, always have an operator ready to stun the top region so that the lost hovercraft fall into the hole.

Finale Cadence
Section titled “Finale Cadence”
Finale Cadence
Section titled “Finale Cadence”Fairly annoying. Because there are several areas to manage early in the stage, you often don’t have the leeway to deploy a medic to heal off its attacks. A cheap medic or a fairly tanky blocker can be deployed on the top region to both deal with the cadence and to help solve the stage is ideal. Note that it also attacks the barricade if nothing else is on the field. This is difficult to take advantage of but worth noting.
Notable Epochs and Debuffs
Section titled “Notable Epochs and Debuffs”
King of Sarkaz
Section titled “King of Sarkaz”
King of Sarkaz
Section titled “King of Sarkaz”Jetpack guys already have high attack, this epoch makes them effectively untankable.

Sufferings
Section titled “Sufferings”
Sufferings
Section titled “Sufferings”Only really annoying when Cadence is present on the field, but makes Cadence extremely annoying.

Commerce
Section titled “Commerce”
Commerce
Section titled “Commerce”Since the stage requires a fairly fast open, commerce slowing down your opener is very detrimental.

Oddities
Section titled “Oddities”
Oddities
Section titled “Oddities”Makes the dps check of killing the jetpack guys higher, which is quite annoying.

Congestion
Section titled “Congestion”
Congestion
Section titled “Congestion”Since you need to have multiple operators deployed to handle both the top and bottom, having only 3 deployment limit is extremely annoying.
Gul’dul’s Silence
Section titled “Gul’dul’s Silence”
Gul’dul’s Silence
Section titled “Gul’dul’s Silence”Makes the dps check of killing the jetpack guys higher, which is quite annoying.
Rolling Ancestors
Section titled “Rolling Ancestors”
Rolling Ancestors
Section titled “Rolling Ancestors”The move speed increase will make it so that the jetpack guys will fly all the way to the other side even when blocked with the standard strategy. You’ll need to actually kill them or slow them instead.
Recommendations
Section titled “Recommendations”-
Cheap operators who can block are very good on this stage. You should have a form of Aerial stun or very strong anti-air. Aside from that, any strong dps operators for the bottom left works.
-
Castle, Friston, Gravel, Deep Color, Beanstalk are cheap operators who can be used to block jetpack guys for the top. Since defender tickets are often useless, Friston becomes especially useful. Robots also don’t consume deploy limit which can help a lot.
-
May and Kroos Alter are good sources of aerial stun for the chests.