Epochal Gaps

Floor: 4
Type: Combat
Spine of Epoch:
• Regular: 5
• Emergency: 5
• Catastrophes: +1
While most stages have at most 2 or even 3 spines, this stage stands out for having a total of 5 (6 with catastrophes epoch) which makes it the most resource-valuable stage. This benefit comes at a cost, as the increased amount of spines heavily restricts your operators’ placements in the opening.
This stage often isn’t a problem and can be solved with a variety of different operators if played correctly. The main mechanic to look out for here is that of chapter 12 with Norport Civilians, Roadside Emergency Reserves (DP boxes) and lower initial DP limit. This stage starts with a DP limit reduced to 30, with each of these boxes giving you 5 DP and an additional 5 DP limit when cleared, while the Norport Civilians increase your DP limit by 2 if the enter the blue box after being revealed. The stage starts with 3 of these boxes, one of which blocks a specific path, funneling all enemies into a side of the blue box, if the reserve box is destroyed enemies will take the shortest path into the blue box. A common strategy is to not clear box blocking either path to focus all your operators into dealing with a single lane.
The second particularity of this stage is the 5 spines, limiting most of the available tiles for deployment at the start. At the point of encountering this stages it is reasonable to assume there are good operators recruited able to clear spines without issues, in the situation where this isn’t the case the stage difficulty can significantly spike as the enemies waves will slowly apply more pressure and having clearing spines will almost always be a requirement to deal with these.
This stage consists of Norport Civilians constantly spawning from the bottom and mid lanes, 3 Armed Spies spawning from the bottom lane, 3 Sarkaz Absurdist Operative Leaders spawning from the middle lane, 1 Sarkaz Absurdist Tyrant Captain spawning from the middle lane (2 additional on the EM version, one from the bottom red box and the other from the top red box) and constant waves of Sarkaz Maze Returners towards the end. The exact waves timings for different variants of this stage can be found in Tomimi.
The emergency version of this stage adds into its difficulty mainly by increasing enemies’ ATK, DEF and HP, each by +50%, on top of adding 2 Sarkaz Absurdist Tyrant Captains to the last wave. The +50% stats increase stands slightly above the average EM stats increase for F4 stages, this can convert the Operative Leaders into a big threat to your range units if not dealt with properly, as well as making the Tyrant Captains a bigger damage check to deal with.
Notable Enemies
Section titled “Notable Enemies”- Sarkaz Absurdist Operative Leader: the main mechanic to look out for is its range attacks which steal 3 DP, having a total of 3 ammo each.
- Armed Spy: these spawn as a Norport Civilian with a dreadkaz mark, they need to be revealed and after being defeated they spawn a dreadkaz with a mark of epoch.
- Sarkaz Absurdist Tyrant Captain: these can often be the main threat on low damage runs, they have a 3 block count, their first attack deals increased damage and have high HP and DEF.
- Sarkaz Maze Returner: while these often aren’t a problem in most stages, because they have a special effect that makes them attack twice when inside a mark of epoch, they can become a threat if spines aren’t dealt with properly or Armed Spies’ mark of epoch is placed on the wrong tile.
Stage Variants / Permutations:
Section titled “Stage Variants / Permutations:”The main variant to look out for here is the reserve box placement, this can block either the middle or the top path and is what defines how to approach the stage.
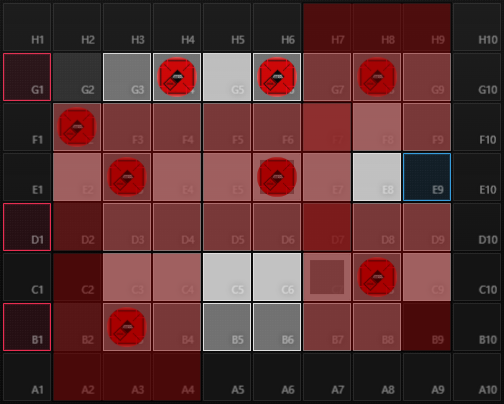
- Open mid lane (top box placement): this placement funnels all enemies into the mid path, generally considered the slightly harder variant as there isn’t a good choke point to deal with all enemy waves, instead it forces you to reveal bottom enemies soon after they spawn and can often end up placing a mark of epoch on your main blocker while the mid and top waves approach.
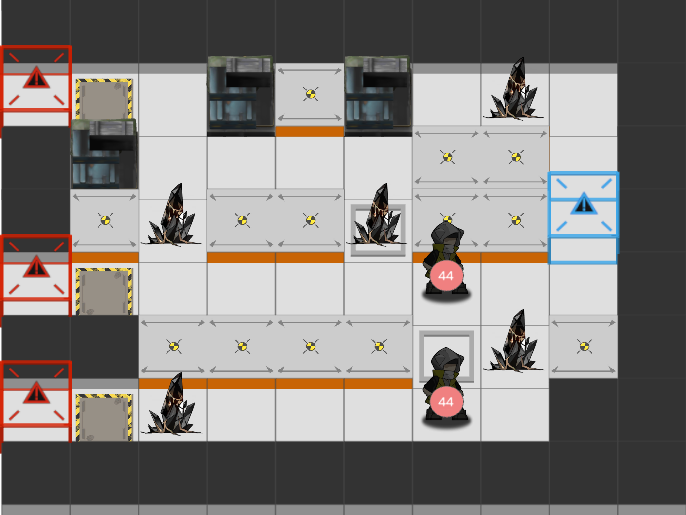
This leaves the following tiles safe from the mark of epoch:
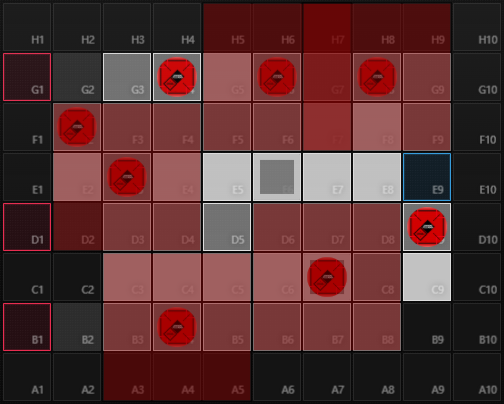
- Open top lane (mid box placement): this placement relieves pressure out of your main blocker, giving you more time to reveal the bottom enemies, allowing you to place the mark of epoch on a more convenient tile and funnel all enemies into a single lane.
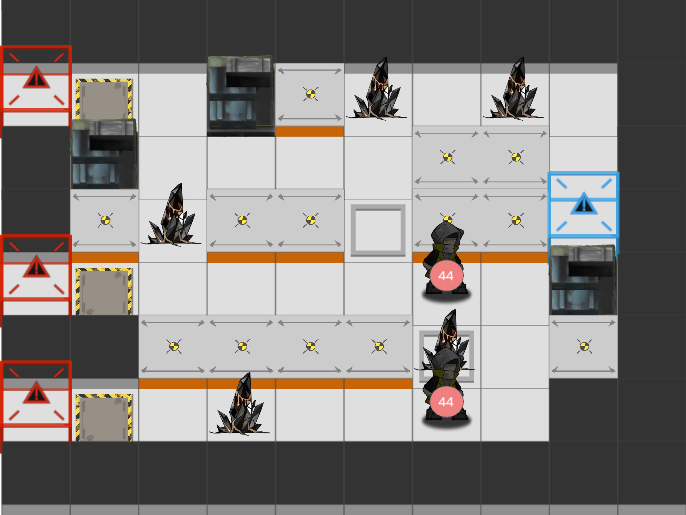
This leaves the following tiles safe from the mark of epoch:
Finale Cadence
Section titled “Finale Cadence”
Finale Cadence
Section titled “Finale Cadence”An interaction that can be seen on other stages between Cadence and some types of devices, in Past The Aquapit for example, is that Cadence is able to attack the devices if no operator is deployed to take aggro. In this stage luckily that is not the case, otherwise with all boxes cleared it could complicate funneling the enemies into a single lane.
Depending on the box placement Cadence can have a shorter or longer path into the blue box. With a top placement the path is shorter, making leaking it faster and reducing its threat during the stage; with a bottom placement however, the time it takes to reach the blue box will be longer, and if not careful ending up taking damage while clearing enemy waves as it walks into the blue box. While the Cadence can often attack devices in some stages, it can’t kill the DP boxes here.
Notable Epochs and debuffs
Section titled “Notable Epochs and debuffs”
Catastrophes
Section titled “Catastrophes”
Catastrophes
Section titled “Catastrophes”This epoch affects the stage in two ways. The first one is making all epochs in the stage harder to kill, which can be an issue without good operators to clear them. The second is banning one extra tile for placement in the opening, this is E8 in both variants, which can be more of an issue with the top box variant as this was the only safe range tile in the high ground tiles next to the blue box, this makes it so you are forced to start clearing the spines from the bottom safe tiles and is harder to reach the top right spines to free up those high ground tiles.

King of Sarkaz
Section titled “King of Sarkaz”
King of Sarkaz
Section titled “King of Sarkaz”This epoch has 2 dangerous effects. The first one is being unable to retreat operators in marks of epoch, this forces you to be more careful with your placements, specially when opening this stage as any agent vanguard that could be placed to generate DP from the Sarkaz Swordsman wouldn’t be able to be retreated. The second effect increases the damage dealt by Sarkaz enemies, with the majority of enemies in this stage being Sarkaz this will often force you to simply avoid taking any damage over resorting to block or tank even the Maze Returners. This also makes the Operative Leaders able to kill most range units from a single ranged attack.

Sufferings
Section titled “Sufferings”
Sufferings
Section titled “Sufferings”This epoch mostly only affects the opening which consists of 2 Sarkaz Swordsman. Generally an agent is enough to deal with this but given that they have to be deployed on a mark of epoch, sufferings may eliminate this as an option, forcing you to deal with them more carefully or to leak them.

Commerce
Section titled “Commerce”
Commerce
Section titled “Commerce”Commerce can often be very deadly given the DP limit mechanic this stage imposes. Starting this stage you are only able to deploy operators with 30 DP cost or less, if commerce is the breakpoint for a key operator being unable to be deployed this can change significantly how you have to approach the stage. Increasing your DP limit may be a higher priority early on or other operators will have to deal with the opening until this operator can be deployed.
Another thing to look out for with this epoch is that while your DP limit slowly increases, this often is enough to redeploy a operators without any issues, with commerce this will not be the case, you have to make sure an operator that is retreated will be under your DP limit to be deployed later, which is often overlooked when dealing with this stage and as such will make revealing Norport Civilians a high priority throughout the stage clear to reach a sufficient DP limit.

Oddities
Section titled “Oddities”
Oddities
Section titled “Oddities”As usual, this increases the damage check required. While for the regular stage this often isn’t an issue, given the above average EM stat increase this could easily be an issue, specially with the Tyrant Captains and their already high base stats.

Yliš’s Ravings
Section titled “Yliš’s Ravings”
Yliš’s Ravings
Section titled “Yliš’s Ravings”This relic is often operator-depedent, but given the scenario in which the operator opening this stage gets affected it will require additional help to either clear spines or buy enough time for the operator to do its job, followed by rushed deployments after spines are cleared or improvised suboptimal placements.
Balor’sača’s Arrogance
Section titled “Balor’sača’s Arrogance”
Balor’sača’s Arrogance
Section titled “Balor’sača’s Arrogance”If the Tyrant Captains weren’t deadly enough, now they are. +20% ATK, HP, and DEF increase will often be enough to kill any blocker in EM while they also become a lot harder to kill. The other enemy that benefits from this is the Armed Spy, these aren’t often a problem but this will still make them require more damage to be defeated.
Recommendations
Section titled “Recommendations”The stage starts with 2 Sarkaz Swordsman, a relatively low pressure opening. To prepare for this stage it is better to identify which operators will be dealing with the enemy waves and clear the spines that allow their placement. It is important to look out for the Operative Leaders, one of these spawns early on while the other two spawn later on, these will steal 3 DP and with a hindered DP limit stage this could often be an issue if not dealt with them properly, a small trick here in case these can’t be dealt before they steal your DP is to bait their ammo with an FRD by retreating the operator baiting before they get hit, this way they waste their ammo but don’t steal your DP.
With the open mid lane (top box) variant, revealing the bottom enemies might need to be rushed, if timed correctly and/or with some CC it is ideal to kill the Armed Spies before they reach the main blocker placed in mid lane, this way the blocker doesn’t end up on a mark of epoch and can have an easier time tanking the Maze Returners.
The last biggest threat of this stage on EM is the 2 Tyrant Captains, they stand by for 30 seconds after spawning, if lacking damage this could be a good time to start damaging them, as blocking often isn’t the most reliable solution, given that they take 3 block count each.