Court Visit
Floor: 5
Type: Boss Stage
Spine of Epoch:
• Regular: 0
• Catastrophes: +2
Mechanics
Section titled “Mechanics”Theresis is a Sarkaz melee Leader enemy, can deal additional ranged attacks with his special attacks. Part of his mechanics are tied to Theresa, considered a device; she doesn’t move, has an SP bar (100 SP), and some of her and Theresis’ mechanics scale based on their distance away from each other, this is telegraphed by a link line to Theresis that changes color depending on their distance:
- 3.5 tiles: red link (intensity increases as they get closer)
- > 3.5 tiles: white link
Note: during phase 1 the color of the link changes matching the distance thresholds listed in the next section. For phase 2 however, the color changes at 1, 2, 3, and 4 tiles of distance; remains to be tested if the damage reduction and SP regen match this.
Special attacks
Section titled “Special attacks”Theresa
Given that Theresa is considered as a device, her stats don’t scale with difficulty, dealing the same damage on D0 as D18. It is important to take into consideration that even at D18 her damage can be threatening.
ATK: 1,000
- SP regen -1.
- Restores 3 SP for every Sarkaz enemy defeated.
- Shock of Will: at 100 SP deals Arts damage and summons 4 Sarkaz Wither Devourers.
- Damage starts at 50% ATK, increasing by 20% per explosion, up to 500% ATK.
First form
- Every 10s summon a Shadow of the Lord.
- When Theresis dies for the first time, enter second form.
Second form
- Gains SP regen based on her distance away from Theresis.
| Distance | SP recovery |
|---|---|
| > 3.5 | +1 |
| > 2.5 | +2 |
| > 1.5 | +3 |
| > 1.0 | +3.5 |
| 1.0 | +5.0 |
- When Theresis is defeated for the second time, deal 500% ATK as Arts damage to all allied units.
Theresis
ATK: 1,800
HP: 120,000
At D18 with Anasa’s Karma this would be:
ATK: 6,689
HP: 1,094,597
First form
- Twins: Theresis deals more damage and takes less damage based on how close he is to Theresa.
| Distance | Damage increase | Damage reduction |
|---|---|---|
| > 3.5 | 0% | 35% |
| > 2.5 | 50% | 50% |
| > 1.5 | 100% | 60% |
| > 1.0 | 150% | 75% |
| 1.0 | 200% | 90% |
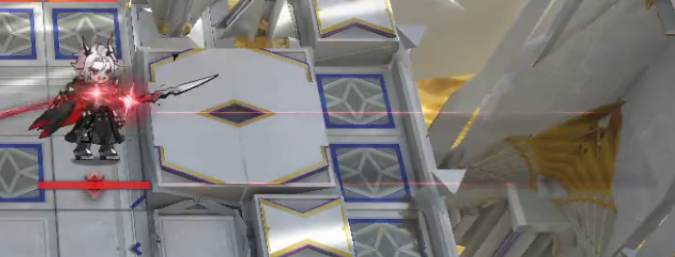
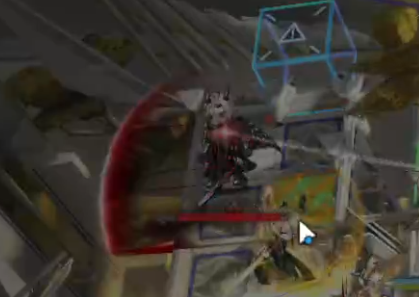
- Brandish: Theresis charges for 9s and releases a ranged attack that deals 150% ATK as Physical damage.
The direction of this attack can be telegraphed by where Theresis is facing and red lines forming a rectangle along the attack’s direction, rotating left > up > right > down.
- 10s cooldown (3s initial cooldown).
- Ignores camouflage.
- Shadows of the Lord will use Brandish as well with Theresis.
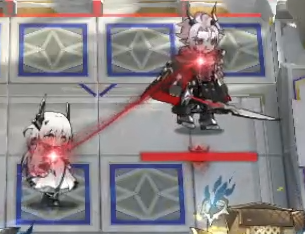
- Guardian: Theresis releases an energy sphere into Theresa. This sphere can be blocked by any operator or summon placed in between its pathing.
- 18s cooldown.
- If the sphere reaches Theresa it will restore 35 SP.
- If the sphere is blocked it will deal 100% ATK as Arts damage to the ally unit that blocked it.
Second form:
- Gemini: Same damage reduction from Twins with the addition of Theresa gaining increased SP recovery.
| Distance | Damage reduction | SP recovery |
|---|---|---|
| > 3.5 | 35% | +1 |
| > 2.5 | 50% | +2 |
| > 1.5 | 60% | +3 |
| > 1.0 | 75% | +3.5 |
| 1.0 | 90% | +5.0 |
- Reshape Will: After 500s (8 minutes and 20s), takes 99 LP.
Enemies
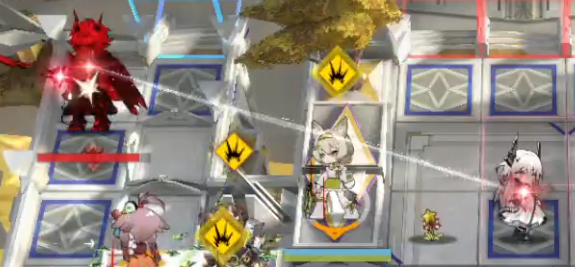
Section titled “Enemies”- Touch of Benevolence (slugs): have relatively low HP but a passive 90% Physical and Arts damage reduction and increase the block count of the allied unit they are blocked by.
- Sarkaz Heirbearer ASV: increases the ATK of the slugs by 10% and grants them an additional 10% of ATK as necrosis damage.
- Sarkaz Wither Devourer/Maw: swallow the first operator they are blocked by, instantly retreating them. When defeated the swallowed operator will be avaliable to deploy without any redeployment cooldown. These only spawn with Theresa’s explosions and when Theresis is defeated for the second time, making them a threat only on second phase.
- Deathveil Assassin: 40% Physical and Arts damage evasion, dashes once when being blocked after their HP goes below 50%. These only appear on the fractured version of the stage, replacing the Sarkaz Withers that spawn when Theresis is defeated for the second time.
Stage description and analysis
Section titled “Stage description and analysis”
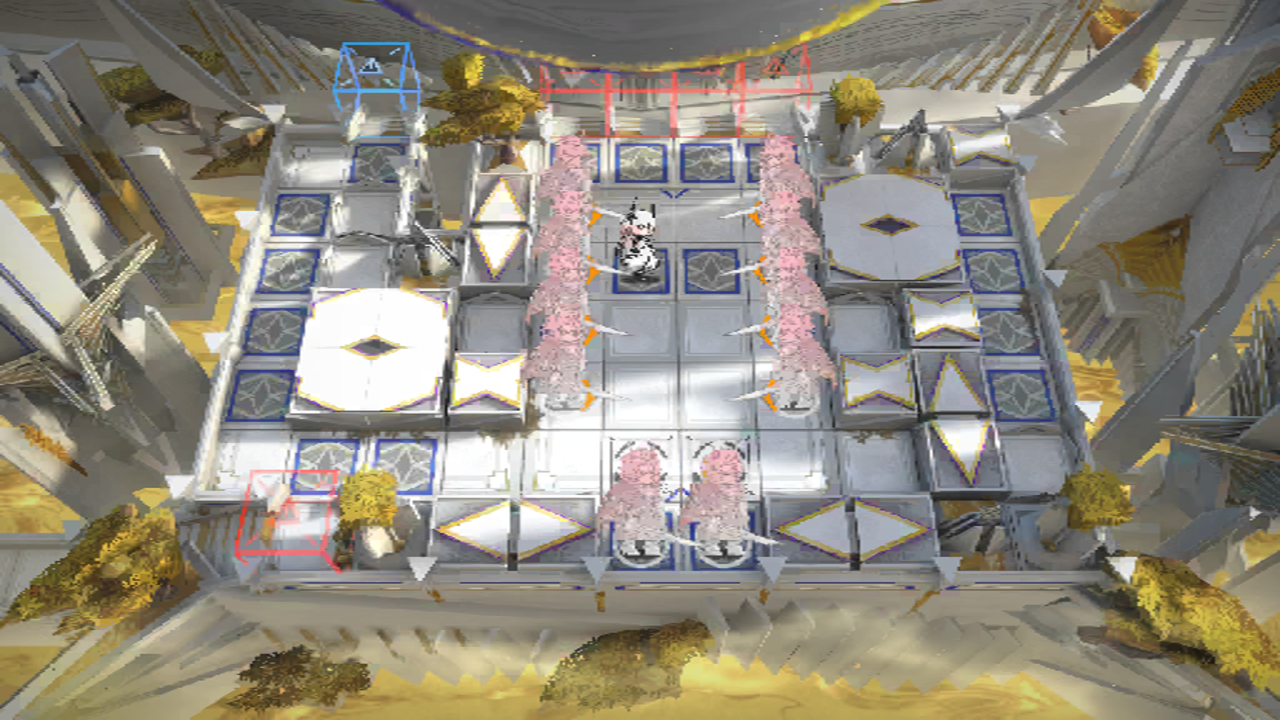
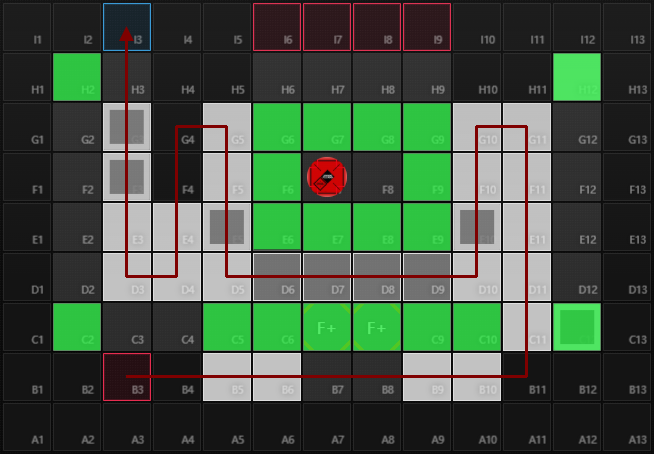
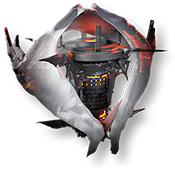
Theresis has 2 phases. First phase consists of Theresis simply walking along its path to the blue box while cycling his special attacks. After Theresis dies for the first time he teleports to the right of Theresa, enters a state of self-bind and enters second form where he won’t attack.
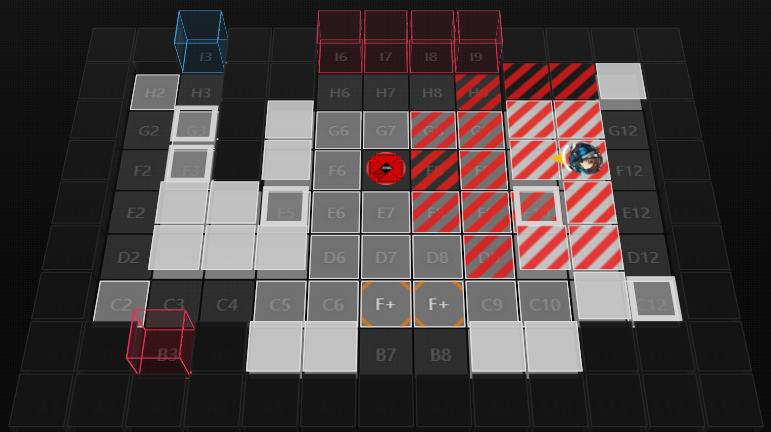
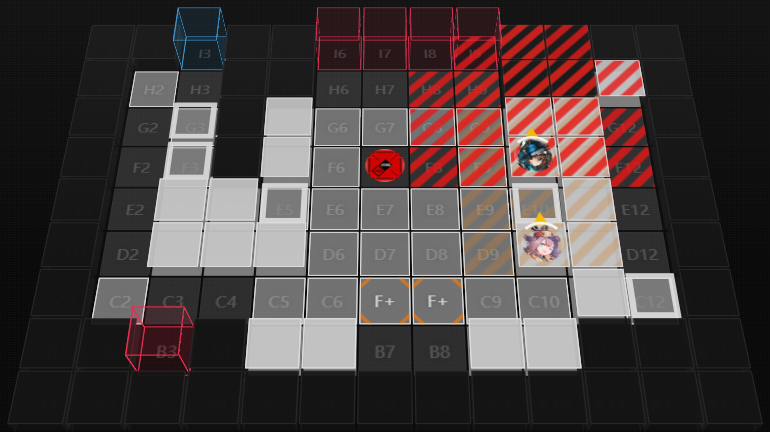
This stage starts with Theresa, Theresis, and multiple shadows of the Lord spawning in the center of the stage (G6-D6, G9-D9, B6-B7). Theresa will only spawn Shadows of the Lord on tiles G2-D2 and G12-D12, which means after the Shadows in the center are defeated they never respawn.
The stage can be divided into different sections:
- Theresis phase 1
- Touch of Benevolence (slugs) waves
- Theresis phase 2
Phase 1
Section titled “Phase 1”Theresis can remain on phase 1 indefinitely, while phase 2 and the slug waves have set durations. The slug waves start either 250s after the stage begins or when Theresis is defeated for the first time. This 250s timer can also be seen on the Shadows of the Lord that spawn initially in the center of the stage.
The enemies and waves to deal with in this stage are relatively simple, the complexity of solving this stage lies on dealing properly with each respective section, this often means dealing with Theresis phase 1 while simultaneously dealing with the slug waves. There are multiple strategies which involve stalling Theresis as tanking him directly is not always optimal, this way certain operators are allocated to stall Theresis while others deal with the slugs.
Dealing with Theresis phase 1 requires paying attention to Theresis’ position and the shadows that remain alive, as Theresis will be constantly cycling Brandish with the shadows mimicking, while Theresa slowly respawns shadows. The order of respawning shadows goes from G2 to D2, continues from G12 to D12 and repeats. While the shadows with Brandish can easily kill most operators, killing the shadows isn’t particularly hard and if taken care of properly this doesn’t pose much of a threat.
Guardian is the other important mechanic we constantly have to deal with, if the spheres aren’t blocked Theresa will reach 100 SP and spawn enemies that are just unecessary for us to deal with, as well as start ramping up her damage earlier than we need it to. Blocking the spheres is relatively simple, any allied unit placed in between the sphere trajectory and Theresa will block it, taking high Arts damage and often dying; for this cheap summons or FRD operators are often used. It is important to take into consideration that when operators are deployed they have around 1s of invulnerability, this makes it so they won’t actually block the sphere until this invulnerability window ends, making the reaction time very tight if Theresis is close to Theresa or we want to place the operator right next to Theresis. Most summons don’t have this issue. If Theresis ends up being tanked, the operator tanking him will often block the sphere on its own if they are positioned in between the sphere trajectory.
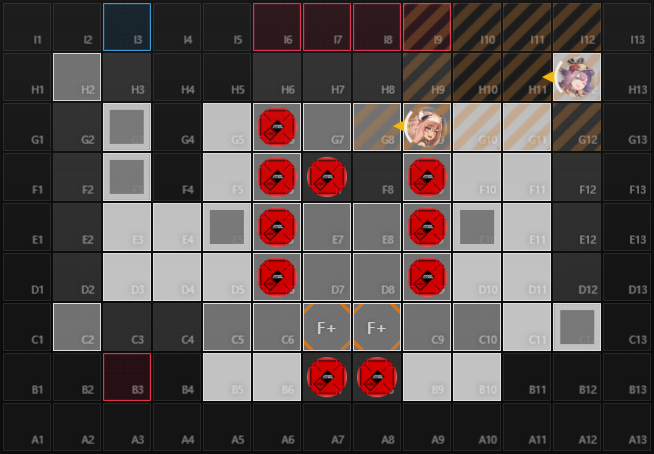
Without any MS debuffs, and without block shifting Theresis, the spheres can be blocked by placing an operator in the following tiles:
| Sphere | No MS reduction | Halo | ’Painful Happiness’ | Halo + ‘Painful Happiness’ |
|---|---|---|---|---|
| 1 | G7 | G7 | G7 | G7 |
| 2 | G7/G8 | G7/G8 | G7/G8 | G7 |
| 3 | E8 | G8 | F9 | G8 |
| 4 | E8 | E8 | F9 | |
| 5 | E8 |
For tiles past E8 it is visually easy to tell where to deploy an operator to block the ball.
One of the main threats of the slugs is that some have a dreadkaz mark, this is specially impactful on ground operators, or range operators if not placed in a safe tile.
General approach
Here it is ideal to delay phasing Theresis for as long as the slug waves keep spawning, as this makes next phase easier.
To achieve this, we need some way to stall Theresis without dealing too much damage to him, while simultaneously having an operator with good AOE dealing with the slugs effectively and another operator blocking the spheres.
Phase transition
Section titled “Phase transition”Depending on the way Theresis is being dealt with, this can allow for a slightly easier phase 2. If Theresis is being stalled this can give us enough time to prepare operators where we want to place them on the next phase to immediately activate their skills and speed up this phase before the threats start. This avoids having to micromanage DP generation, redeployment times, theresis explosions, deployment limit required by other operators to deal with Sarkaz Withers, and boats with Anasa’s Karma right as we just phased Theresis.
When Theresis is defeated for the first time he will transition to phase 2. During phase transition Theresa preserves her SP charge, however, if she just reached 100 SP and the animation to spawn the Sarkaz Withers and boats (with Anasa’s Karma) starts as Theresis phases she won’t spawn any enemies. This requires that her animation starts, this means that if Theresis phases before Theresa’s SP bar turns orange and starts to deplete she will spawn the enemies immediately as phase 2 starts. While this isn’t something one should aim to do, it is a useful trick that can help ease phase 2 start when Theresis is able to be phased on a precise timing and spheres weren’t able to be blocked, resulting in Theresa gaining SP.
Phase 2
Section titled “Phase 2”After Theresis’ is defeated for the first time, phase 2 will start. Theresis teleports to the right of Theresa while she gains SP regeneration, using Shock of Will at 100 SP. The main threat here is on the constant explosions and damage ramp up from Theresa. Here it is important to take into consideration the shift tiles we are provided with in the stage. Theresis has a weight of 5; operators usually have between 2-3 shift force, remembering the shift distance table:
| Final force | Non-projectile push distance | Projectile push distance | Pull distance |
|---|---|---|---|
| -3 or below | 0 | 0 | 0 |
| -2 | 0.08492 | 0.11825 | 0.03 |
| -1 | 0.37363 | 0.44030 | 0.35 |
| 0 | 1.56247 | 1.69580 | |
| 1 | 1.98705 | 2.13705 | |
| 2 | 2.77347 | 2.95013 | |
| 3 | 3.33058 | 3.52392 |
We can see here that a minimum force of 3 is needed to shift Theresis, this is to increase his distance away from Theresa and significantly reduce the rate in which she uses her skill, reducing both the explosions and Sarkaz Wither Devourer spawns frequency.
It is important to emphasize that the previous tables of damage reduction and SP regen increase in steps, this means that, given that Theresis starts phase 2 exactly at 1 tile away from Theresa, shifting him just slightly is enough to push him into the next threshold in which his damage reduction is of 75% and Theresa’s SP recovery is +3.5.
After Theresis is defeated for the second time Theresa will deal 5,000 Arts damage to all alied units and 4 Sarkaz Wither Maws will spawn, each with a dreadkaz mark.
General approach
There are multiple approaches for this part of the fight that depend on the operators drafted.
One option is to simply burst down Theresis as fast as possible, this is because of 2 reasons: first one being that shift operators are often expensive to draft and the second is that the damage dealt by Theresa will ramp up making the stage harder as Theresis remains alive.
If we are able to shift Theresis instead, this reduces the frequency of the explosions and Sarkaz Wither spawns, alleviating the pressure of constant Sarkaz Wither and boats spawns.
In general, it is recommended to have a way to deal with the constant spawns of Sarkaz Withers, this can be an operator that either kills them quickly or can stall them, like an ambusher.
If Theresis remains at 1 tile away from Theresa; that is at 90% damage reduction, it is highly recommended to have a source of true damage to deal with him.
Stage Variants
Section titled “Stage Variants”
Anasa’s Karma
Section titled “Anasa’s Karma”
Anasa’s Karma
Section titled “Anasa’s Karma”When going for ED4, Anasa’s Karma is required and this adds another layer of difficulty to this stage. So far we have talked about the mechanics and enemies which define how ED2 is played out but the significance of this relic might make this the most important section here. This relic affects the stage in the following ways:
- Padmasana of Rebirth (boats) are added into the stage.
- Leader and Elite enemies gain +50% HP, this affects:
- Theresis
- Sarkaz Withers
- Boats
- Sarkaz Heirbearer ASV
- Deathveil Assassins
- Portal/Window/Chests from inspirers
- The fight turns into a pseudo emergency version, that is, while it doesn’t count as an emergency fight that would stack relics like Minoan Ode or Friston.P, all enemies in the stage gain +25% ATK, HP, and DEF, as well as adding dreadkaz marks to 18 slugs, for a total of 26.
To put it into perspective, these changes make it so bruteforcing the stage is often not a viable option anymore or results being more complicated, the constant boat spawns deny most ranged tiles; obtaining this relic in addition restricts your economy throughout the run so the solutions (operators that solve the stage) for this ending will be limited given that simultaneous solutions for ED4 are required as well. Comparing the stats increase on D18, we go from Theresis having:
- ATK: 5,351
- HP: 583,785
- DEF: 2,000
to:
- ATK: 6,689
- HP: 1,094,597
- DEF: 2,500
This is almost double the HP which scales worse with negative epochs or cursed relics. In practice this makes it so either the squad or composition being played out has to have hope efficient strong counters to the stage or strong relics such as Golden Chalice or ‘Civilight Eterna’ (given we have a true damage dealer operator) to reduce the chances of losing the run.
The stage starts with 2 boats on C10 and C5 following the next trajectory:
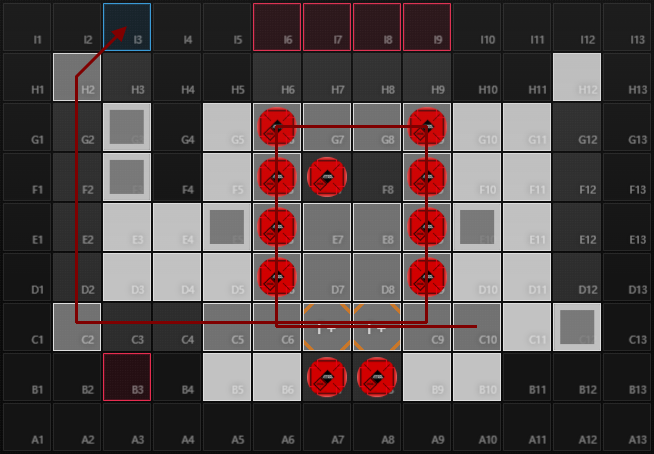
In addition to this, on every explosion from Theresa a boat will spawn from the bottom red box, following the next trajectory and leaving the deployable tiles marked on green safe:
When a boat reaches a tile in which an operator is deployed, the operator will be immediately retreated, its redeployment time will freeze and the operator will be loaded into the boat, reducing its movement speed by 50%. If the boat leaves the stage, the operator will not be able to be deployed until the next stage. If the boat is defeated, the operator redeployment time will unfreeze.
Each boat can load up to 3 operators but will forcefully retreat every operator on its path regardless.
If theresis isn’t shifted on phase 2, this makes it so a boat spawns on average every 20.4s, with their movement speed being 0.4 tiles/s, they would be spaced by 8.16 tiles. This means that if we place an operator on a ranged tile, they would only have 20 seconds to deal damage before having to be retreated, as well as having multiple tiles obstructed by these simultaneously.
Fractured
Section titled “Fractured”When fractured, Theresa will spawn 7 Deathveil Assassins instead of the 4 dreadkaz marked Sarkaz Wither Maws when Theresis is defeated. These are invisible and it is recommended to have an operator with invisibility reveal to deal with them more easily.
Notable Epochs and Debuffs
Section titled “Notable Epochs and Debuffs”
King of Sarkaz
Section titled “King of Sarkaz”
King of Sarkaz
Section titled “King of Sarkaz”This epoch will easily eliminate tanking Theresis as an option. In addition to the damage increase, being unable to retreat operators placed on marks of epoch can result in a heavy DP loss when blocking the spheres if Theresis is being stalled in the center of the stage as slugs with dreadkaz marks die.

Sufferings
Section titled “Sufferings”
Sufferings
Section titled “Sufferings”This stage opening is relatively slow compared to other stages, this gives enough time to set up your operators and heal any that would require so. While the danger of this epoch doesn’t show itself as it does for most other stages, here it means that the operator which could have survived tanking Theresis’ sphere now dies, resulting in a heavy DP loss, specially with ED5 egg or when fractured. For the second phase, depending on the strategy chosen, if operators must be constantly deployed as Theresa is constantly charging her skill at +5 SP/s, this will not allow your operators to survive and do their job if they aren’t healed in time.

Oddities
Section titled “Oddities”
Oddities
Section titled “Oddities”As usual, this epoch increases your relics damage check. For some strategies that rely on a crusher tanking Theresis, this allows them to stall for longer before it forcefully gets phased.

Congestion
Section titled “Congestion”
Congestion
Section titled “Congestion”It is not rare to reach this point without any additional deployment limit. There is a huge difference between 3/4/5 deploy Theresis. While it depends on the squad, 3 deploy limit will often allow little to no mistakes and require operators that can deal with multiple threats of the stage simultaneously or force you to constantly rotate redeploying operators. The difference between 3 and 4 deploy limit is very noticeable, 4 deploy limit will open up many other easier options to deal with Theresis, the slug waves, and constantly regenerate DP. 5 deploy limit is not much different from 6+ and will often only force you to be slightly more careful about how different threats are dealt with.
Gul’dul’s Silence
Section titled “Gul’dul’s Silence”
Gul’dul’s Silence
Section titled “Gul’dul’s Silence”At the point of reaching this stage it is reasonable to have enough damage to the point where 3,000 DEF is not as noticeable and less impactful, specially on Theresis given that Gul’dul’s Silence’s stacks are cleared relatively fast. However, this relic has a small threat: this effect also applies to the Shadows of the Lord, if the operator clearing up the shadows on the sides is not strong enough to deal with the increased DEF, they might be unable to clear them in the interval where Theresa spawns them soon before Brandish starts.

Balor’sača’s Arrogance
Section titled “Balor’sača’s Arrogance”
Balor’sača’s Arrogance
Section titled “Balor’sača’s Arrogance”The impact of this relic becomes more noticeable on the higher floors, F5/6/7. Luckily, it is usually manageable on this floor without having to obtain too many damage relics. The damage increase would be something to be considered if the approach for the stage involves tanking Theresis, specially with King of Sarkaz epoch.
Good operators
Section titled “Good operators”- Kal’tsit: S3 deals true damage, being able to deal with Theresis second phase without having to shift. In addition to this, Mon3tr summon can often tank Theresis on phase 1.
- Mon3tr: Deals true damage, can jump next to Theresis to avoid the boats and provides ASPD to nearby operators.
- Feater: E1 Feater has 2 force, with her S2 range and placement on the shift tile, this is enough to shift Theresis to push him into the next damage reduction and SP regen threshold. In addition to this, there are strategies in which E2 Feater can push Theresis far enough to reach 50% damage reduction.
- Rope: Similar to Feater, Rope E2 can pull Theresis with either skill from the shift tile.
- Deepcolor: Her summons allow her to block Theresis’ spheres.
- Gravel: Similar to deepcolor, her redeployment time allows her to cycle blocking Theresis’ spheres and block-shift.
- Greyy/Rosmontis: Good way to deal with the slug waves.
- Shu: While Shu isn’t often drafted due to the low hope economy, she is a known counter to Theresis 2nd phase with her teleport mechanic.
- Quartz: given how well crushers scale on IS5, E2 Quartz HP pool often allows her to tank Theresis phase 1 with a healer that can sustain its damage.
- Logos: S1 instantly executes the slugs, releaving most of their pressure. S3 is great damage and applies necrosis better than S1, helping bypassing Theresis’ damage reduction.
- Ethan: With enough ASPD, he can stall Theresis phase 1 and stall the Sarkaz Withers on phase 2.
- Croissant: E2 can shift Theresis
- Hoederer: Can often tank Theresis and/or deal with the slugs, as well as being able to perma stun the Sarkaz Withers on phase 2.
- Ulpianus: Great lane holder against the slugs, S1 can pull Theresis with Gravity defying machine.
- Ines/SA/Scene: This is mostly for the fractured version, as all three provide invisibility reveal.
- Ray: Her bind and high damage allows her to kill the boats.
Operator combos
Section titled “Operator combos”- Amiya (caster) + May: Amiya paired with May is a hope efficient solution to deal with phase 2. Amiya deals true damage while May slows down the boats to buy time for Amiya to charge and use her skill.
- May + Beanstalk: With enough ASPD May can perma slow Theresis while beanstalk summon cycles perfectly to block Theresis’ SP sphere, with any FRD blocker Theresis can then be block shifted to be perma stalled.
- May + Gravel: If positioned correctly Gravel can take the job of block shifting Theresis while blocking the spheres, removing the need for Beanstalk.
- Ela + Gravel: Ela S1 can slow down Theresis long enough to achieve the same effect as May, while also providing some damage and AOE slow for the Sarkaz Withers on phase 2. The slow from S3 doesn’t last enough for one full cycle but can be used if there are multiple operators that can block shift Theresis or other sources of slow.
- Mlynar + Gravel: Gravel’s hidden trait of attacking twice can be taken advantage of to deal True damage from its S3 secondary effect.
- Angelina + Rope: Angelina provides -2 weight which allows Rope to pull theresis all the way down, trivializing phase 2. Additionally, Rope can cancel brandish which lowers the HP requirement to tank him during phase 1.
Phase 1 strategies
Section titled “Phase 1 strategies”Ela + Gravel stall
Section titled “Ela + Gravel stall”Ela is a great operator that can adapt to different situations across different runs, taking advantage of her 3 skills.
- S1 applies the Slow debuff, reducing the targets movement speed by 80% for 10s which can be used to perma stall Theresis with the help of Gravel to block shift.
Placements
Section titled “Placements”Following this placement, Ela must be deployed only after Theresis does its last right side Brandish on the C column, without movement speed debuffs this is usually around C6, with movement speed debuffs this is around C2.
In this position Ela can clear the shadows in F12, E12 and D12, freeing up the high ground tiles on the left side, mainly E4, for a range operator to deal with the slug waves throughout phase 1, while also providing slow mines to permastall Theresis in tiles G2-H2.
Strategy
Section titled “Strategy”This strategy consists on letting Theresis walk to G2-H2, deploying a mine to slow him down, deploy gravel as soon as Guardian animation starts to block the sphere and block shift him back and repeat.
An easy visual queue on when to deploy Gravel is when Theresis closes its eyes.
While for the slow mine is when the Brandish attack from the shadows on the sides passes the tiles on the opposite side of the stage, this is for example, for a shadow in G12, when its Brandish just passes G2.
Precautions
Section titled “Precautions”Something to look out for is the cycle of Theresis attacks, from the start of the stage he does Brandish -> walk -> Guardian -> repeat. If Theresis is blocked, forcing an attack as the ball attack cooldown finishes he might skip it, breaking this cycle and delaying the next ball to happen in between the walk. This can be very problematic as Ela’s slow lasts just long enough to slow for the full walk duration, in the case where he throws the sphere in between the walk this will case the slow effect to end before finishing the walk and allowing him to reach the checkpoint tile, breaking the stall and resulting into leaking him. To deal with this issue, a second mine can simply be placed, however it is important to consider this might be an issue without SP regen, another option is to double or triple shift Theresis.
Video example
Section titled “Video example”May + Gravel stall
Section titled “May + Gravel stall”This strategy is mainly used with Soul Escort but can sometimes be applied to other squads, in which they would be more restricted by the longer FRD and VG agent redeployment times. The objective in this strategy is to stall Theresis for as long as possible to deal with him after the slug waves finish.
When the stage starts, Theresis’ attack pattern is:
- Brandish → walk → Guardian → walk → repeat
Brandish has a charging time of 9s with a cooldown of 10s (starting after charging time) and Guardian has a cooldown of 18s, this makes it so Guardian will always be forced to be in between 2 Brandish attacks. Guardian has its own casting time which makes it happen further into the cycle, eventually delaying it enough to be casted right before Brandish. This makes it so after 2 Guardian attacks, the skill will be delayed enough to be casted right before Brandish and give us the consistent attack pattern:
- Brandish → walk → Guardian → repeat
This attack pattern is what we want Theresis to follow and should be careful not to break it. Any auto attack from Theresis that we let him do on the blocker can break this cycle and will take some time to fix it, unnecessarily complicating the stall.
The walk time in here is Guardian cooldown minus the time Theresis stands still casting Brandish, this is exactly the 9s of charging time. Given Theresis’ MS of 0.175 tiles/s, this gives him enough time to move 1.575 tiles. However, if Theresis was slowed down by the standard 80% movement speed slow, this would result on , allowing him to walk only 0.45 tiles, less than half of a tile which is around how far he gets pushed when being block-shifted. This allows for a stall method with any source of slow and block-shifter with less than around 19s of redeployment time.
This is done by using May S1 to slow Theresis, and a gravel to block-shift Theresis.
May S1 is an offensive recovery skill that slows the target
- S1 lvl 7: 4 SP and 2s Slow
- S1M3: 3 SP and 2.5s Slow
Given a Slow duration , May would have to refresh it every seconds in order to permaslow a target. Applying Slow every seconds requires May to attack a number of times within seconds, that is having a final ATK Interval of . At E1 with s and , she would need a final ATK Interval of 0.4 in order to permaslow theresis, with her base ATK Interval 1s, given the final ATK Interval formula:
,
solving for additional ASPD:
,
given the rounding function, we get:
,
,
we only care about the minimum ASPD required, that is:
.
As ASPD is an integer value, then the following expression will always give us a value that makes this inequality true:
.
Considering that May gets 5 ASPD from her Talent at E1, this makes it so that 136 additional ASPD is needed to permaslow, while at E2 with her talent increasing to 8 ASPD, and Mod3 adding 3 ASPD, only 52 additional ASPD is needed.
- S1 lvl 7: 136 ASPD
- King’s Lance + Coin-Operated Toy with 145 ingots
- King’s Lance + Golden Chalice + Coin-Operated Toy with 45 ingots
- S1M3+Mod3: 52 ASPD
- King’s Lance + Coin-Operated Toy with 5 ingots
Placement
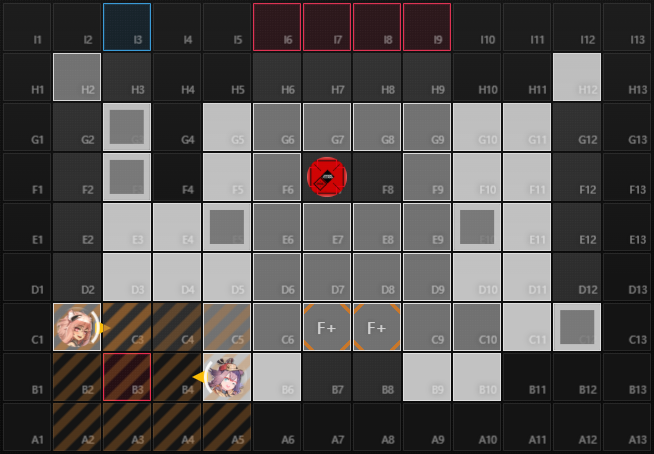
Section titled “Placement”The most optimal placement to do this is on the top right.
This placement allows Gravel to block the sphere as she shifts Theresis but requires the shadow in G9 to be cleared as the stage starts and to spend a few extra bodies to shift Theresis. As Theresis walks into G9, May will take some time to clear the shadow in G9 and to slow Theresis down (even if the shadow was already cleared), this makes it so Theresis has to be block-shifted twice to avoid letting him reach the checkpoint in G9 from which he won’t be able to be block-shifted back into G8.
Once setting up the stall, there are 2 things to worry about afterwards:
- Shadow in G12 respawning
- Slugs spawning on G9
Shadow respawns
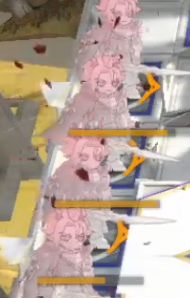
The shadow in G12 will constantly respawn around every 96s and will make it so May gets distracted from slowing down Theresis, here it is better to have an extra body ready to block-shift twice if May isn’t able to clear the shadow in time, or some extra help to clear the shadow. While clearing the slugs one might lose track of which was the last shadow that has spawned, an easy way to check this is by looking at the timer under the shadows, the most recent one would be the bar that is fully charged, in this case it’s the one in the middle.
Additionally, Theresa has an animation when spawning the shadows, paying attention to this we can tell exactly when the G12 shadow will respawn.
Before the slugs start spawning, the G12 shadow respawns a total of 3 times. The first spawn is at a safe timing, during Brandish, which usually gives May enough time to deal with it. The remaining 2 spawns are while Theresis is walking and will require either double block-shifting or some help to instantly clear the shadow. During the slug waves, the shadow respawns only once halfway through, this shadow spawns during Brandish animation, which is at a safe timing as well.
It is important to note that if Theresis isn’t slowed down even for a very small portion of the walk, it is very likely that the stall will break, giving May a very small window to kill the shadow, depending when the last slow was applied to Theresis. Because of this, it is better to be safe and help May clearing the shadow, as well as double block-shifting when needed.
Slug waves
The threat of slugs spawning on G9 could suggest that May gets distracted from slowing down Theresis or that when deploying Gravel, the slug gets blocked, leaving Theresis as the 2nd target getting blocked from which it can get shifted slightly upwards or downwards, possibly messing up the walk timing. These two possibilities aren’t actually as dangerous as they may appear.
First, for the threat in which Gravel could block the slug before Theresis, luckily this isn’t the case. When Theresis has to be block-shifted, regardless of the slug remaining standing still on the tile, Gravel will prioritize blocking Theresis first.
When the slugs spawn on G9 they stand still for a few seconds, May will continue attacking Theresis while they stand still, only after the slug starts moving May will attack it.
Theresis’ attack timings are fixed, as well as the slugs spawn timings. Given that Theresis attacks don’t get delayed by an attack animation right before Guardian or Brandish, this makes it so the slugs’ spawn timings are consistent with Theresis Guardian and Brandish timings. There are 6 slugs in total that spawn on G9. The most threatening one is the first one that starts moving before Theresis starts Guardian, May can easily get distracted here (heavily favoring E2 May over E1 for the extra slow time) and might require double block-shifting. The 2nd slug starts moving just a few frames before Guardian but shouldn’t generally cause any issues with May getting distracted as Theresis should remain slowed down for the remaining part of the walk. The remaining 4 slugs start moving during Guardian/Brandish animations.
If May has too much ASPD to slow down the slugs, she might stall the slugs long enough to remain distracted after Brandish animation finishes, double block-shifting should be enough to deal with this.
One additional problem out of these slugs is that May could kill them, spawning a Dreadkaz. While this is rare and mainly happens when May has too much damage, this is only an issue if the Dreadkaz spawns on G9 instead of F9 (the tile below). Either a block 2 operator would be required to double block-shift Theresis in case May gets distracted or to place Gravel on G7 to block the sphere and block Theresis during Brandish animation afterwards.
Video example
Bottom left
Section titled “Bottom left”After the slug waves are done, Theresis should be lowered down and operators should be prepared to deal with Phase 2. While this can be done in the top right position, this requires May to deal with the shadow in G12 which isn’t very optimal, for this reason it is better to let Theresis walk after lowering down his HP to continue the stall on the bottom left corner.
This placement allows Gravel to block the sphere while shifting at the same time and leaving Theresis’ Brandish to ban the C row and columns 2 and 3, which aren’t generally used for placements to prepare for Phase 2, appart from pullers with relatively fast skills to charge that can be deployed after phasing.
Phase 2 strategies
Section titled “Phase 2 strategies”Amiya - May
Section titled “Amiya - May”The most common and one of the cheapest solutions to deal with Theresis’ phase 2 with Anasa’s Karma is Amiya + May. Amiya’s S3 deals true damage, allowing her to DPS Theresis without requiring to shift him, while May buys time for her to charge her skill and deal damage by slowing down the boats.
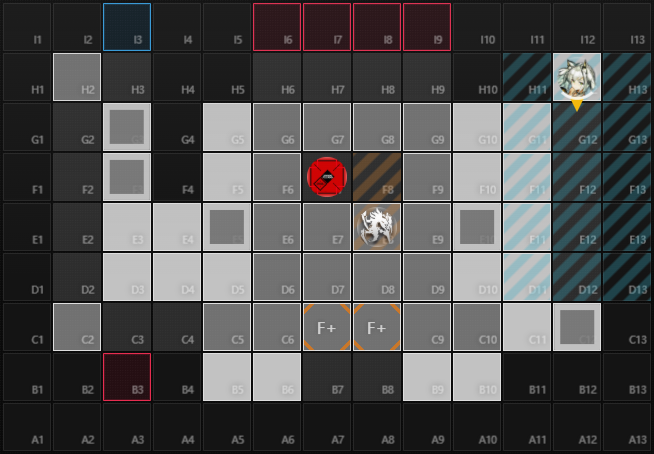
Placements
Section titled “Placements”Before the phase starts Amiya can be placed early to start charging her skill.
This placement optimizes damage with Scout’s Scope. If Theresa has any SP previous to starting the phase and Amiya’s skill isn’t fully charged it might be better to simply place Amiya on F10. With no MS reductions, the boat takes 27.5s to reach E11 (the tile under Amiyas placement in the diagram), while Amiya’s skill lasts 30s.
After boats start spawning she will be on a timer to charge her skill and deal damage, for this we deploy May to slow down the boats and buy more time for Amiya. Their placements go as follows:
The idea behind this placement is that Amiya’s range extension will make it so she gets distracted by enemies as they path down below Theresis. Placing Amiya facing up makes it so she can charge her skill on the Sarkaz Withers and her range extension allows her to attack Theresis, limiting her range so she can’t get distracted.
In most cases Amiya skill will give her enough HP to survive Theresa’s explosions, on the other hand, May will usually instantly die after a few cycles if she does not have a decent amount of HP, as these explosions can reach 5,000 Arts damage as the phase progresses, starting from 500 and increasing by 200 every explosion. Because of this, the placement should be carefully thought of in consideration of the boats position in the cycle and Theresa’s SP bar. Sarkaz Withers can be defeated to manipulate Theresa’s SP bar, by killing devouers to force an early explosion, or avoid killing them for a late explosion, as killing a sarkaz enemy restores 3 SP.
Lastly, as soon as Amiya is retreated, May should be retreated as well to save DP and so their redeployment times match and we don’t deploy May late on the next cycle.
Damage output analysis
Section titled “Damage output analysis”In order to analyze how much damage Amiya can output on phase 2, first we need to look at the cycle in which she can be deployed and deal damage. After phase 2 starts, Theresa starts charging an amount of SP based on how close Theresis is to her, most of the time we won’t be able to shift Theresis and so Theresa will regenerate 5 SP/s. In addition to her SP regen, she gains 3 SP for every Sarkaz enemy that dies, with the 4 devourers that spawn this makes it so on average she has 12 initial SP per cycle. After Theresa reaches 100 SP she deals Arts damage to everyone and spawns a boat. The explosion has an approximate SP lockout of 2.8s and the boat spawns around 4.7s after she reaches 100 SP. Considering the 12 initial SP from the devourers that would eventually die, each explosion cycle lasts around 20.4s.
Amiya will be deployed as previously demonstrated in the diagram right after the boat passes F10, by this time the next boat would be around tiles/s s tiles behind, this is on B11, and a 3rd boat would be spawning. May is then deployed on D10 after the first boat is out of range (D8), while the second boat would be exiting D11 and the 3rd boat would be around B5-B6.
This gives us until the next boat approaches Amiya, as we don’t want her to get kidnapped, to charge her skill and deal damage to Theresis. During this time May will be slowing down the boats, with enough ASPD she can slow the second boat enough for the third to catch up and so she will start switching targets between the two of them. We can simulate this but first we should define the following scenarios to compare the impact if ASPD relics vs damage relics.
At this point of the run, it is fair to assume that we have triple King’s relics, that is King’s Lance providing +50 ASPD and King’s Crown with 150% internal damage. We also have 30% external attack from the tree and likely a few more external attack buffs, given how common they are in comparison to other internal buffs. Here we can consider the following additional ASPD breakpoints:
- King’s Lance = 50 ASPD
- King’s Lance + 80 ingots Toy = ~100 ASPD
- King’s Lance + 150 ingots Toy and Chalice = 350 ASPD
- Max ASPD = 500 ASPD
Something reasonable to consider into this analysis is the effect of the relic Civilight Eterna, which increases True damage taken by enemies by 150%, resulting in a x2.5 final damage output multiplier. This simply ends up being a x2.5 multiplier to her final DPS output, which will depend on her base damage and ASPD, meaning that at low ASPD scenarios it won’t perform as well as one might expect.
Next we compare the total damage per cycle, a cycle being, given a certain ASPD on May to slow down the boat, the time Amiya gets to deal damage, either by charging her skill and being forcefully retreated by it or manually retreating her before a boat kidnaps her, in addition to her redeployment time. In practice her redeployment time might not match the time she isn’t deployed but this doesn’t reflect much difference in this analysis.
Simulating the previous scenario (with E1 May) shows that the impact of ASPD relics is much higher than just increasing her damage per hit. At the bottom we have 50 ASPD, the scenario without Toy or Chalice. Just obtaining Toy with 80 ingots increases her damage by a factor of x4.7 and in most scenarios we would have more than just 80 ingots, however, if we look at the damage with an additional 200% external damage this a x2.5 increase. This difference appears mainly because she only gets around 5s of skill uptime before she has to be retreated, compared to 17.5s at 100 ASPD, in which case it would be significantly better to load an operator into the boat instead of relying on May to slow it down. With Chalice we can see an even bigger increase of damage that no realistic run would get enough external damage to match it.
Note: this analysis takes into consideration Soul Escort squad redeployment time reduction but the analysis result remains the same.
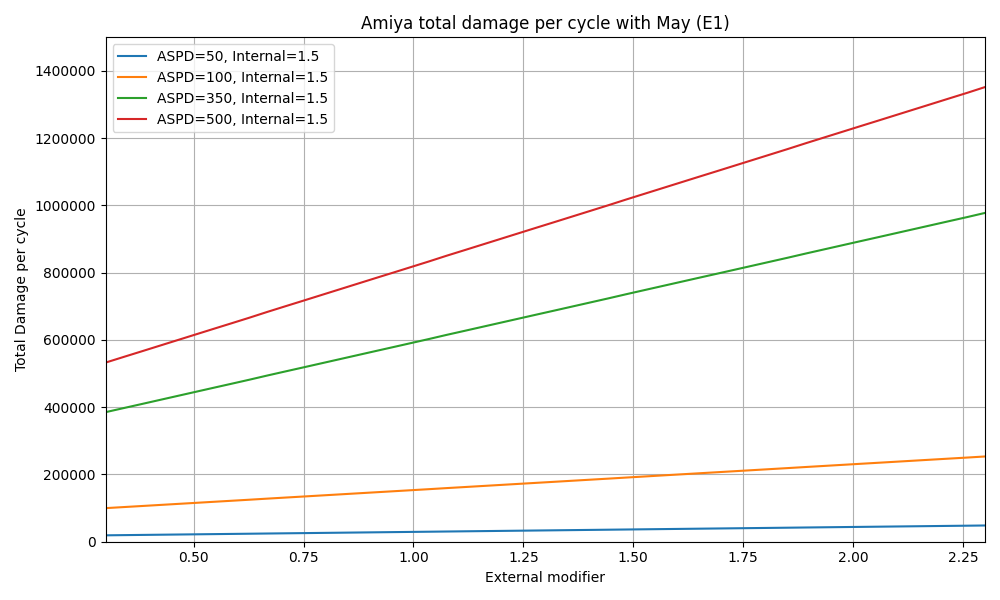
To put into perspective the impact of these buffs, we can also measure the damage dealt as a percentage of Theresis’ HP as shown in the next table (Theresis’ HP being 1,094,597). Here we assume the the same internal ATK values from before and we compare the two scenarios with and without Rise and Fall.
| ASPD | Damage per cycle | Theresis HP % | Damage per cycle | Theresis HP % | |
|---|---|---|---|---|---|
| +30% external ATK (baseline) | +60% external ATK (Rise and Fall) | ||||
| 50 | 19,028 | 1.74% | 23,404 | 2.14% | |
| 100 | 99,897 | 9.13% | 122,871 | 11.23% | |
| 350 | 385,317 | 35.20% | 473,931 | 43.30% | |
| 500 | 532,784 | 48.67% | 655,310 | 59.87% | |
It is important to note that this analysis is done considering E1 May and that she is the only source of slow for the boats. E2 May will have an easier time slowing down the boats and providing Amiya more time to charge her skill which is the biggest problem on low ASPD scenarios. Even in this case the ASPD impact is still very noticeable.
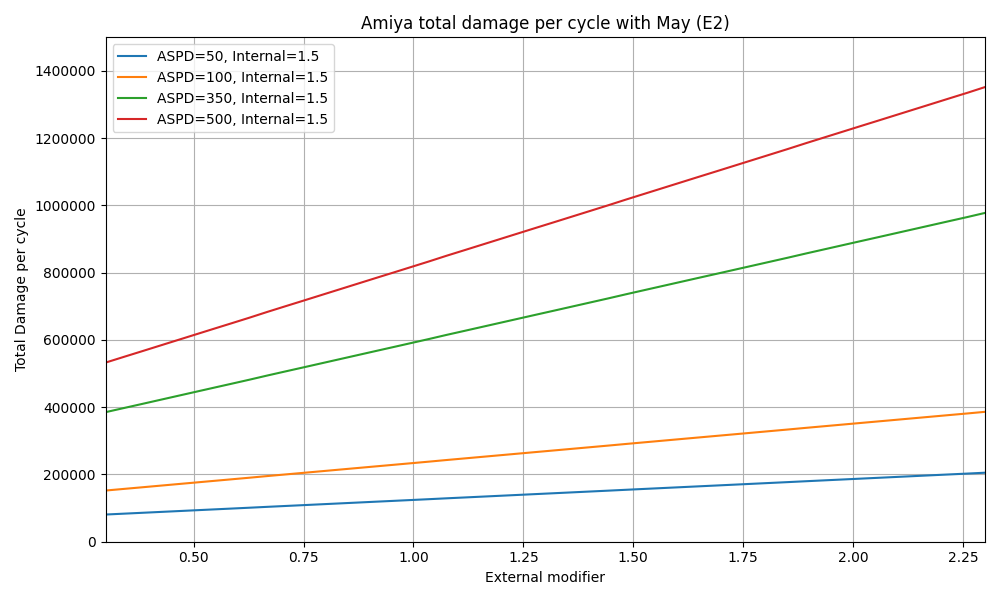
| ASPD | Damage per cycle | Theresis HP % | Damage per cycle | Theresis HP % | |
|---|---|---|---|---|---|
| +30% external ATK (baseline) | +60% external ATK (Rise and Fall) | ||||
| 50 | 80,869 | 7.39% | 99,467 | 9.09% | |
| 100 | 152,224 | 13.91% | 187,232 | 17.11% | |
| 350 | 385,317 | 35.20% | 473,931 | 43.30% | |
| 500 | 532,784 | 48.67% | 655,310 | 59.87% | |
Considering the scenario where we only have King’s Lance, it takes roughly ~28s to get enough SP to charge Amiya’s skill. This creates a cycle of s, as her skill duration is of 30s and her redeployment time is 70s. First cycle only lasts 30s as we can usually prepare Amiya’s skill while we stall Theresis on the previous phase, with this we can fit 4 cycles before the 500s pass by, s. This gives plenty of time for boats to pass by. While it is very optimistic to get a full skill duration before a boat reaches Amiya on a low ASPD scenario, we can still achieve a close estimate if we have additional operators to load into the boats to buy more time for her. Next let’s consider a minimal relics scenario to see how this would be in practice.
Amiya has 762 base ATK, let’s assume the following buffs:
- +30% external ATK from the tree
- +30% external ATK from Rise and Fall
- +150% internal ATK from King’s Crown
- +230% internal ATK from her skill
After applying these buffs we get 5,852 ATK. Amiya has an ATK Interval of 1.6s, with 50 ASPD from King’s Lance this would be 1.0667s. For a 30s skill duration, this results in 164,592 total damage, over 4 cycles this would be 60% of Theresis HP. A combination of ASPD or external ATK buffs would be ideal to allow Amiya to deal with the entire stage when Toy or Chalice were not obtained and no other operators were drafted to help dealing damage. It is important to consider that the stage will grow harder the longer Theresis remains alive and this still requires Amiya to be able to use her skill for its full duration. Additionally, Theresa’s damage will continuously ramp up, meaning there is a point in which May won’t be able to survive an explosion, this is something worth considering when planning how to approach the stage.
Optimization
Section titled “Optimization”Previously we saw that Sarkaz enemies defeated restore 3 SP on Theresa, while this is taken into consideration with the 4 Sarkaz Wither spawns per explosion for the average boat spawns cycle calculated earlier, this also means that each cycle and boat spacing can vary depending on how many Sarkaz Withers are defeated in between each cycle. This can be abused to maximize the spacing between 2 boats to increase the uptime of an operator to be deployed on a range tile; however, this needs to be performed in advance. The next scenario will help visualize how to manipulate Theresa’s explosion cycles.
We want to deploy Amiya on F10 as soon as a boat exits this tile to start charging her skill and maximize her deployment duration. Let the first boat that spawns after Amiya reaches redeployment time be . We will wait until boat passes F10 to deploy Amiya, this will take seconds. After spawns, we want to maximize the time until the next boat spawns so that Amiya has the maximum amount of time to charge and finish her skill, and we do this by delaying defeating Sarkaz Withers after spawns. has to travel 15 tiles to reach F10 and 15.5 tiles to exit this tile which allows Amiya to be deplyed, without any movement speed reductions this takes s, any boat spawning after Amiya has 38.75s redeployment time left will pass through the tile when Amiya is ready to be deployed; then the boat spawning after , is the boat we want to delay from spawning. Knowing this timing we are now able to plan how we should play to maximize their distance away from each other. Depending on the way we are dealing with the Sarkaz Withers, we can try to speed up defeating as many as possible, specially those who have low HP, to force an explosion after the 38.75s mark as we will deploy Amiya after this boat passes F10, right as this boat spawns we should slow, stall, or delay killing them for as long as possible. With the relic ‘Painful Happiness’, which reduces MS by 15%, the boats’ MS would be 0.34 tiles/s, giving us the timer 45.59s instead. An alternative option to maximize the spacing between these 2 boats is to load an opeartor on the second boat, the boat’s movement speed is reduced by 50%, delaying the boat long enough that the 3rd boat spawn would reach F10 faster than the second boat, in which case we would want to delay the 2 boats spawns after .
Kal’tsit
Section titled “Kal’tsit”Kal’tsit is an operator that stands out on phase 2 due to its true damage from her summon.
Placements
Section titled “Placements”Before the phase starts Kal’tsit, if possible, Kal’tsit and her summon should be deployed early to start charging her skill.

This placement maximizes her deployment initial uptime, allowing her to remain on the field before the first boat reaches her.
Assuming Theresis wasn’t shifted, that is Theresa’s SP regen is 5 SP/s, the first boat would take ~24.7s to spawn (considering its spawn delay from Theresa’s explosion). For the time the boat takes to reach her (28.5 tiles to travel) we can consider 4 scenarios:
- No MS debuffs
- ‘Painful Happiness’
- Boat with an operator loaded
- ‘Painful Happiness’ + Boat with an operator loaded
In the first scenario the boat would take tiles tiles/s s to reach Kal’tsit. On the second scenario, the boat’s MS would be tiles/s, so the boat takes 83.82s to reach Kal’tsit. On the third scenario where an operator is loaded into the boat, it would be sufficiently slowed so that the second boat that spawns reaches Kal’tsit first, this would be the time of the first scenario in addition to the 24.7s it takes the next boat to spawn, resulting in 95.95s. Last scenario would follow the same logic as the previous one, taking the time the boat takes ‘Painful Happiness’ instead. Then in these three scenarios, Kal’tsit would remain deployed for:
- No MS debuffs: 95.95s
- ‘Painful Happiness’: 108.52s
- Boat with an operator loaded: 120.65s
- ‘Painful Happiness’ + Boat with an operator loaded: 133.22s
Damage output analysis
Section titled “Damage output analysis”The best and worst phase 2 start possible scenarios are:
- Kal’tsit skill ready on phase 2 start
- Mon3tr summon retreated as Theresis dies
Kal’tsit’s skill has a 35s cycle and her summon redeployment time is 25s. This results in Kal’tsit being able to use her skill the following number of times:
- Kal’tsit skill ready on phase 2 start
- No MS debuffs: 3 Skills
- ‘Painful Happiness’: 3 skills
- Boat with an operator loaded: 3.75 skills (Kal will have to be undeployed 5s before her 4th skill completes)
- ‘Painful Happiness’ + Boat with an operator loaded: 4 skills
- Mon3tr summon retreated as Theresis dies
- No MS debuffs: 2 skills
- ‘Painful Happiness’: 2 skills
- Boat with an operator loaded: 2.5 skills
- ‘Painful Happiness’ + Boat with an operator loaded: 3 skills
Next, it is important to notice that some relics affect specifically operators only while others specify “all allied units”, which include summons. King’s relics, Rise and Fall, the skill tree buffs, Coin-Operator Toy, Chalice, and Chivalric Commandments are examples of buffs that affect all allied units.
Considering the scenario with triple King’s relics, we can calculate the damage output within this time. Mon3tr summon has 1402 base ATK, ISW- mod gives +50% internal ATK and S3M3 gives +260% internal ATK that decays by 13% ATK per second for the 20s skill duration, resulting on an average of +136.5% ATK. This results in:
- Internal ATK: 1 + 0.5 + 1.5 + 1.365 = 4.365
- External ATK: 1 + 0.3 + 0.3 = 1.6
Applying these buffs on Mon3tr summon we get a final ATK of . The total damage output per skill would be:
| ASPD | Total damage | Theresis HP % | Total damage | Theresis HP % | |
|---|---|---|---|---|---|
| +30% external ATK (baseline) | +60% external ATK (Rise and Fall) | ||||
| 50 | 119,334.74 | 10.90% | 146,873.52 | 13.42% | |
| 100 | 159,112.98 | 14.54% | 195,831.36 | 17.89% | |
| 350 | 367,183.8 | 33.55% | 451,918.5231 | 41.29% | |
| 500 | 477,338.94 | 43.61% | 587,494.08 | 53.67% | |
As we can see here, in a non-highroll scenario Kal’tsit would require multiple skill activations to defeat Theresis all by herself. After she has to be retreated she can be placed on H12, the only safe range tile.
Here Kal’tsit would get 2 skills per Mon3tr summon deployment, as it loses 50% of its max HP when no enemies die during the skill, and we will continuously need to be redeployed. At this point Theresa’s damage will continuously keep ramping up, meaning that if Kal’tsit’s max HP isn’t high enough she will immediately die to it at some point. After this point the overall DPS will heavily decrease.
If there is not enough damage to finish the phase quick enough or HP to avoid this last scenario, it is better to have a second source of damage to help deal with this phase.
Optimization
Section titled “Optimization”If we have intitial SP relics there is a trick we can take advantage of. Kal’tsit is unable to charge her skill if her summon isn’t deployed, this forces her to lose any initial SP when she is deployed, however, if her summon is deployed on the same frame as her she will retain her initial SP. This can easily be achieved by pause deploying her, followed by pause deploying her summon without losing frames when unpausing.
Mlynar - Gravel - Ethan
Section titled “Mlynar - Gravel - Ethan”Mlynar’s S3 on top of dealing a decent amount of AOE damage, has a special effect in which Kazimierz operators deal 12% of Mlynar’s ATK as True damage to enemies within Mlynar’s range, this synergizes particularly well with Gravel. Gravel has a hidden trait that makes her split her damage into 2 instances of damage, each of these applying the 12% ATK as True damage from Mlynar, making her a decent True damage dealer option to deal with Theresis.
Placements
Section titled “Placements”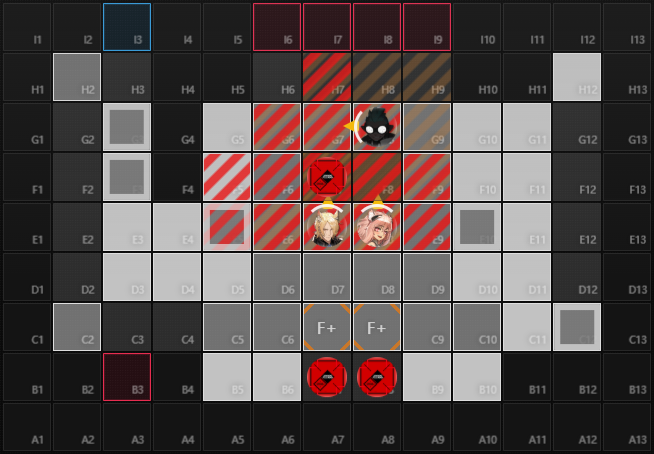
Ethan’s job here is to bind the devourers so that Mlynar defeats them with his AOE damage, with enough ASPD Ethan can usually bind the devourers in columns 6, 7, 8, and 9 long enough for Mlynar to do his job. Usually being better to cycle his skill when Mlynar’s skill is down.
Damage output analysis
Section titled “Damage output analysis”Assuming triple King’s relics, 150 ingots with Coin-Operated Toy and Golden Chalice, no Rise and Fall, this results in:
- External ATK: +30%
- Internal ATK: +150%
- ASPD: 350
Pot 1 E2 Lvl 90 Mlynar has 385 base ATK, his talent provides 110% ATK scale, S3 adds 180% ATK scale and doubles its trait to +400% Internal ATK. Assuming no devourers are defeated yet, his ATK can be calculated to be:
With ATK scale buffs increasing his own damage applied before penetrating DEF. From his final ATK, Gravel would make Mlynar deal an additional 390 True damage per instance of damage. Gravel has a base ATK Interval of 0.93s, after ASPD is applied this results in a final ATK Interval of 0.2, or 0.1 if we considering each instance of damage as a separate attack. This results in 3900 True damage DPS, or 109,200 True damage dealt over the duration of the skill. This is roughly 10% of Theresis HP with Anasa’s Karma.
Adding up Mlynar’s own damage, applying ATK scale and DEF his damage results in roughly 3941 damage per attack, which is further reduced to 354 after damage reduction is applied. After ASPD, his total damage per skill results in 37,170, adding up to the True damage calculation, in total he deals around 13.4% of Theresis HP per cycle.
Feater push
Section titled “Feater push”This strategy is based on this video.
This approach focuses only on solving phase 2, which is done by pushing Theresis away from Theresa to reduce her SP regeneration and Theresis’ damage reduction. This strategy consists of utilizing Feater’s module to increase her shift force to push Theresis more easily.
Theresis has a weight of 5. Feater S3M3 has a shift force of 3, her Mod1 provides +1 shift force when blocking 2 or more enemies. In this stage we also have two Specialist Tactical Point tiles, the tiles in which operators gain +1 shift force located on C7 and C8.

We can also remember the distance enemies are pushed based on push force from the following table:
| Final force | Push distance (non-projectile push) | Push distance (projectile push) |
|---|---|---|
| -3 or below | 0 | 0 |
| -2 | 0.08492 | 0.11825 |
| -1 | 0.37363 | 0.44030 |
| 0 | 1.56247 | 1.69580 |
| 1 | 1.98705 | 2.13705 |
| 2 | 2.77347 | 2.95013 |
| 3 | 3.33058 | 3.52392 |
Feater push is a non-projectile push so we don’t care about the last column here.
This strategy is conformed by different types of push. The next two sections will explain the logic behind them while the last section contains a concise step guide to perform the strategy. These two sections are not required to fully understand to perform the strategy, they simply provide an explanation of the general idea behind it.
Right side long push
Section titled “Right side long push”In the first part of this strategy Theresis is pushed slightly to the right so he can be targetted from both columns 8 and 9 later on, as well as to increase his distance away from Theresa. For this, the distance to be pushed has to be less than 1 tile, looking at the table -1 final force would be ideal. This is achieved by Feater having force 4, utilizing the module, which requires her to block 2 enemies before being pushed. On phase 2 we only have devourers spawning and we must stack 2 of them so that Feater blocks 2 before being swallowed by one of them. To achieve this we can slow down one of them in order to synchronize their pathing.
The 2 devourers that walk through tile F6, from which Feater will push Theresis, spawn from I6 and I7 red boxes and stand by on H6 and H7 respectively for 10s. After the 10s stand by time, I6 devourer travels a distance of 1.5 tiles before reaching Feater, while I7 devourer travels from H7 -> G7 -> G6 -> G6-F6 middle point, this is 2.5 tiles. To simplify this, both of their paths intercept on G6 center, so we need I6 devourer to reach G6 center, that is 1 tile, in the same time devourer I7 reaches G6 center, that is 2 tiles. To achieve this we must slow down the devourer on the left (I6).
Next we will find when we need to slow it down and for how long. We will refer to both devourers as: for the devourer on the right (I7 spawn) and for the devourer on the left (I6 spawn), then their respective distances in which they intercept each other are and . Lastly, the time they would take to travel will depend on their movement speed as follows:
,
,
where is the movement speed of the devourer slowed down and the distance traveled by the devourer slowed down. We want the devourers to reach G6 center at the same time, that is .
.
Here we are looking for an expression for the slow duration (we will call ) for the left devourer that satisfies this equality. For this we require leaving the expression in terms of variables we know. If we look back at the pathing the left devourer takes, it covers 1 tile of distance in which part of it should be covered at its normal while the other is at its slowed , that is:
.
We know that will have a movement speed , then the time it takes to cover this distance would be . Substituting on the previous equation we get
Having the expressions and , we can leave the previous equality in terms of .
This leaves us with this simple expression depending on the devourer base movement speed, the slowed down movement speed and the distance the right devourer has to travel.
We know that and devourers MS is 0.6 tiles/2s or 0.3 tiles/s, for simplicity we will work with tiles/s. The slowed movement speed under the standard -80% movement speed reduction effect would be 0.06 tiles/s. With effects like ‘Painful Happiness’ or Halo, considering the minimum MS value is 0.05, we obtain the following values:
- Slow + ‘Painful Happiness’ = 0.051
- Slow + Halo = 0.05
The times we obtain from here are:
- 80% Slow: 4.166s
- Slow + ‘Painful Happiness’ = 4.902s
- Slow + Halo = 6.25s
Now we need to figure out how we would slow the devourer. An easy option is with Ela mines, either S1 or S3 can work. S1 has a duration of 10s while S3 lasts 7s, both taking around 0.4s to explode after deployment. This means that we would need to deploy them (applying only the -80% MS slow) seconds before the devourer starts moving for S1 and seconds for S3. Given that the devourer stands by for 10s after reaching H6, then the mine would be deployed after the time specified in the next table, measured from the moment the devourer stops moving.
| MS reductions | Ela S1 | Ela S3 |
|---|---|---|
| No MS reductions | 3.766s | 6.766s |
| ’Painful Happiness’ | 4.5s | 7.5s |
| Halo | 5.85s | 8.85s |
For example, with no MS reductions and Ela S1 we get 3.766s, as soon as the devourer stops on H6 we pause, note down an operator redeployment time (e.g. 35.5s), then we would deploy the mine when the timer marks s.
Upwards long push
Section titled “Upwards long push”At this point Theresis should be in between tiles F8 and F9. The next step is to push him upwards, previously Feater had 4 Force with her skill and module, by placing her on C8 she would have 5 Force, this gives us a push distance of 1.56247 tiles, repeating this push twice would leave Theresis in between tiles I8 and I9, where any operator with enough range can be placed on H12, the only safe tile from the boats.
In order to push Theresis this far we need to use her module, which requires devourer stacking again. Here it is a lot easier and there are more options to stack them. An option is to simply block shift one of the devourers multiple times until the other one catches up, we can also slow one down and if the second one passes it we can also block shift it or slow both down again.
Final strategy
Section titled “Final strategy”So far we have seen how we can push Theresis. In practice we need Feater to be redeployed multiple times but this isn’t an issue as we can take advantage of the devourer’s effect in which after swallowing an operator and dying the operator returns immediately without waiting for its redeploy time. With this we would do the following:
- (F6) Feater push
- (F6) Feater long push
- Let devourer swallow
- (C8) Feater long push
- Let devourer swallow
- (C8) Feater long push
- Retreat
This would require to kill the devourer immediately after it swallows Feater. The strategy then consists of doing one small push as phase 2 starts to immediately reduce the SP regen from Theresa, then wait for the devourers to spawn and continue with the long pushes.
This leaves Theresis at a distance of tiles to the right and tiles upwards away from Theresa, that is tiles away from Theresa, leaving him at 50% damage reduction and 2 SP/s regen on Theresa.