Bad Neighbors
Floor: 1
Type: Combat
Spine of Epoch:
• Regular: 1
• Emergency: 1
• Catastrophes: +1
A saxaphonist appears at the beginning of the stage. The saxaphonist can fire projectiles in all 4 directions periodically. After a certain delay, the saxaphonist goes through the tunnel and reappear at the far right.
A spine is availabe on this stage. Aim to destroy the spine before the stage ends to obtain one plan.
The trash mobs on this stage are composed of dogs and sarkaz infantry units. Their low stats make it such that most starting squads can easily lanehold without too much issue.
One trick for this map is that there is a hole next to the tunnel. The saxaphonists (including the starting one), the Sarkaz crossbowman and Gopnik path slightly up towards the hole before entering the tunnel.
NM and EM differences
EM replaces Sarkaz Crossbowman with one Remnant Saxophonist
Notable Enemies
Section titled “Notable Enemies”- Remnant Saxophonist: fires projectiles which can be deadly to some ranged operators.
Stage Variants / Permutations:
Section titled “Stage Variants / Permutations:”No known permutations or variants of this stage.
Notable Epochs and Debuffs
Section titled “Notable Epochs and Debuffs”
Catastrophes
Section titled “Catastrophes”
Catastrophes
Section titled “Catastrophes”Two spines appear on this stage with Catastrophes. Make sure your laneholding ranged units do not get distracted by the spines and cause leaks.
It is challenging to stall enemies to greed both spines for this map since the majority of the enemies are squishy. Consider focusing on getting at least one spine.

King of Sarkaz
Section titled “King of Sarkaz”
King of Sarkaz
Section titled “King of Sarkaz”Sarkaz crossbowman are considered Sarkaz enemies. Watch out for their increased damage output on your operators. Deploying operators within the Mark of Ages of the spine would cause then to be unable to be retreated, which can be detrimental to squads with fast-redeploys as main damage dealers to the spine.

Sufferings
Section titled “Sufferings”
Sufferings
Section titled “Sufferings”If the squad does not have a healer, watch out for the Sarkaz crossbowman or the Saxophonist killing your ranged units.

Commerce
Section titled “Commerce”
Commerce
Section titled “Commerce”Not possible to get Commerce on F1.

Oddities
Section titled “Oddities”
Oddities
Section titled “Oddities”Most of the enemies are weak and squishy. Some more damage on the crossbowman or saxaphonists may be required.
Recommendations
Section titled “Recommendations”With the correct timing, it is possible to block-shift the enemy upwards so they fall into the hole, removing a large threat of the stage.
The timing for block shifting the enemies is as follows:
- First saxaphonist: no specific timing. The enemy is already displaced upwards. Drop a unit on it and squeeze the enemy.
- Subsequent Sarkaz crossbowman/saxaphonist: The enemy will briefly pause (1s) next to the hole before entering the tunnel. Deploy a unit on the enemy when they pause at the checkpoint.
- Gopnik: Hover a unit over the tile below the hole. Deploy the unit the moment the model of the unit is overlapped over Gopnik.
Example video link:
Stage Strategies
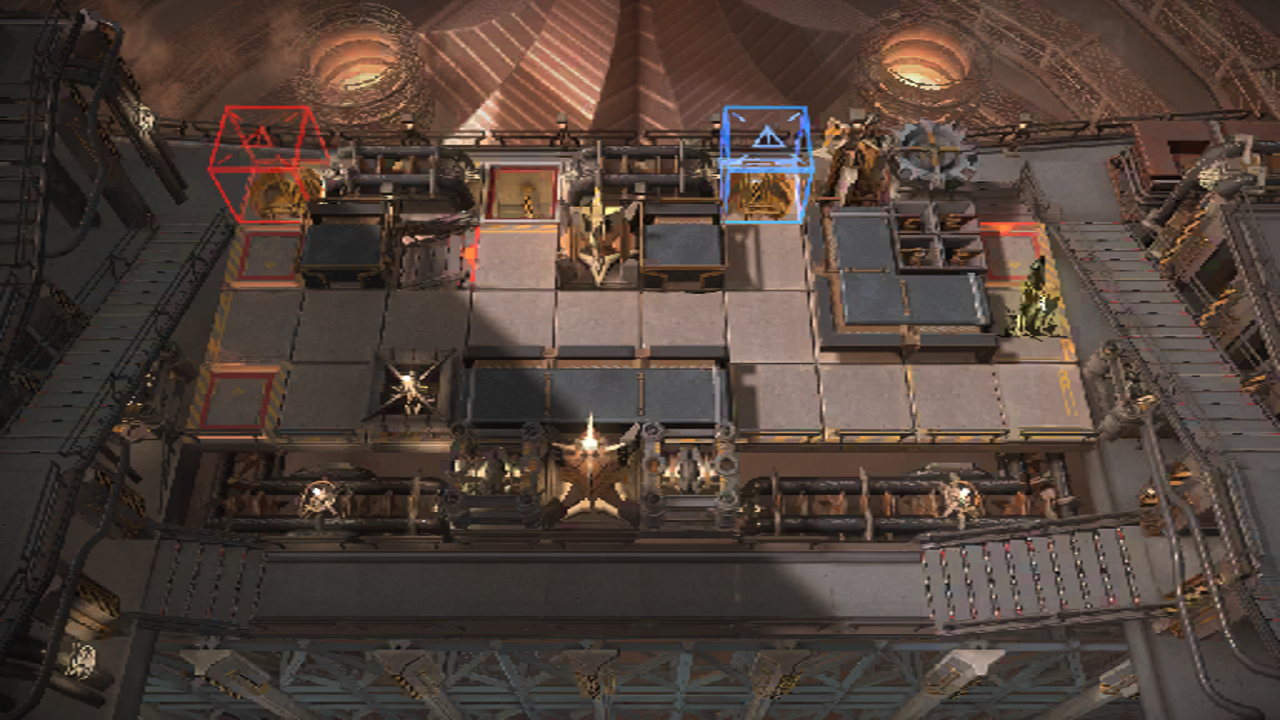
Section titled “Stage Strategies”Standard Method
Deploy Silverash two tiles below the blue box facing right. A common mistake is to point Silverash facing down, which is unable to take Duck Lord or Fatty. Activate S3 immediately so it cycles back in time for hidden enemies, no need to wait for the Sax, Silverash’s autos can finish it off.
If there are no hidden animals and you want to go AFK, deploy Medmiya to the right of Silverash facing left, you may now go AFK.
3 step AFK placements
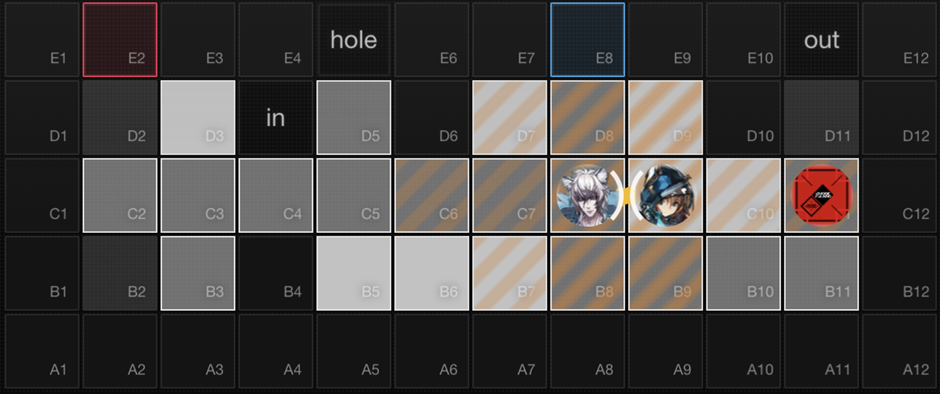
If there are hidden animals, deploy Amiya two tiles to the right of Silverash facing left and Deepcolour to the left of Silverash.
anti-animal placements
Hidden Animals and Chests
Section titled “Hidden Animals and Chests”- Duck: activate Silverash skill immediately as the Duck enters range, activate Medmiya S2 immediately as the Duck enters range, this should be enough damage and MSPD reduction to take out the Duck. We deploy Silverash to the right so that he has more tiles to DPS the Duck.
- Dog: Silverash has anti-invis, just activate his skill.
- Gopnik: use Deepcolour’s Tentacles to squish him down the hole, the timing isn’t too tight, Silverash can also kill him outright.
- Fatty: activate Silverash skill as he enters Amiya’s range, activate both skills. We deploy Silverash to the right so that he has more tiles to DPS Fatty without his damage reduction.
If there are treasure chests on the bottom left corner, use Deepcolour to take them out/activate them for Silverash or use Medmiya to heal them. If Deepcolour doesn’t take out the treasure chest before the Sarkaz sniper, stall it out of range with her Tentacles.
Debuffs
Section titled “Debuffs”- Yellow toll: Do not unnecessarily enter with Yellow toll because Silverash will lack damage for a potential EM Duck, but it will still be trivial.
- Catastrophes: point Silverash downwards and cycle 2 skills on the Spines, making sure to retreat Silverash for a faster cycle. You will need Deepcolour and Medmiya to lanehold.
- Commerce: no effect
- Congestion: no effect
- King of Sarkaz: you will need to squish Sarkaz snipers down the hole with Deepcolour’s Tentacles, they hit too hard for your high tiles to facetank.
- Sufferings: no effect
- Oddities: you will need to squish the elites down the hole, otherwise they clog up Silverash’s block count with their increased HP
Skills
- Yato S1
- May S1
- Beanstalk S2
Strategy
Section titled “Strategy”- Start the stage by immediately deploying Yato on B11 facing up to start clearing the spine.
- Yato will be retreated as soon as her skill finishes and redeployed immediately as her redeployment cooldown finishes.
- Deploy May on B7 facing left side when enough DP is avaliable.
- Deploy Beanstalk on D7 facing left side when enough DP is avaliable.
- Deploy Beanstalk’s plant on D5 to push the saxophonist.
- Immediately retreat Beanstalk at:
- (NM) 12 enemies killed.
- (EM) 8 enemies killed.
- Deploy Beanstalk on D7 as soon as her redeployment cooldown finishes:
- (NM) facing up, followed by her plant on D8.
- (EM) facing down, followed by her plant on D8.
- (EM) Use Beanstalk’s skill as soon as her plant dies.
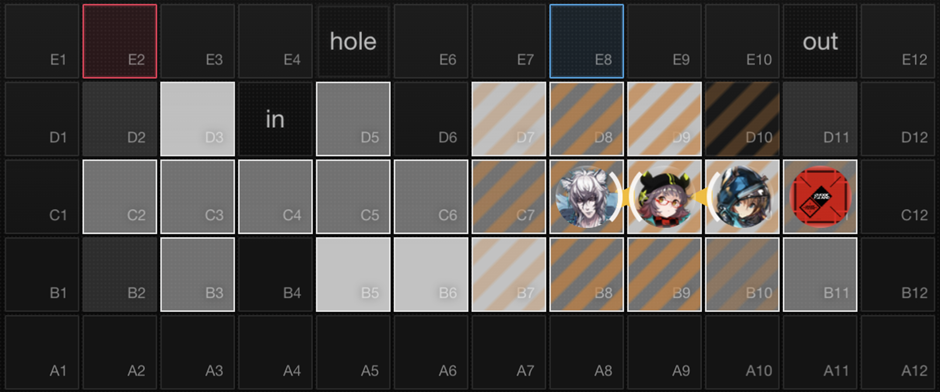
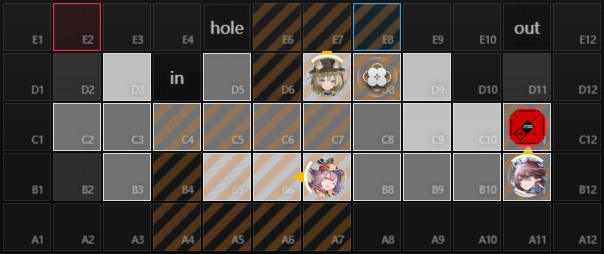
NM placement:
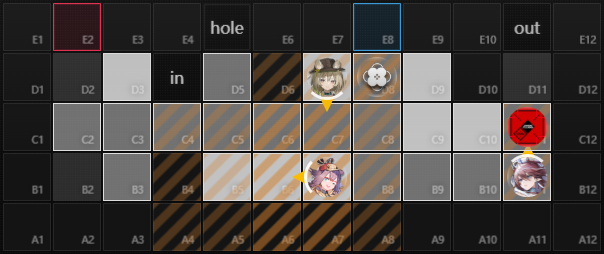
EM placement:
Animals
Section titled “Animals”- Gopnik: Yato can push it into the hole, refer to the video by 千舟wolfark.
- Crying Thief: wait for it to walk into C8, deploy Yato on C7 facing right and activate Beanstalk’s skill.
- Duck Lord: unable to kill.
- Fatty: Yato will eventually kill it.