Sniper/Medic Rosmontis Guide
Overview
Section titled “Overview”Sniper/Medic Rosmontis start is one of the most powerful strategies in IS5 DLC2. It uses the most overpowered hand, has the best common relics buffing it, and uses operators who are all independently strong regardless of relics. I don’t wish to spend too much time singing the praises of Sniper/Medic; I think its virtues are self-evident.
That being said, Sniper/Medic is not without weaknesses. The first is that compared to Soul Escort (likely the strongest Lamp Squad), Sniper/Medic has a significantly lower chance of getting the Grand Wish inspirer which forces a prosperity epoch to happen. Epochs on boss stages are one of the biggest variables when playing since they can create unwinnable scenarios such as Sufferings Epoch in ED5 (the ball will one shot the operator as they get released) or Oddities in ED4 (+50% hp Envy’s and Quilon is often untenable).
Another weakness is that Sniper/Medic struggles to win with just Lamp relics. The most obvious solution is acquiring damage relics. Base attack relics in particular like Silver Forks can singlehandedly solve the damage issue. Less obvious is that we can also compensate for lacking damage through more creative play like with White Dance Shoes which lets us place ranged operators out of harms way so they can dps for longer, or spawn pillars in ways we couldn’t before. Squad size relics also factor into this, since at minimum every extra squad size we get is a body which stuns for 5s on deploy with very tanky stats.
Sniper/Medic is also a bit weak into F4 Shop Rob. Without a way to cheat the start of the fight with the 3 hovering chests (Mr. Boom, Initial DP, Initial SP, 2 agents, Mercenary Inspirer, knight lance pro, etc.), Sniper/Medic is reliant on Kroos Alter stun RNG assuming only King’s Lance.
While these are 3 notable weaknesses of Sniper/Medic, it should be noted that these weaknesses are not unique. Every squad except Soul Escort needs to find a proper solution to the Shop Rob and relies on rng to get Grand Wish. Every squad including Soul Escort also greatly struggles when put in a position with only lamp relics. In fact, Rosmontis sniper/med has the lowest reliance on getting RNG relics to buff its damage out of every meta comp.
With DLC2, Wisadel-less flingers no longer have the raw power to just blast through every stage. Instead, the game plan is now to abuse pillars. Understanding the spawning logic for Rosmontis pillars is critical to success. You can get away with extremely weak clears as long as you have enough casters and snipers to throw at the enemy. This guide is primarily for players doing d18 245 runs (endings 2, 4, and 5 in one run).
Sniper/Medic is about voucher efficiency. Your total hope requirements are low, but your total voucher requirements are high. Your goal is to reduce the RNG of vouchers as much as possible. Your final squad will likely look like Rosmontis, Greyy, Kroos Alter (Krooster), Amiya, Indigo, Ethan, Gravel, Kal’tsit (Kal), Shamare, Mon3tr, 1 agent, and one additional 6* of your choice.
Here is an example livestream where I did a full 245 run: https://www.youtube.com/live/xECk9_JEWrM?si=R7-MkJ3ib7yK_Xv8
Here is a playlist of Rosmontis clears of stages: https://www.youtube.com/watch?v=ysJJmMcthwQ&list=PLafQQ7F8F-gA3h9geV52BGEksFtuhpccA
Drafting Guideline
Section titled “Drafting Guideline”
The Operators: Main Draft
Section titled “The Operators: Main Draft”Rosmontis is your primary carry for most of the run, and it is worth discussing some of her traits. Skill 1 is primarily used if you have spinach-type relics and you don’t need the stun or AoE of Skill 2. It can be used on the Cannot shop fight since it doesn’t stun Cannot. However, Skill 2 is useful for when Cannot starts to run. Skill 2 is the skill you’ll primarily be using. The larger splash from Skill 2, combined with its attack buff, allows Rosmontis to hit both the Spike and adjacent enemies simultaneously. This is especially useful on stages like Bloodline Debates. With enough ASPD, this skill permastuns, which is also useful. Skill 3 is a skill with extremely good damage but very niche application. It is, however, extremely useful on the stages where it is good, like Elusive Mercenary and Battle for Survival. Rosmontis also benefits from caster relics, which widens the pool of what buffs her significantly (don’t take malediction though).
Her most important and high-skill-ceiling trait comes from her talent, which allows her to spawn a tactical equipment (pillar) whenever a caster or sniper is deployed, including ones that are already on the field when she is deployed. It is worth discussing how its logic works here since it is critical to your success. The game checks every 3 frames to see if Rosmontis is deployed; if she is, then the game will determine how the pillar will be spawned.
If an enemy is in range of the caster or sniper on a tile where a pillar can be deployed, the pillar will spawn on that enemy. If there are multiple enemies, then the one which is the closest to the blue box is prioritized.
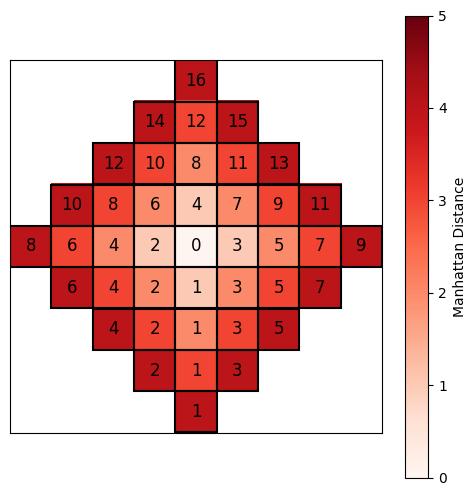
If no enemies are in range of a deployable tile for the pillar, the game follows the following spawn logic:
- The closest tile in operator range based on Manhattan Distance.
- If there are multiple tiles in range that are the same distance, take the bottommost one.
- If there are still multiple tiles in range that are the same distance, take the leftmost one.
The pillars have several important properties that make them critical to double flinger gameplay:
-
They function as bulky 2-block ground units that do not attack.
-
This means they provide valuable ground presence that this squad sorely lacks, allow us to stall to kill spikes, and will bait attacks from enemies which would otherwise be targeting your ranged ops.
-
It is important to note that since the game only checks to spawn pillars every 3rd frame, only 1/3rd of your frames will have the pillar be spawned after Rosmontis. This means if a ranged enemy can target both Rosmontis and the pillar, it will often target Rosmontis. The solution to this problem is usually simple. We will either count the frames if it is critical to opening like on Simulated Skirmish, or we will deploy another caster or sniper to spawn a pillar to protect the important operators.
-
-
They apply a flat -400 DEF and -20 RES debuff to all grounded enemies in a 3×3 area centered on the pillar.
- This allows the snipers in the squad to go through enemies that they otherwise struggle to pierce.
-
If a pillar lands on the same tile as an enemy, it will stun the enemies on the tile it landed on for 5 seconds.
- This trait is useful for keeping threatening enemies stunned so that your operators have enough time to finish them off, or for keeping 3-block enemies stunned so they stay in range.
Overall, the pillars provide an incredible amount of utility to the squad. Proper application of the pillars is critical to consistency since they carry weak runs. Drafting cheap snipers and casters like Durin is often quite useful for the pillar utility alone.
-
Greyy Alter is your second flinger. He notably has a very consistent slow which is quite useful and distinct from Rosmontis. They pair well together in general, with him slowing enemies down so that Rosmontis can repeatedly stun them. Use Skill 1 and never switch off of it.
-
Kroos Alter (Krooster) is very important to your run. Through most of your run, she is your main source of anti-air, notably stunning hovering enemies to make them damageable by your flingers. Her being low DP relative to flingers is also important since it means she can be used for pillar spawning as needed. Absolutely essential for Motorized Squad and Frequent disputes. She’s also your default faceoff boat killer and Quilon burst solution. Draft her before Greyy.
-
Kal’tsit is your primary medic for most of the run and valuable ground presence. You have no real ground presence outside of Mon3tr and pillars. S2 is what you use when you need her to be a medic or to kill large amounts of enemies. S3 is what you use for killing spikes, elites, Theresis, and Amiya.
-
Amiya is an incredibly flexible unit. She primarily serves as a spike killer and medic for most of the run, using her medic form on Skill 2. Her caster form lets us pillar abuse even with medic and guard vouchers; her S3 has a higher total damage than the medic form’s S2, letting her kill catastrophe spikes. Caster Amiya is also used as a boss killer for all 3 bosses. She does excellently on Theresis, alright on Quilon, and excellent on Amiya + her bosses. She’s also a viable boat killer during Faceoffs if you have high ASPD but low attack scaling. Her Guard form is mainly for situations where you need a melee operator, which comes up in Simulated Skirmish.
-
Indigo has 3 purposes. The first is to be the sub-DPS and binder on faceoff boats. The second is to enable pillar spam. The third is to be your Yliš’s Ravings and Qui’sartuštaj’s Promise hedge since these two cursed f3 collectibles tend to make Ray unavailable for Quilon. Her damage is nothing to scoff at either and her binding is extremely good. It is worth E2’ing her almost always; only avoid doing so if you need the hope to recruit your other operators.
-
Ethan binds Cannot, Theresis, Quilon, and stalls all 3 phases of the Amiya fight. Very important. E1 is bad but functional; E2 if at all possible. The main reason he’s not a must draft is because he can be replaced by Qiubai who works at e1. Since the comp doesn’t struggle with hope we can afford to draft Gravel first and wait to see if we get a guard or specialist voucher first for our bind option.
-
Gravel eats Theresis energy balls and bounces balls in Amiya’s fight to keep the boss pillar from popping early. E2 highly recommended because of the DP refund module.
-
Shamare is for debuffing Quilon + envys in P3 and for debuffing Amiya in P3. Something of note is that if you precharge a doll in one deployment and then retreat her, on her next deployment she will immediately have the doll available. You can use this trick to have the doll immediately available for P3 Quilon and Amiya.
-
Mon3tr removes the damage check in Map 2 of Quilon. Because of her ability to boat jump (see https://is-central.github.io/is5-sarkaz/stages/the-dharma-sermon/), we are able to use her and also boat Kal’tsit for a massive total damage increase compared to using just Krooster for map 2. As such, RNG damage relics are now unnecessary for Quilon since map 2 is trivially solved.
-
Agents are critical to generating enough DP. I’d recommend picking taking one out of Surfer and Cantabile. Surfer and Cantabile are effectively interchangeable and often taken together. Surfer is a bit better, and in spots like the shop rob, her talent can make the difference between getting the initial 3 chests and not. Ines is expensive but has useful traits like the invis reveal, higher base HP, better range, and being invisible on S2. Taking a second agent is fine, but with proper play one agent is sufficient.
-
Gummy is a slightly overlooked part of a lot of drafts. Her E2 provides valuable healing and a fairly tanky body. Since we often use early medic vouchers on Amiya, Gummy and Amiya are often our only sources of healing until floor 4. She is also useful on Quilon since she can serve as bait for envys and heal the lotus that spawns out of reach of Kal’tsit in the final 25% HP. Since her E2 only costs 1 hope, as long as it doesn’t impact your hope curve, it’s often worth promoting her. She also serves as a bottom lane solution in the shop rob at E2.
The Operators: Luxury Drafts
Section titled “The Operators: Luxury Drafts”-
Hoederer is the big winner with the release of IS5 DLC1 and 2. He is extremely strong on any team, and Sniper/Medic is no exception. He can solo one of the phases of Quilon, hold any lane, solve map 2 of ED5, and solo Amiya on map 3. This makes him extremely strong and useful. However, none of these roles are needed for Sniper/Medic since we have operators to burst down Quilon and Amiya. He significantly alleviates the pressure of decision-making though and can compensate for weaker relics. He’s also resistant to the epochs that standard Sniper/Medic picks are weakest to, such as Oddities and Sufferings. He is probably the draft you want the most out of all the luxury picks.
-
Ray is complicated. She is extremely strong, being a far better boat killer than Kroos Alter. High damage and bind on a very good cycle make her extremely useful. However, she is your 4th sniper draft since Krooster has too many useful properties like the stun talent and being 1 hope. This makes her often skipped since she’s non-essential to most strategies. If you have the spare hope and vouchers, she is very good for all the bosses.
-
Mylnar is a good taunt tank for ED5, making it so that agents no longer need as much HP to safely generate DP in ED5. Aside from that, his performance isn’t particularly noteworthy, and I wouldn’t normally pick him over Hoederer.
-
Tinman would ordinarily be a good pick, but since we have 2 specialists that we absolutely want E2’d (Gravel and Ethan), he becomes the 3rd specialist pick. Unfortunately for him, that means he basically never gets drafted since 6 specialist tickets is a big ask and he’s rarely worth spending a scout or portal on. Nevertheless, if you find yourself with an excessive amount of thoughts and specialist vouchers, he’s worth considering.
-
Yato Alter adds a lot of damage to Quilon burst with S1. She also functions as a fast redeploy for ED5. A pretty strong operator and worth considering when your damage is lacking. The main problem is her hope cost and that she’d also be a 3rd specialist pick in most circumstances.
-
April is quite good. She’s a fast-redeploy pillar. Her problem is that she’d be our 4th sniper we recruit, so her priority is low. On top of that, while her redeploy time is good, it’s not so good that we can spam pillars.
-
Feater is our chalice-less ED2 solve of choice. At E1, she pushes enough to make Theresis’s damage reduction go from 0.9 to 0.75 and the SP gain to go from 5sp/s to 3.5sp/s. A pretty niche pick since being chalice-less is pretty rare and wasting a specialist ticket is unadvisable. Note that with Mon3tr+Kal+Amiya, you have enough damage to not need Feater.
-
Shu you would only consider if you don’t have chalice for ending 2, don’t have a specialist voucher, and now need to play for any solve possible or you’ll lose to ending 2. She is a tankier body than Gummy for ED4 as well, though this doesn’t matter much.
-
Ulpianus: +18 initial SP relic pick only. Worse than Hoederer in every meaningful way for Sniper/Med.
General Notes
Section titled “General Notes”Throughout the run, you have a few things you should always be conscious of.
-
You need to be conscious of your lamp relic progression.
-
Because the lamp is inconsistent at rerolling (~62% chance), managing the lamp is the most critical part of your run. Refreshing being so inconsistent and being potentially disastrous means that we try to minimize our refreshes.
-
Naturally spawning Wish Fulfilled and Possibility nodes are high-priority targets.
-
Aim for Hand of Rumble on floor 2, King’s Lance on floor 3, and King’s Crown, King’s Armor, and Chalice on floors 4 and 5. Note that King’s Legacy isn’t that impactful for the run usually and can be skipped. King’s Armor is only taken because we need 3 King pieces to get the full effect of Crown. As such, if King’s Legacy is obtained, then you can skip King’s Armor entirely.
-
-
You need to hit 38 ingots no matter the cost.
-
This is because 38 ingots + 112 from the shop rob gives us Chalice from Lamp, which is mandatory to beating endings 4 and 5.
-
Saving Machine inspirers and combining them with Elder’s Crown or with each other is a huge ingot boost.
-
Keeping 4+ weight thoughts and selling them in the rogue trader for 2 ingots each is good value.
-
Relics that generate ingots are generally high value.
-
If you are desperate, you can use Window inspirer to spawn the Prosperity Epoch, which significantly increases chest spawn rates in combats.
-
-
You need to be conscious of voucher progression.
-
With how many snipers, specialists, and medics we need, it is important to prioritize these vouchers.
-
We always want to promote our snipers and medics through various promotion options to save a voucher.
-
The only exception to this is your first vanguard voucher. Even though our total voucher requirements for vanguards are low, we will lose if we don’t have our agent for Quilon at the latest. As such, prioritize your first agent extremely highly.
-
-
You want to get a Window inspirer and 2 Rise and Fall to prepare for ED4 and 5.
-
This is semi-consistent to do as long as you are diligent about keeping the components of Rise and Fall and Elder’s Crown in reserve.
-
Relocation (which can be made from Wall+Elder’s Crown/Wall) is another option for ending 5, though generally worse than Rise and Fall.
-
They will provide crucial HP stacking and prevent an untimely epoch from ending your run.
-
-
You want at least one HP relic.
-
The first one matters the most.
-
This is because with the +100% max HP from Window + Rise and Fall, your flingers will barely be out of one-shot range of Envys on Quilon. We would like to increase the safety a little since random lightning strikes at the wrong moment could make things go very wrong.
-
Your 5* agents will need module or +30% max HP on top of the +100% from inspirers to live the ball + Amiya attack in ending 5.
-
-
You want “unconditional” damage and damage amp relics.
-
Both Hand of Rumble and King’s Crown are conditional damage buffs; as such, they amplify the operator’s base attack that they have when they enter the stage.
-
As such, buffs to your base attack like Rise and Fall and relics like Silver Forks are extremely potent and dramatically increase your damage.
-
More damage can never go wrong, but the first one is the most important for your operators to hit several thresholds.
-
Damage amp relics are just generically strong (carriage driver’s whip, gold-plated dice, scout’s scope, etc.).
-
Floor 1
Section titled “Floor 1”-
Start with E2 Rosmontis, Indigo, and Gummy.
-
The only time you’ll do 3 combats is if the 3rd combat has a spike.
-
The reason for only doing 2 combats is because F1 combats on average will not give a spike.
-
Since our core drafts are 5* snipers that only cost 1 hope, we do not care about getting to level 3 command level before the shop.
-
Saving plans for F2 and F3 gives us greater flexibility in pathing and greater decision making power.
-
-
Always take Krooster first, then Greyy (both E1). Promote Krooster after recruiting Greyy.
-
You should only spend hope in F1 combats if you get a Sniper or Vanguard voucher or if you get a hope relic.
-
The reason we don’t acquire Amiya from F1 combats is because of her extreme availability. Since she is available in 3 different vouchers we will almost certaintly acquire her even if we delay it.
-
Having 5 hope entering F1 shop means we can acquire Kroos Alter, Greyy Alter and Surfer if their vouchers are available. Even if they are not, we can then buy Amiya on the second page of the shop.
-
The priority for the path on F1 is:
-
The path with the most amount of combats
-
The path which has the most spikes/chance of spikes
-
The path with the emergency combat
F1 Shop
Section titled “F1 Shop”Your primary goal in the shop is the vouchers.
-
Surfer, always have at least 3 hope saved for her.
-
Snipers
-
Specialists
-
Kal’tsit is prioritized over Amiya; you’ll rarely have the hope for Kal though.
-
Every other voucher is for either getting/promoting Amiya or grabbing a free 4* operator if you have spare ingots.
Use your first ticket from guard, caster, and medic vouchers on Amiya usually. The second one will also usually be to promote Amiya. After that, guard vouchers can be used for Quartz, Castle, and later on Hoederer. Caster vouchers after Amiya should be for Indigo if you have spare hope (enough to be ready to recruit Surfer if she shows up next combat) or Durin. Medic vouchers after Amiya should ideally be for Kal; otherwise, Silence or Rose Salt are good picks, but these are low priority early on. Specialist vouchers are extremely important; take Gravel first then Ethan. The reason for this is because even though Ethan is more important for ED4, Gravel is effectively mandatory for ED5 and helps more with surviving en route (Dense Jungle, ED2, Cadence baiting). Ethan is also more easily replaced since in the event that you never get a second specialist voucher, you can draft Qiubai as a worse but functional replacement. Ethan and Gravel both ideally should be E2, but you can live with Gravel being E1 if need be.
The rest of the shop is heavily context-dependent, and it is difficult to give exact priorities since relic quality is so varied. Here are some common things to look out for:
-
Squirrel, Anchor, Lamp relics
-
Mr. Boom, initial SP, initial DP (makes F4 shop rob trivial)
-
Scales of Avarice and Lucky Coin (makes getting 38 ingots trivial)
-
Max HP relics (Lakebed Aegis for example), Medicine Sticks
-
Base attack relics like Remote Strike (ASPD relics to a lesser extent)
-
Squad size relics
-
Hope relics
Make sure to buy Machine, Industry, Witchcraft, and Window inspirers as well. Ultimately, the F1 shop is something that has to be adapted to. I provided a general guideline, but you have to assess your own needs to see what you need to buy. Try to have some ingots left over for the refresh. Also note that you should sell some inspirers/lingerers if you know you’ll be over toil limit after taking the ED2 lingerers on the next floor. They provide free ingots for you to buy more stuff.
Floor 2
Section titled “Floor 2”-
This is the floor where we do a lot of our development.
-
This is because only two stages out of 7 don’t have a spike in regular, and only one doesn’t have a spike in emergency.
-
As such, it is most plan-efficient to maximize combats here.
-
-
There is also a very high chance of a scout appearing.
- Always scout Krooster first if she’s not promoted, then Greyy or Kal, then Ethan.
-
Remember that Amiya can be switched to caster form.
- Use it as needed to stall enemies with pillars or to kill catastrophe spikes with S3.
-
Reroll an encounter or similarly low-value nodes into a wish fulfilled and path fairly aggressively here.
-
Be mindful to have at least 2 (ideally 3) plans going into F3, since being path-locked on the same route as the lost and found is often detrimental.
-
If a lost and found appears on floor 2, it is usually worth taking if the path is good to avoid being locked into a path on floor 3.
-
I would recommend not taking the ending 5 encounter here unless you are significantly ahead in resources/lamp relics.
-
Floor 3
Section titled “Floor 3”-
Lost and found is forced.
- I don’t care if the path is a single line with 2 encounters and a single combat; take the lost and found.
-
Picking up the Amiya encounter here is good as well.
-
Try to get King’s Lance here, though it isn’t forced.
Something that is worth bringing up is that while refreshing is a valuable tool, we like to only refresh when necessary. It is usually better value to path into a bosky which has a guaranteed wish fulfilled than it is to pray for the refresh to succeed. If you have to refresh, avoid refreshing regular combats that you are path-locked on (especially on floor 4) unless you can beat every emergency on the floor. Refreshing at the start of a floor is usually better to minimize the chance of being path-locked into an unwinnable fight.
Cursed Relics
Section titled “Cursed Relics”I will now discuss the cursed collectibles and their level of severity:
-
Balor’sača’s Arrogance (Ball sack):
-
The only one where actively going out of your way to trade it away in a lost and found might be worth it.
-
+20% attack makes Theresis far harder to tank, envys in ED4 will have 6.2k attack, and Amiya blast is harder to survive.
-
+20% defence is also quite annoying since Krooster is often our choice of boat killer and Quilon burst.
-
None of the other curse relics are significant problems, but this one is a huge one. The worst part of this relic is the minimal counterplay you can have with it; you simply must out-stat it.
-
-
Yliš’s Ravings:
-
Even though 80% of the value of flingers is in their auto attacks, -20 SP is devastating to most of your other operators.
-
This is largely because of Quilon phase 3, where Ray and Krooster will need 30 seconds to be able to use their skills, which is abysmally slow.
-
When this happens, King’s Legacy and SP generation becomes important.
-
Consider taking Indigo for her off-skill bind over Ray.
-
Amiya caster S3 is decent as well and doesn’t care about it.
-
It makes the shop rob harder.
-
If a lost and found isn’t too out of the way, this one is a decent trade away as well.
-
-
Qui’sartuštaj’s Promise:
-
It triples the cost of your 5* snipers and medics. Quite annoying, though very playable because your operators are still pretty cheap.
-
You just have to be conscious of it and drop your luxury picks like Hoederer.
-
-
Gul’dul’s Silence:
-
Flingers hit multiple times per attack, and Hand of Rumble means their DPH even on F3 is good enough to pierce.
-
The only notable thing is that it makes openers harder, and ED2 shades are far more tanky with it.
-
-
Shard of the Untold Kings:
-
Absolutely free.
-
It’s a conditional attack debuff, so it’s additive with Hand of Rumble and King’s Crown.
-
Floor 4
Section titled “Floor 4”This is the floor where your run gets decided. It’s also likely the floor you’ll die the most.
-
Check to see if there’s a shop.
- If there is, check to see if you can rob it without leaking any chests (see shop rob section). If you can, then do it.
-
If there is no shop or you can’t rob it, then check if there’s a faceoff.
-
If there is a faceoff and you can do it (this is why you draft Indigo + Krooster/Amiya), then you do it.
-
Indigo+Krooster will need 3 kings relics + a bit more damage to do it.
-
With good base attack relics, they can do it with just lance + crown.
-
Indigo+Caster Amiya S3 is also another solve to consider with high ASPD but low attack. Civilight Eterna + Lance is also enough for Amiya to do it.
-
Saving your deathmatch inspirer entering floor 4 is a good idea because of the faceoff node.
-
-
If neither of these conditions are possible, then pick the path that gives you the most strength possible without completely killing your plans. You will be forced to F5 faceoff and hope for the shop to be on the same route.
-
You can farm the Cadence (Amiya ED5 blob) for relics by leaking it in combats.
-
Make sure to ration your shields appropriately.
-
You should kill the Cadence if you are path-locked and the next node is an emergency combat.
-
Kill it on the last combat of the floor otherwise.
-
-
Remember to abuse the wish fulfilled at the end of the floor for guaranteed lamp relics.
This is the hardest floor. The only advice I can give aside from practice is to not be afraid of regular combats. Elusive Merc, Chaos, and Frequent Disputes are challenging stages, but rerolling them into emergencies is often guaranteed death. A person who loses to frequent disputes may be bad temporarily, but a person who runs from frequent disputes will forever be bad.
The Shop Rob
Section titled “The Shop Rob”A F4 shop rob is essential for the consistency of the run. It is the most difficult part of the run, largely because of how weak your squad often is when doing it and how high stakes it is. Leaking even a single chest is effectively -10 ingots and can often mean your run is over. As such, this section of the guide will be a rough overview of the strategies that are used to beat this stage. It is important to recognize your own needs when you do this fight and adapt accordingly. If you want to do this fight, assuming only lamp relics you’d need rumble + kings lance. Getting crown or another damage relic is also ideal.
The most challenging part of this fight is the initial 3 hovering chests. This is why we often need to adapt to our relics for this. By far the most valuable support item for this is Mr. Boom, who single-handedly solves the start. Initial DP, initial SP/SP gen relics also solve the chests. Of note is that Surfer with the Mercenary inspirer (without ED2 relic and not fractured) will give enough DP to deploy everyone we need for the opener. Since Mercenary is a common inspirer, this is a preferred solution for runs without Mr. Boom. Note that this needs P6 Surfer and Kroos Alter (The writer of this guide also has a P2 Rosmontis).
Suppose we don’t get any of these though; we then need to look at our operators. 2 agents will significantly alleviate the issue. A single agent with more attack speed than just King’s Lance is a significant boon here. Ines S3 is unlikely to be available here but if she is, then her bind also solves this part. Ray can also substitute for the initial 3 chests instead of Krooster, being a better option in basically every way. It is important to note that if you don’t have Mr. Boom, I’d recommend you to not combine the ending 2 relics to avoid the +3 DP penalty. Once Krooster and Kal are properly set up, the top side is mostly solved. Remember to set Kal to S2 for this fight.
The table below shows tested solves in descending order of viability, but it is ultimately up to the player to adapt to their circumstances as needed. Often the lower tier solutions should be combined for maximum consistency in the shop rob.
| Solve | Notes |
|---|---|
| Mr. Boom | By far the best way to solve it. Only 8 ingots from F1 shop and you have a ~35% chance of getting it |
| Support Fog Machine | Largely a worse Mr. Boom for shop rob, significantly improves Faceoff matchup though |
| Knight Lance Pro | Cannot alone will give 150 ingots so you can completely ignore the top. |
| Initial DP Relics | Immediately being able to place down Krooster and Kal solves the chests |
| Primordial Vestige | 16 ingots from F1 shop so it’s expensive. It is basically an initial dp relic for only shop |
| Glory Pack | Deploy any operator with a summon like Deep Color and place the summon beside the chests and retreat. Note that Kal doesn’t work for it |
| Civil War Inspirer | Basically an initial dp relic but you have to save the inspirer which is often annoying |
| Ines | Use s3 to bind the chests once they start moving. Pretty consistent solution but expensive |
| Initial SP Relics | Lets Krooster stun and dps more consistently, but you still need to place down Kal in time |
| Ray | Can get the initial chests but you’re a bit short damage wise with just Kings Lance + Crown |
| ASPD Relics | Lets Surfer generate more dp and Krooster stunlock. |
You can watch a commentated shop rob here: [Arknights] IS#5 D18: Narrative Offer (Shop Rob) (Rosmontis/Flinger) - YouTube (Note: it’s old and somewhat outdated)
The Start
Section titled “The Start”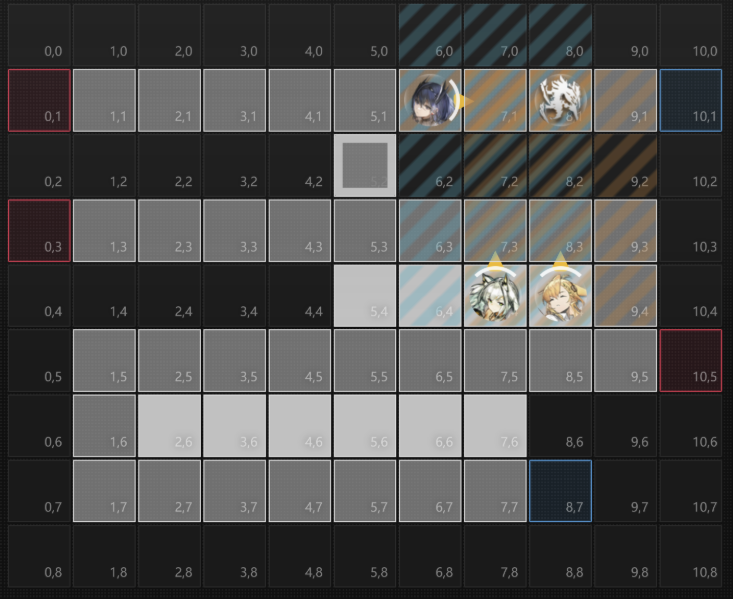
For weak shop rob, the start is Agent > Krooster > Rosmontis after Krooster stuns at least 2 chests out of the air. Rosmontis will pillar the chests and keep them in place. For strong shop rob, the start is Agent > Krooster > Kal
Weak Shop Rob Strat
Section titled “Weak Shop Rob Strat”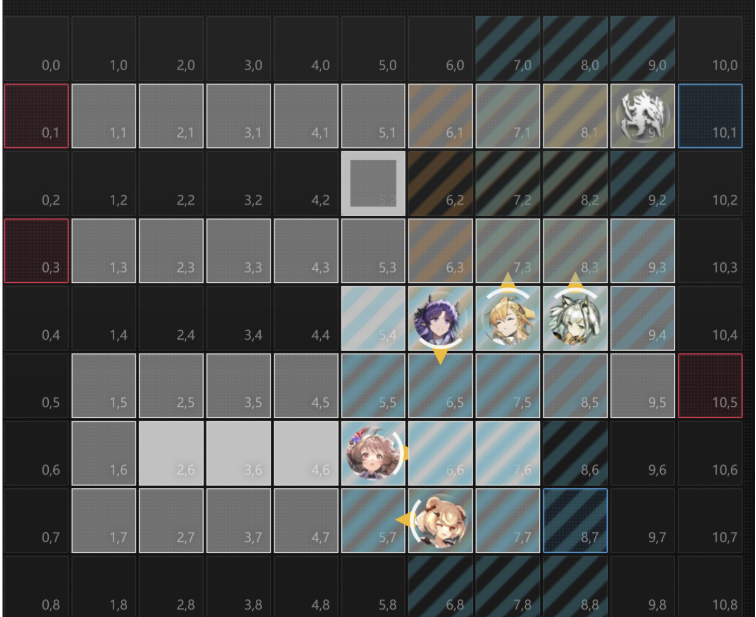
The weak setup for shop rob; Hibiscus is Amiya medic here.
This is the “weak” setup for shop rob. The idea behind this setup is that we will leak every drill and focus primarily on the top. You will most often use this strategy since it can be pulled off with pretty weak squads and relics. It usually only requires Hand of Rumble + Lance; you may need Crown if you have absolutely no extra damage.
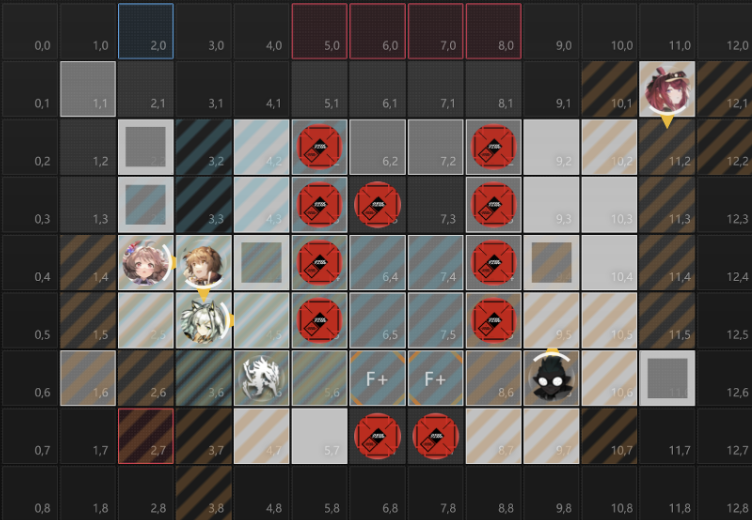
If we use this strategy, then after the initial 3 chests are dealt with, retreat Krooster and Kal immediately to reposition like this. Once every drill is leaked, we then deploy our flingers on the bottom and blast Cannot. Eyja here is largely unnecessary but increases safety. You can also place Rose Salt or Silence on 7,6 pointing up instead. The drills have an attack stat of 1329; it is not unusual for 2 drills to enter in quick succession. As such, we want to make sure Kroos Alter in particular is able to survive 2 in a row without healing. With Medic Amiya talent, Kroos Alter does barely survive, but ideally, you should increase the safety buffer with HP relics. Note that starting out, it is a good idea to kill the dog that will sit on 3,5 once it arrives there with Greyy. Note that when the wave of cars comes on the top, you can deploy Rosmontis to pillar and kill them. You can use Amiya skill for the wave of cars on the bottom or simply retreat Gummy and leak 2.
Strong Setup
Section titled “Strong Setup”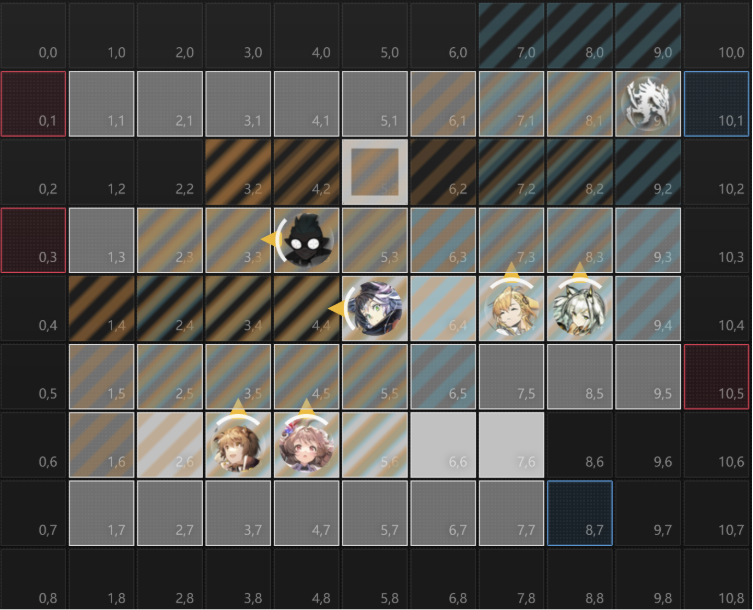
This is usually the setup if you have 3+ kings collectibles. With King’s Crown getting its full buff, it’s extremely easy to just bulldoze Cannot and spawn camp the stage. If Cannot reaches 2,3 be very careful to not accidentally stun him or your run goes down the toilet. This strategy is extremely braindead, but you realistically won’t get to do it often.
Floor 5
Section titled “Floor 5”-
If everything is going well, then you’ll have chalice or at least coin-operated toy + 3 kings. If that is the case, this floor is basically a victory lap.
-
Do the faceoff boat map.
-
Complete the rest of your squad.
-
Assemble the rest of your lamp relics.
-
Get the second ED5 encounter.
-
-
If you weren’t able to get at least one of faceoff or shop on F4, then I am sorry for your loss.
-
You will need to go to faceoff no matter what.
-
Be wary of the DLC emergencies (Regular Army, Rhine Guardians).
-
You can comfortably beat all other emergencies and regular maps with just kings + rumble.
-
If you’re lucky enough to get a faceoff + shop on the same route, then that is good.
-
Otherwise, make sure to get the second ED5 encounter here if you’re still doing 245, since floor 6 has too few nodes to work with otherwise.
-
Make sure to ration your plans properly; you need at least 1 for the refresh for chalice on floor 6.
-
ED2 Court Visit
Section titled “ED2 Court Visit”With chalice, this is a trivial fight. Stall the boss with Ethan + tank with Kal until all the slugs are dead. Then blast Theresis with Kal + Amiya caster S3. Without chalice and no Civilight Eterna, consider taking Feater to slow down the rate of explosions and boat spawning. Adapt to the circumstances as needed; remember that Kal gets a lot of damage uptime with SP relics.
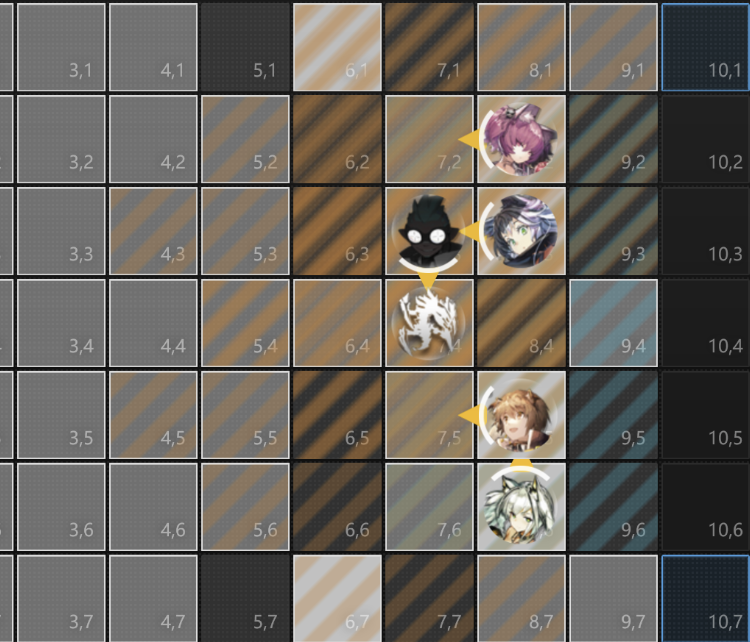
Start off by blocking balls, generating DP with agents, and stalling Theresis with Ethan. If Ethan fails his bind and Theresis moves, then simply block-shift him back up. Don’t deploy the left-side operators until the slugs start spawning. Once that happens, you can stop block-shifting Theresis/Retreat Ethan so he moves down. Note that you can use Krooster instead of Ray, simply place her at 10,4 facing right.
Phase 2
Section titled “Phase 2”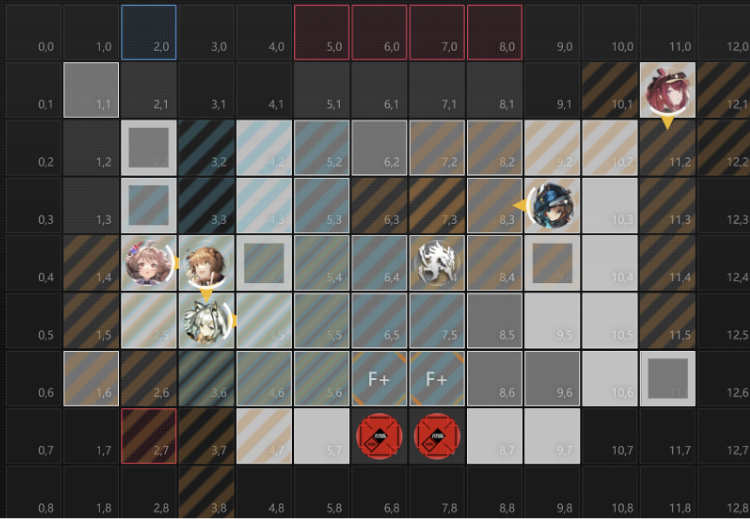
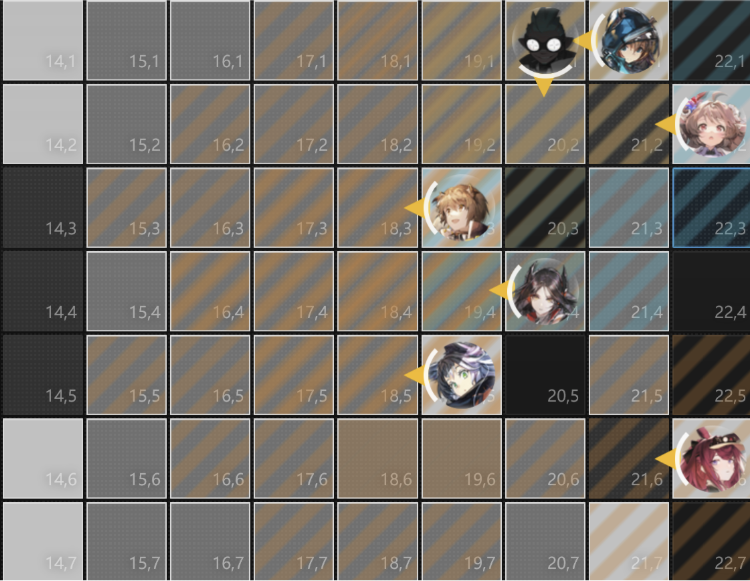
Once he phases, reposition Mon3tr (you can preemptively do this) and place Caster Amiya down. Then just burst him down. If your DPS is especially bad, you may need to redeploy Amiya again; in those cases, make sure to point Amiya up in the same position. Mon3tr will go on 4,5 to dps the boss if you have her. Once the boss is dead, your squad might be wiped in the blast if you don’t have HP stacking. As such, we keep Ethan + Rosmontis in the back to finish off the mobs.
Floor 6
Section titled “Floor 6”If things are going ideally, you’ll have chalice by now. You can reroll the shop for another wish fulfilled/combat/encounter. If you didn’t get the second ED5 encounter on floor 5, you can gamble on the second node, which will almost always have an encounter. On any combat in floor 6, use Window; otherwise, you run an extremely high risk of having a crippling epoch on Quilon or Amiya.
If things are going less ideally, you’ll hopefully have done at least one of shop rob or ED5 second encounter. Otherwise, you’ll just have to hope that the epoch you get doesn’t suck too much since you need chalice (and thus need to reroll the combat) to beat Quilon.
ED4 Quilon
Section titled “ED4 Quilon”If you’ve prepared properly, this fight shouldn’t be too hard usually. In low-roll runs, this fight can be very tricky though. The main thing of note is that the first wave of envys will hit Greyy before any operator/pillar directly below him on the left side. As such, I’d recommend placing Surfer there, then deploying Greyy left and Rosmontis right so that the pillar spawns left of Surfer, which makes it get targeted before Greyy. All the envys afterwards will path down, so it doesn’t matter as much then. Make sure to abuse pillars to keep your flingers alive if they can’t live a hit/multiple stack up. Placing E2 Gummy or a crusher below Greyy is also good. Smarties are also big trouble for the left side; save Greyy’s skill to keep them at bay, otherwise Greyy will die. P3 can be a big pain. I’d highly recommend placing the Shamare doll on the top of the map so that it debuffs both Quilon and the envy that spawns from one of the sides. This is ultimately a DPS check, so hopefully you have enough DPS.
Phase 1 and 2
Section titled “Phase 1 and 2”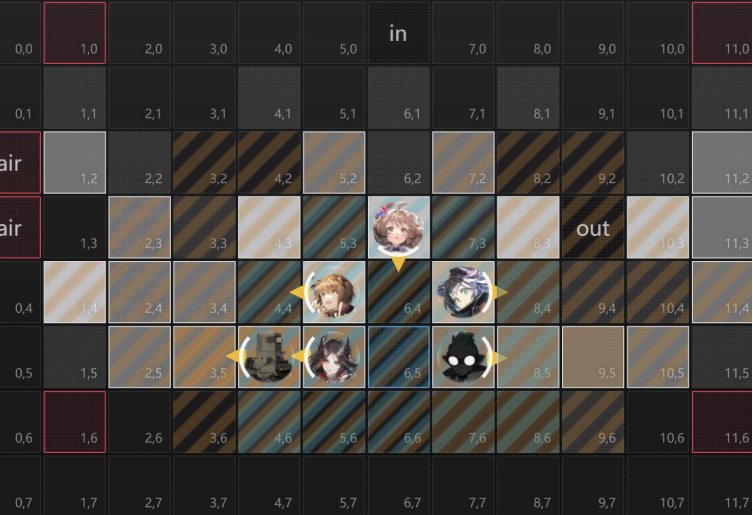
Castle is the pillar that gets spawned if you manipulate the spawn correctly. Make sure to have Shamare’s skill charged before you send her off on the boat. When boating casters and snipers, you can point them down on 4,3 to spawn pillars to help protect Greyy. Now that Mon3tr is out, the conventional strategy to phase Quilon is to simply activate Ethan skill on top and activate Mon3tr skill to phase him. On the first boat, execute the boat jump with Mon3tr so that she’s available for map 2. On the second phase, we want to immediately retreat Ethan when Quilon becomes invulnerable. Then feed your agent to the boat. This will slow the boat down enough so that Ethan will be able to be deployed before Quilon is vulnerable again.
Phase 3
Section titled “Phase 3”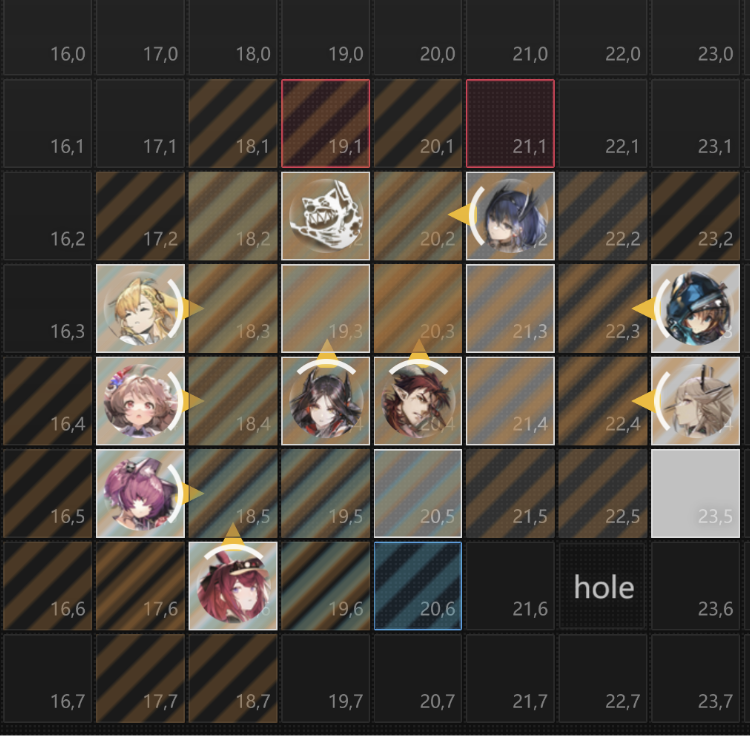
It is heavily advised to send at least one of Hoederer/Indigo/Ray to keep Quilon in place. Note the Shamare doll placement that halves the Envy’s attack the moment they spawn; this is important to prevent Indigo from getting one-shot. Kal’s Mon3tr and Mon3tr serve to bait the Envy hits. Krooster and Mon3tr do most of the damage.
ED5 Amiya
Section titled “ED5 Amiya”You will basically never have a case where you beat Quilon and then lose to Amiya, outside of getting Suffering’s Epoch.
The moment the map starts, place down Gravel to bounce the ball on the same row as Amiya, then deploy your agent directly in front of Amiya to generate DP. Then deploy flingers, then Kal and Shamare. We charge up Shamare’s doll and then retreat and place down Caster Amiya. In map 1, use Ethan to bind Patriot so that the DPS are hitting him with his damage reduction aura up. Delay popping the boss pillar until most of the rest of the mobs are dealt with. Once the boss pillar is popped, you deploy operators to quickly pop the pillars behind the boss. Once all mobs are dead, use Amiya S3 to kill.
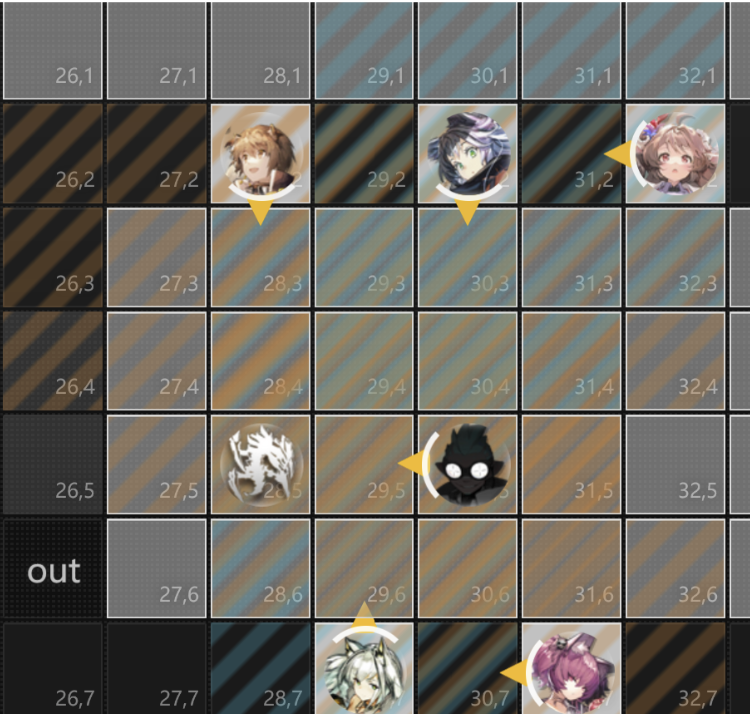
Repeat for map 2. Deploy Eyja immediately. Don’t touch the balls on rows 14,3 and 14,5; let them pop the enemies in the middle naturally. Then place down Rosmontis when the bind casters cluster on 18,4. You can then place down your agent to generate DP. Hoederer would go on 19,4 if you have him. Finally, place down Greyy, Ray and make sure to place Gummy or another tanky body last on 19,4. Ray if you have her kills bottom world cursers to prevent them from stacking up though she isn’t important. Amiya kills Theresis. If you have Mon3tr instead of Eyja, simply place Ros where Greyy is and Mon3tr where Ros was.
For map 3, note that you should have a plan for the bind casters. The ball placement here has two variations, so you’ll need to change positioning accordingly. There are two general strategies. The brute force strategy is to open with agents and Rosmontis and just deal with most of the mobs on the map, then burst Amiya down on 28,5. Have your entire setup ready for when she phases. In particular, have Shamare’s doll + Eyja S3 ready. Note that you have to place Shamare’s doll after she phases, otherwise the attack down will not apply. Once she phases, it’s a DPS check. Keep Shamare’s doll up and use Kal + Flingers + Amiya to burst her down and keep your operators alive. Our Amiya will almost always do more damage than Greyy on enemy Amiya, but Greyy is good for mob clearing. Decide on your priorities as needed. Don’t stall too long since Amiya will eventually use her tile ban skill. Hoederer cheeses P3 extremely hard, but you only get the hope to draft him in maybe half your runs. The more consistent strategy is to clear out all the mobs and then stall the boss until she starts her tile ban attack. Once she starts it, if we phase her she will then reset her sp. By then blocking her at the blue box (after baiting out her blasts), no balls will run into her and we can kill her at our leisure. This is difficult to explain in an written guide and so I’d reccomend watching the videos linked at the top.