Love in Sami
Love in Sami: A Waltz of Two Sargussies
Section titled “Love in Sami: A Waltz of Two Sargussies”
Foreword
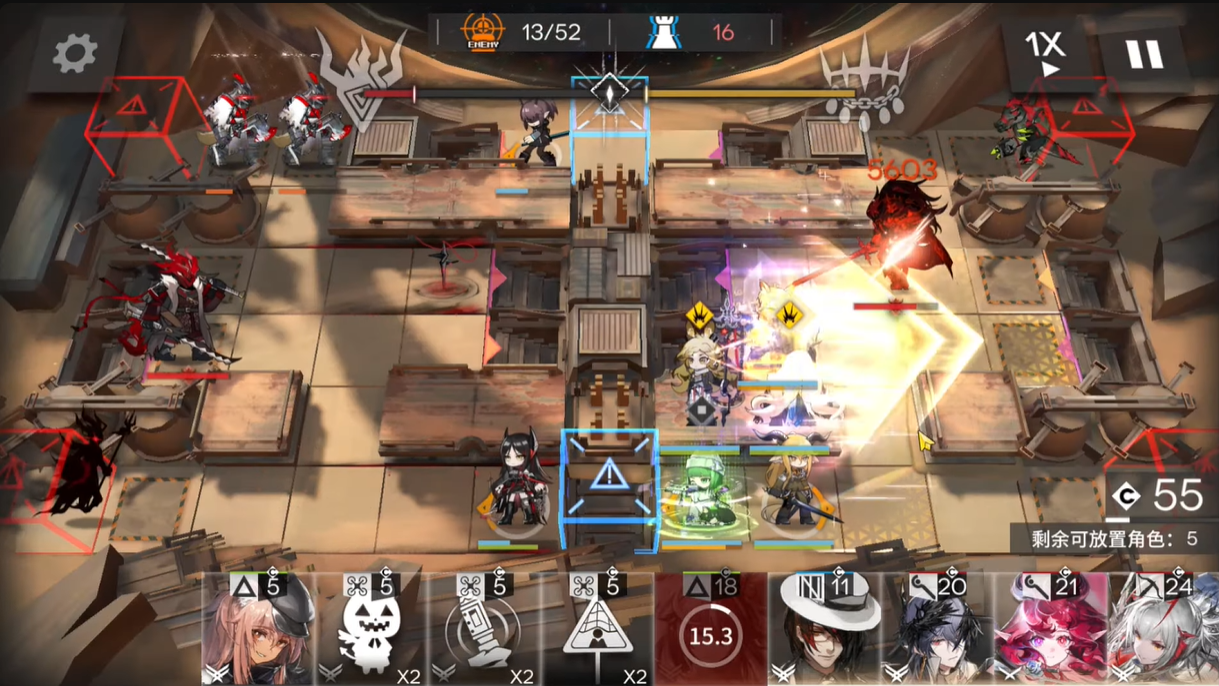
Section titled “Foreword”It’s that time of year again – new expansion to an IS drops and the latest ending is absolutely atrocious, a pile of wacky mechanics and completely overtuned stats that snowball you to oblivion and back when you make a single mistake.
I don’t promise to provide a foolproof workflow when approaching the ending 4 fight in Expeditioner’s Jǫklumarkar, either normal or alter variant (in fact, especially not alter variant), but at least you’ll be more or less armed with enough knowledge to be able to have a vague idea of a plan going into the stage and know how to pivot when things go wrong.
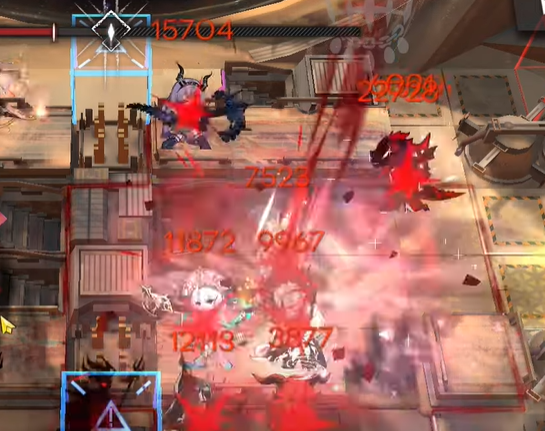
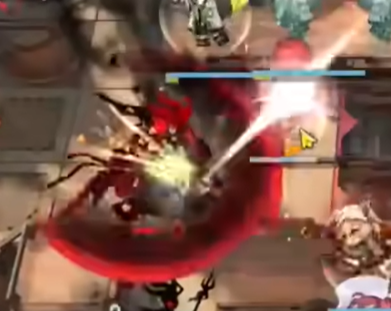
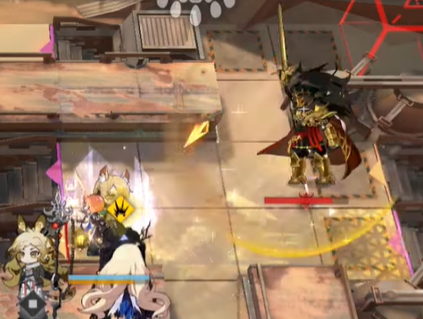
This way, we have less of this:
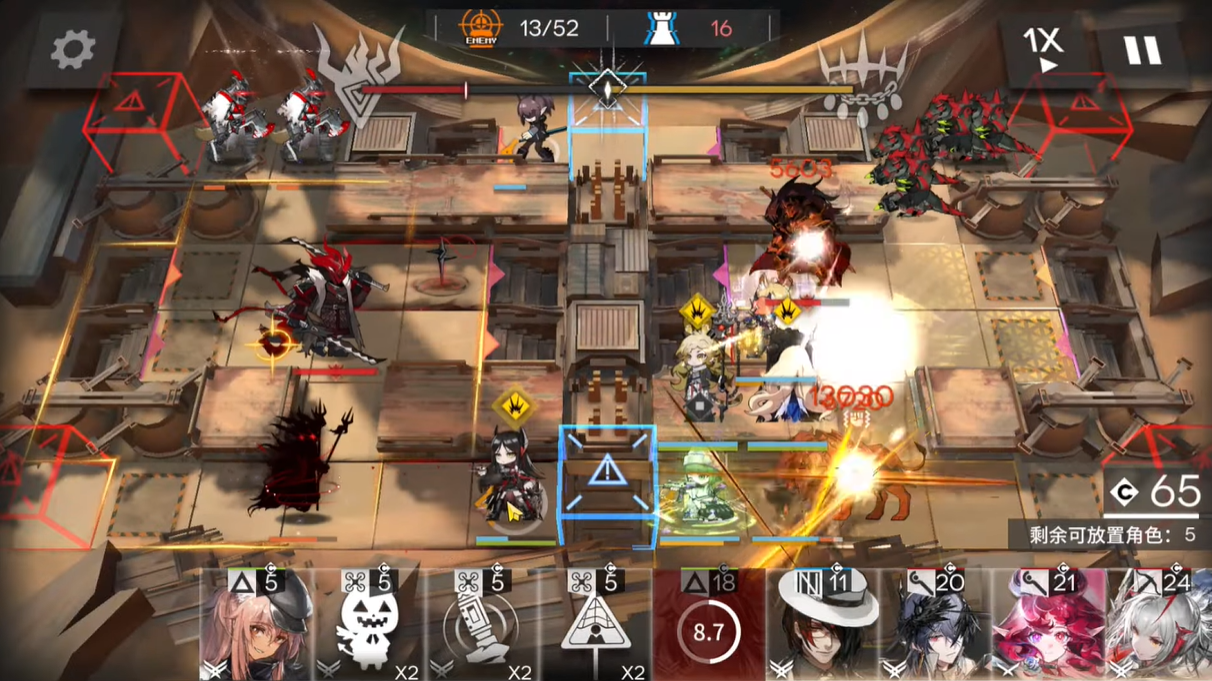
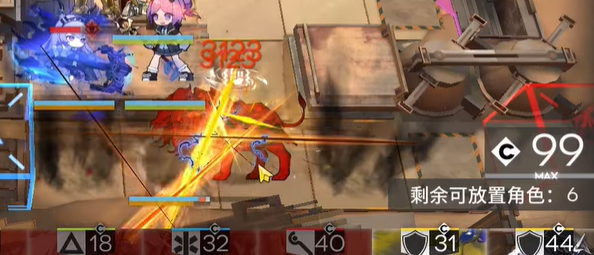
I was told that worse operators take more damage from the cannon, curious…
Let’s get started.
It may not seem like it, but there’s very much a method to my madness
Section titled “It may not seem like it, but there’s very much a method to my madness”Like always, to understand why we approach anything in a given way, we have to understand the motivation behind doing things that way. As such, we have to start with understanding the enemies. Though if you don’t care about the enemies, skip directly to A modular approach for discussions about possible strategies.
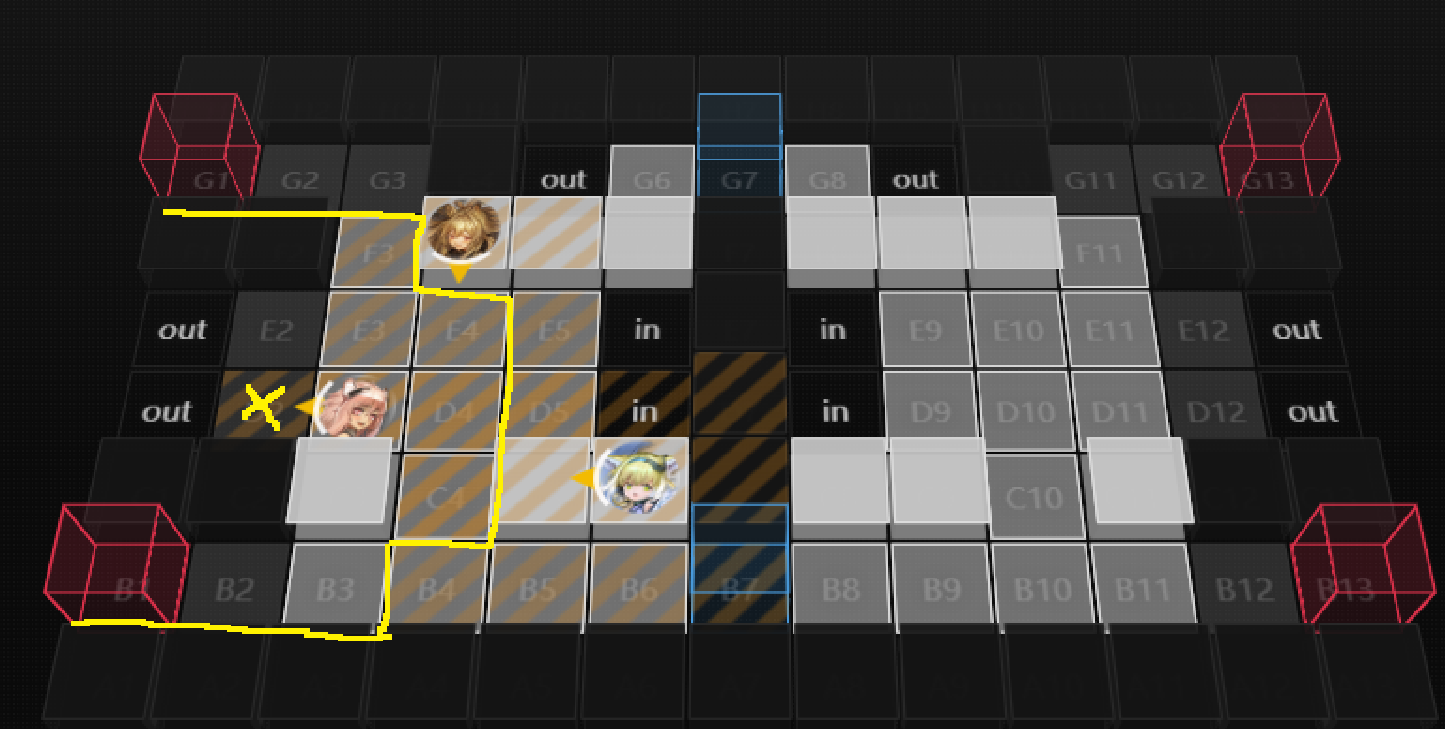
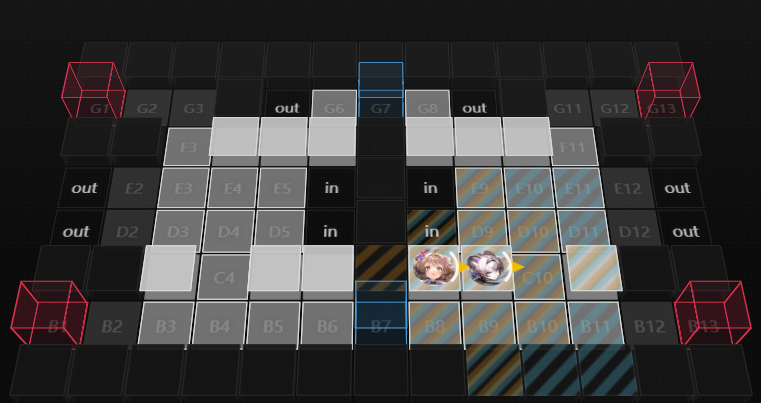
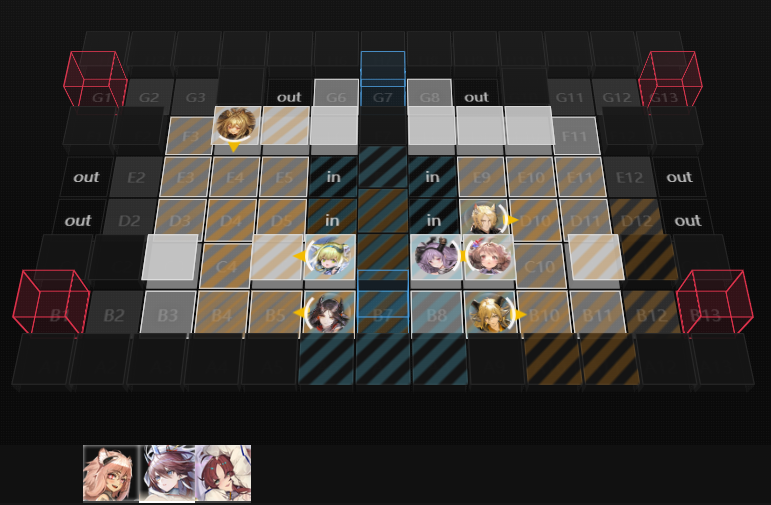
I might refer to specific tiles using coordinates for convenience, which follow this map:
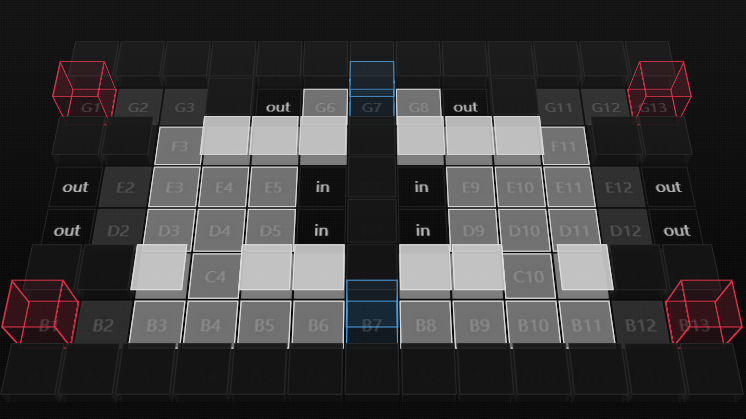
Note that names used in this guide (?) might differ from the actual translation in game, as I’m just using wiki fan translations.
Kharanduu Khan, Scourge of the Land
Section titled “Kharanduu Khan, Scourge of the Land”Sargussy #1, I’m gonna refer to him as red king going forward, since bro is red, a king, and his actual name is too hard to type.
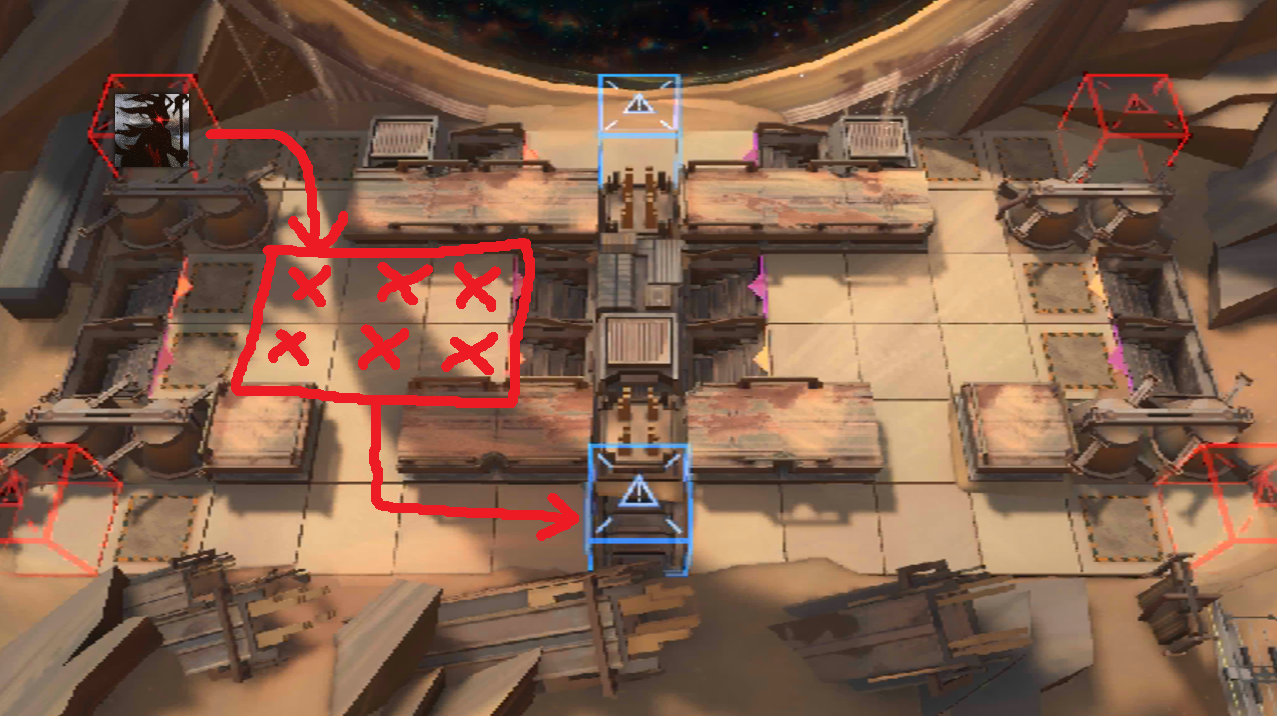
Starting at E2, red king constantly moves towards the right, teleporting to alternating rows, until eventually teleporting right in front of the blue box, and moving inside. If we count moving across both the top and bottom row as “one cycle”, then red king walks a total of 5 cycles before finally teleporting in front of the blue box.
Given red king’s maximum attack range of “diagonal” (very scientific):
It shouldn’t be hard to see that none of the ranged tiles on row C or row F will never be always safe as the red king patrols the entire left middle portion and diagonal range means he can reach every ranged tile left side, but you can totally put them on the opposite side of the red king and have them be safe from red king. For example, a Ceobe on C5 while the red king is at E3, let’s say.
If ranged tiles aren’t always safe, we might be thinking about blocking strats to take the focus off ranged operators, but it’s not as easy as that. Red king attacks with 3045 physical damage every 5s, but for every attack he performs consecutively, he increases his own ATK by 30% and ASPD by 30, max 10 stacks and falling off when out of combat for 4s.
This means that you could probably eat one, or maybe even two attacks from him, but continuously fighting him is not the greatest idea due to the scaling ATK and ASPD. Which motivates helidrop strats (where you put your DPS opposite side of red king and buy as much time as possible using slowers like Suzuran), or just completely outranging him with ranged operators on the right side:
After all, right side ranged tiles are mostly immune from red king’s antics, so I might as well farm the fool from afar
If that wasn’t enough, red king also summons cannon fire (exactly like the Londinium Secondary Defense Artillery from chapter 10 – same size and everything) on the yellow king every 30 seconds:
As the red cannon does a whopping 6090 physical damage (200% of ATK, so if his ATK is scaled up from attacking, this also becomes higher), it is paramount that we manage cannon placement to be FAR away from our operators by carefully controlling yellow king’s pathing.
Note that cannon summoning priority is operator blocking red king > yellow king > taunt > deploy order, so when everything goes wrong, you can block red king right before he summons cannon to avoid improperly managed cannon placement nuking your team.
Finally, with a DEF of 6250 and RES of 50, it should be abundantly clear that Ceobe is the optimal solution when trying to chip away at red king’s 536K health pool, but that’s for the worst case where you have no combat relics whatsoever. With some combat relics you can get creative – even Warfarin + Ray can work (though requiring almost +100% damage in effective combat power, whether through damage scaling, ATK increases, ASPD increases, or other equivalents).
The DEF and RES are further increased by 2000 and 50 respectively when yellow king dies. Red king is also given a permanent +100 ASPD and +100% movement speed buff, which makes managing him even harder.
Lugalszargus, Lord of the Almanac
Section titled “Lugalszargus, Lord of the Almanac”Sargussy #2, same rules as before, now bro is called yellow king cuz I just cannot be bothered to type his full name every time.
Starting at D12, yellow king moves left for 5 cycles (exactly the same as red king) before finally teleporting in front of the blue box and walking in.
With a maximum attack range of “like, basically a knight’s move and a wee bit more” (again, only the most scientific of measurement units):
The ENTIRETY of the right side’s deployable tiles are reachable by yellow king. However, unlike the red king, yellow king doesn’t actually buff ATK or ASPD when in continuous combat. So while he still hurts A LOT with 3045 arts damage every 4s (notably different from red king’s physical damage), at least homie doesn’t ramp to +300% ATK +300 ASPD while attacking your operators.
Since all of right side aren’t safe from attacks, we’re forced to tank with some decent healing. Again, it’s not as straightforward as we first think – yellow king is capable of performing Crownslayer’s dashes (exact same cooldown of 15s, and exact same blink distance of 1.5 tiles), so trying to hold him in place isn’t going to work so well.
Much like red king, yellow king also summons cannons on red king at 30s intervals, though this time it’s 9135 arts damage (300% of ATK dealt as arts damage instead of physical damage). Same targeting rules apply, but since we don’t intend to continuously fight red king left side (either via helidrops or outranging), we don’t have to worry so much about managing this cannon.
Honestly this cannon’s VFX is cuter, I will not accept any counter arguments
With DEF of 1250 and RES of 90, this time it’s not so clear who’s the obvious solution, since there are many, many operators that can punch through the 1250 DEF effectively. Nevertheless, people tend to opt for physical damage operators for yellow king, just be careful the operators used don’t significantly alter movespeed (or at least, if they do, pay attention to cannon timing, this will make sense in a bit).
Like the red king, there’s once again a DEF/RES increase of 2000/50 respectively when red king dies, and a permanent +100 ASPD and +100% movement speed buff. This time, however, the +100 ASPD is very much actually a positive thing for us, as long as we can manage the heavy healing burden.
This is because increased attack speed means less movement between each attack’s massive windup (windup stays mostly the same but attack interval decreases, so that much more of yellow king’s time is spent on attacking rather than moving).
It follows that while his theoretical movement speed is doubled, his effective movement speed is significantly decreased. You might have had a similar experience in one of the CC dailies with Manfred tags that increase his ASPD, where bro’s attack speed scales so much that he just locks himself in place. This case is similar.
Another quirk of yellow king is that he can’t actually trigger his Crownslayer blink while in his attack animation, so if you’re slick about it, a couple fast redeploys for block shifting, a good tank (Młynar, Lin, whatever), and decent healing is “perma CC” for yellow king when red king is dead.
Brief aside regarding alter endings
Section titled “Brief aside regarding alter endings”From Braving Nature 12 and up, floor 5/6 bosses have a 35% chance to transform into an “alter” version where map layout stays the same, but enemies and red/blue box placement can vary wildly. For ending 4, this means though bosses stay the same for ending 4 normal (Sands of Time) and alter variants (Enter Eternity), some enemies appear in both (albeit in different pathing and quantities), while some enemies are present in one but not the other.
What enemies appear in both
Section titled “What enemies appear in both”Khagan’s Shade
Section titled “Khagan’s Shade”
These things go bottom left in both variants. In Sand of Time, there are 26 of them total, going in waves of (in order) 1, 2, 1, 2, 3, 2, 3, 2, 4, 2, 4 and directly bolting towards blue box:
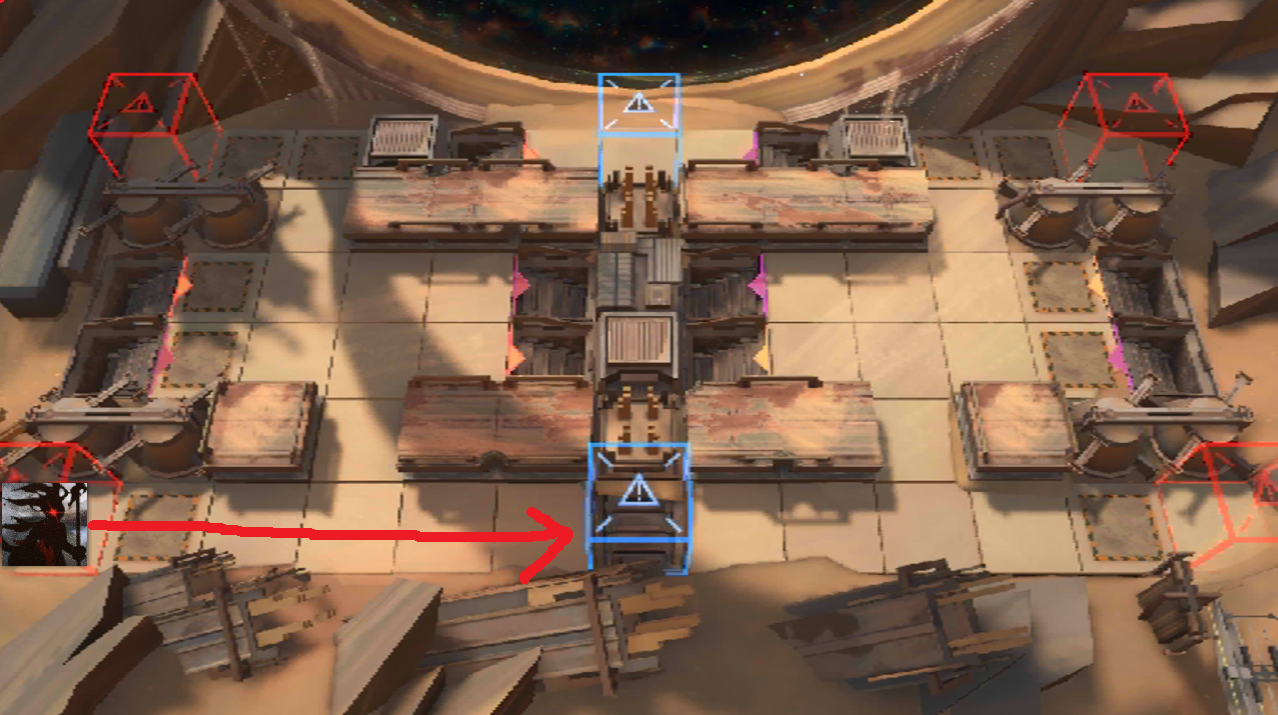
In Enter Eternity, there are 12 total, in two waves of 6 where they spawn from top left, chill in a 2x3 for quite a while, then eventually moves on to blue box:
Since they afk there for quite a while, this generally means the cannon spawned by yellow king will hit them at least once, which is quite welcoming for softening them up before we have to deal with them.
With 12K HP but only 625 DEF and 30 RES, there are a lot of ways to deal with them, you can get pretty creative here – Ines + the occasional fast-redeploy deployment, Zuo Le, Ascalon, and many more can clean these up with ease. Notably, they deal 2132 physical damage per hit, so blocking them might not be the greatest idea.
Royal Companion
Section titled “Royal Companion”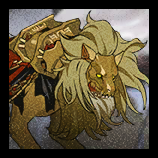
These go bottom right in both variants. In Sands of Time, there are 8 total that directly run from red box to blue box while in Enter Eternity there are 6 total.
Notably the interval at which they spawn can be fairly awkward, in Sands of Time the smallest spawn interval is 19s (ranges from 19-30s) while the smallest spawn interval in Enter Eternity is 23s (ranges from 23-52s).
I bring this up as while you can probably handle Khagan’s Shades with off-skill operators due to their fragile stats, Royal Companions have 59K HP with 375 DEF and 50 RES – you’re probably not killing these off-skill. They also deal 3947 physical damage per attack (albeit with a 3s attack interval) so blocking them can be a challenge as well. A potential sleeper pick is Hoederer S2 to handle lions, bonus points if you get some crowd control duration extension relics.
With extremely hard hitting attacks and high HP, it’s often actually very difficult to deal with all of the lions. Even a modern fast-cycle burst skill like Degenbrecher S3 has an actual cycle of 34s (30s cooldown + 4s skill duration), which means she can’t line up with everything.
So, if you can’t quite afford to dedicate that much resources into dealing with all of them, a popular strategy is actually just leaking all of them. Generally, when you’re at the boss you expect to have more than 6/8 HP, so this is definitely something to consider.
Bloodboil Knightclub Elite
Section titled “Bloodboil Knightclub Elite”There are a couple (4 total in Sands of Time, 6 Total in Enter Eternity) Bloodboil Knightclub Elites that spawn left side and go from top left to blue box. Since you’ve probably dealt with them before, we skip the mechanics introduction (totes not because I’m lazy).
They hit pretty hard (2138 physical damage per hit, scaling up to 2x), and it’s not that easy to deal with them as they have 38K HP with 1000 DEF and 0 RES (lol), but given left side’s relatively low pressure, it’s not a massive deal even if you can’t properly deal with them.
In Sands of Time they chill out top left before moving to the blue box, in Enter Eternity they chill in the middle before moving to the blue box.
Tiacauh Ripper
Section titled “Tiacauh Ripper”12 of them total spawn right side in (Sands of Time in 6 waves of 2, Enter Eternity in 2 waves of 6), but they’re totally just arbitrary fillers that get caught up in the actual fight. Generally, you don’t have to explicitly plan for them, so no stress there. With 22K HP and 575 DEF/10 RES, the HP pool is low enough that you can probably just react with whatever random skill/helidrop you have to your disposal and move on with your life.
In Sands of Time they immediately move to the blue box, in Enter Eternity they chill out in the center (Similar to the configuration of Khagan’s Shade) before moving to the blue box.
Variant-specific enemies
Section titled “Variant-specific enemies”Sands of Time
Section titled “Sands of Time”None, Enter Eternity is just this but better.
Enter Eternity
Section titled “Enter Eternity”Tiacauh Ritualist
Section titled “Tiacauh Ritualist”There are 7 total, in waves of 2, 2, and 3. They start spawning relatively late into the stage, but always synced with Armorless Union Third/Cleanup Squad (NL archers).
With low ATK and low HP – 18K HP, 761 arts damage per hit, they harass your ranged tiles top side but are generally not required to dedicate resources specifically to take them out ASAP. The bigger concern is the significantly increased healing pressure when these croc casters AND NL archers start farming your right side tank.
Nevertheless, they follow the exact same pathing as Tiacauh Rippers:
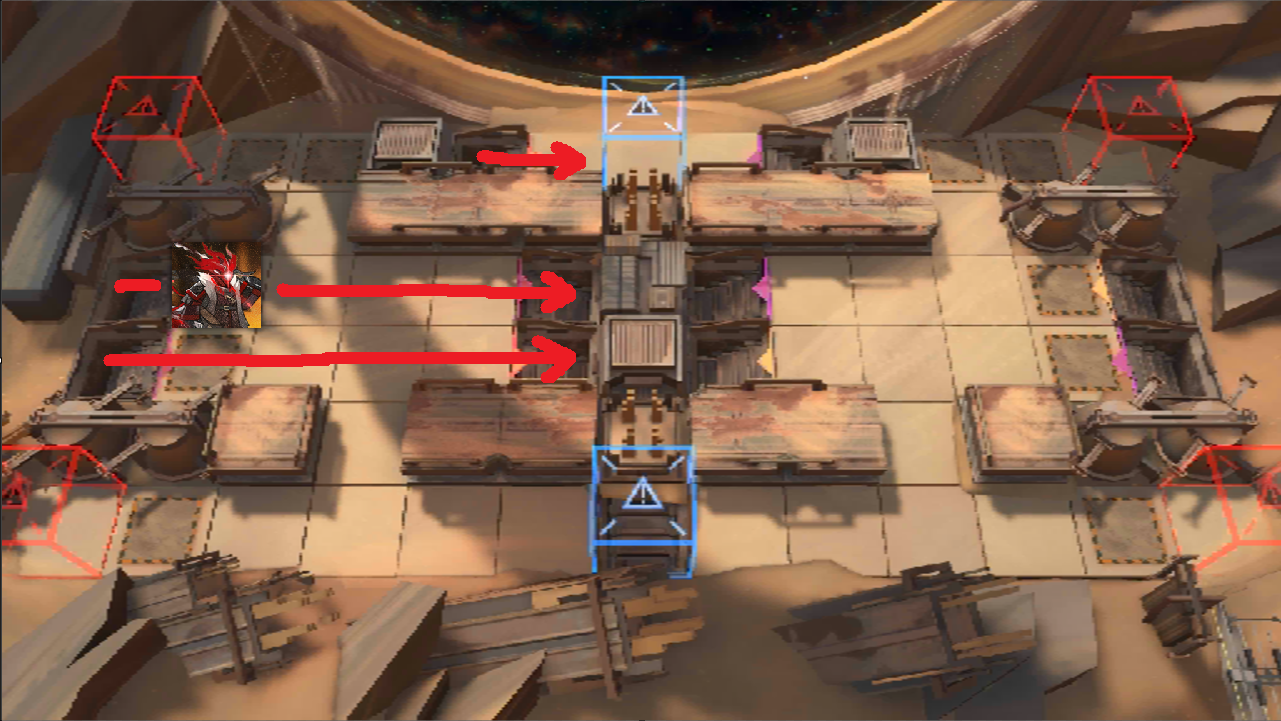
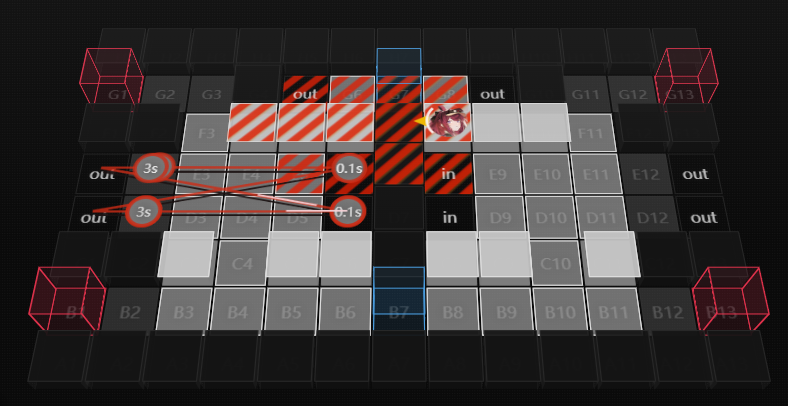
Which seems like they can probably reach everything right side, but this isn’t actually true:
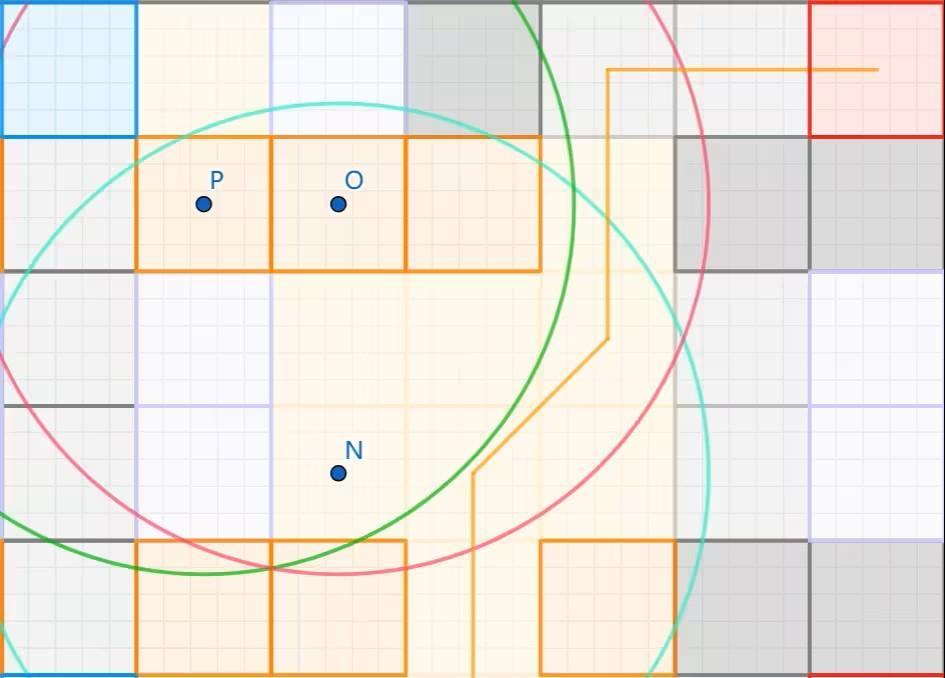
This chart looks very daunting, but focus on the orange line – that’s the path that croc casters take. The green circle shows croc casters’ maximum attack range centered around tile F8 (marked as P): notice how the maximum attack range of casters doesn’t actually intersect with their path. This means that the tile F8 is completely safe from harassment.
Elite Knight Shielder
Section titled “Elite Knight Shielder”The bottom left to blue box path in Enter Eternity are used by these homies instead, with stats similar to Bloodboil Knightclub Elites (35K HP, 1625 DEF, 0 RES) and moderately hard hitting with 2302 physical damage per hit, we can mostly treat them as the same enemies.
With decent DEF, arts damage is obviously better for dealing with them, but modern physical carries work fine too. There are 8 of them total, spawning 1 at a time, so a sleeper pick that can consistently deal with medium pressure bottom left is Zuo Le, whom I really like as a late pick which performs great in both normal and alter ending 1, alter ending 2, and of course ending 4.
Armorless Union Third/Cleanup Squad
Section titled “Armorless Union Third/Cleanup Squad”The bane of my existence. Much like Nature’s Clause (Cannot rob stage), these pose the highest threat of all non-boss enemies in this stage. Similar to the croc casters, they spawn in three waves, first with 2 third squads, second with 2 cleanup squads, and last with 2 of either.
Both of them have 19K HP, with Third Squad dealing 1645 physical damage every 3 seconds, and Cleanup Squad dealing 2302 physical damage every 5 seconds. Because their spawn timing syncs with croc casters, together they present an immense threat to your tanker, who now has to eat NL archer, croc caster, AND yellow king damage. Rough napkin math puts this at 3349 DPS (!!!) before DEF and RES, of which the NL archers proudly contribute 2017 DPS at the last 4 archer + 3 croc wave.
Dealing with them with fast-redeploy operators would be the ideal solution as you want to deal with them ASAP, but their spawn is fairly awkward to reach with other DPS. The kicker is that their HP tends to be just barely high enough that Kirin R Yato S3 doesn’t quite finish them off (if you have no offensive relics) while Kirin R Yato S2’s taunt is likely to get her killed, so put that into consideration when planning your approach.
Tiacauh Champion
Section titled “Tiacauh Champion”6 of them total in Enter Eternity, spawning in 2 groups of 3, chilling mid-right side before moving on to blue box:
Both groups in the position marked in green
For our purposes, all champions except the bottom left one are not that interesting, chilling in the middle like that for extended periods of time just means they get farmed by cannon and our ranged operators.
Their stats are not so different when compared to the lions, except for the blocking quirk. Be careful to kill the ones that are going to get blocked by your tank, and it’ll be no problem.
A modular approach
Section titled “A modular approach”Whew! I figured I wasn’t gonna yap about enemies too much but ended up doing so anyway. That was the hard bit, now we use our map knowledge to devise a drafting plan in preparation of ending 4.
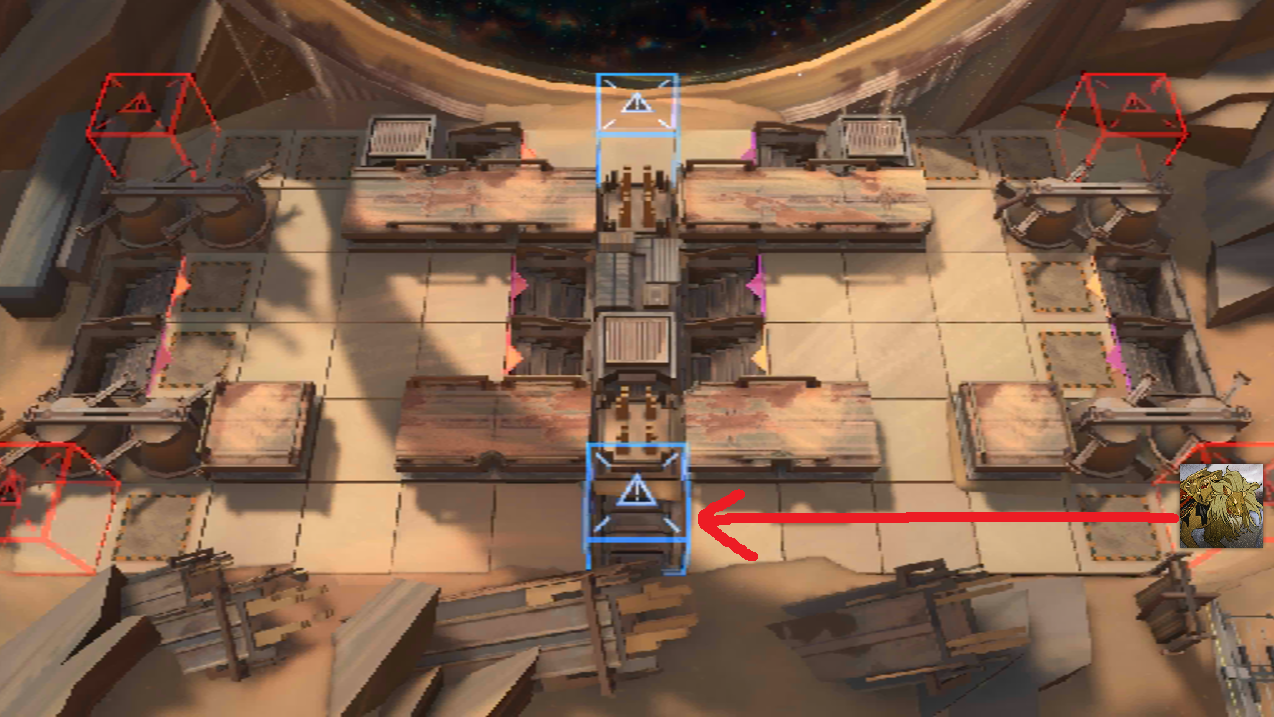
When going through enemy pathing, you might have been abstracting away the “actual” enemies in favor of “bros that go bottom left” or “bros that go bottom right”, and that’s more or less the mentality we want when thinking about who to take – we want four solutions for the four threats in this stage: red king, yellow king, bottom left, and bottom right.
Red King
Section titled “Red King”As (not so subtly) pointed out earlier, the obvious solution for red king is Ceobe - homie has 6250 DEF! There’s absolutely no reason not to abuse that for damage with Ceobe’s talent.
It’s not as easy as “haha I put down dumb doge I win”, though. We have to keep in mind that red king is constantly moving around to patrol his portion of the map, and yellow king is also spawning cannon on red king every 30s.
With Ceobe’s anemic initial startup requirement of 15SP, you have to carefully position her so that she doesn’t end up in yellow king’s cannon range, but still greedy enough to get some good damage into red king.
It’s not quite doomed yet, though. There are things you can do to help Ceobe out, either to buy time for charging skill, controlling cannon to not hit Ceobe, or prolong red king movement to allow Ceobe more time for farming damage. Popular choices that exist right now include Gravel and Suzuran. Later on, Ela serves as a strict upgrade to Suzuran, while Gravel is still probably the highest pick rate not-6* operator for ending 4.
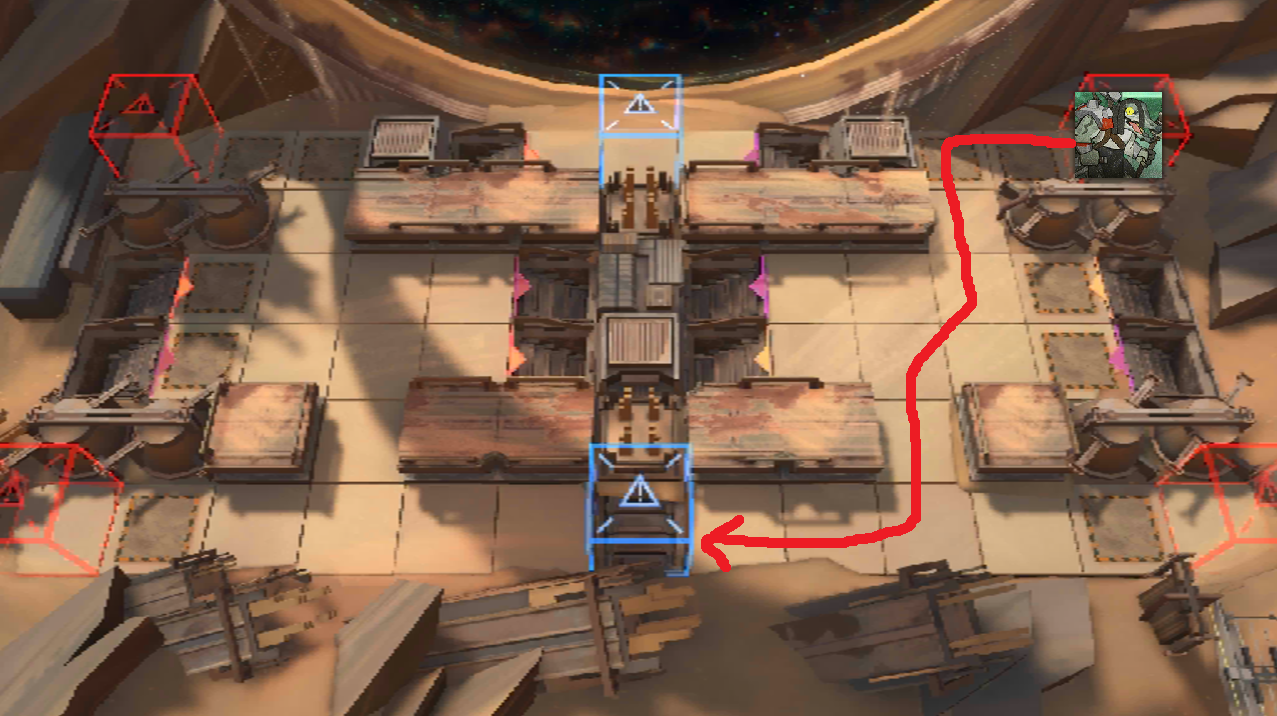
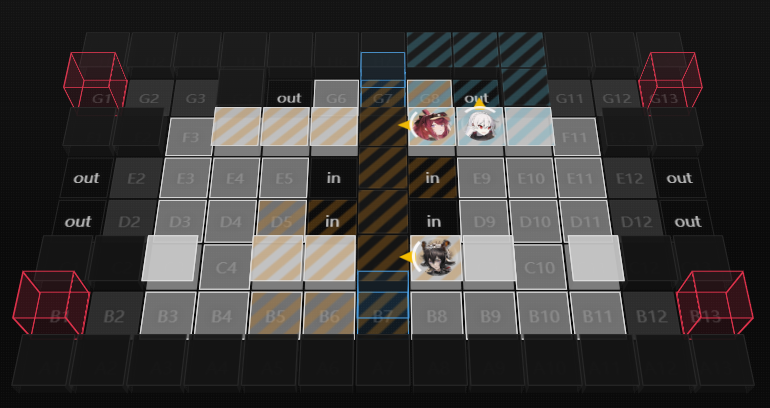
Let’s take this hypothetical where red king is sitting on tile D2, with yellow king spawning cannon very soon:
How might we decide to approach this? Here’s one (of many) possible way:
Yes, the cannon is going to spawn quite soon, but it counts current position of red king, so if we were to block with Gravel (note that Gravel can generally take at least one hit from red king and survive), yellow king thinks “Well idk what they’re cooking, but clearly red king is still on D2, so I’ll bomb his ass there”, keeping the cannon away from Ceobe.
At this point, your Ceobe is probably 6-8s away from using skill, and red king is about to step into her range. But remember that red king’s maximum attack range is only diagonal! So, he’s not going to reach any of your operators for a while. As you get better at estimating cannon location, you can place your operators even more aggressively so that they’ll already have skill ready by the time red king steps into range.
Regardless, this step is easy – just use skills lol. Depending on relics/foldartals, you might do as little as a third of red king’s health when you’re forced to retreat your ops, or you might almost kill him in one cycle (be careful to leave him on a sliver of health if that’s the case, we can easily kill him later, no reason to enrage yellow king yet). Repeat this helidrop as many times as necessary, and that’s the left side solved.
You can obviously draft anything you see fit for this stage, you’re not limited to always drafting Ceobe every run, for example the crowd control doesn’t have to be Suzuran, could totally be like, say, Muelsyse. You might choose to add a Texas the Omertosa S2 somewhere in the mix, or not at all. After Logos release, you can also substitute Ceobe for Logos. Experiment a lot to find your comfort drafts, I’m just providing a general outline.
As mentioned earlier, another mildly interesting solve is to forego helidrop altogether and farm red king from the other side, this could be to add damage (if your relics are bad), or serve as the actual kill for red king (if your relics/foldartals are decent):
One popular strategy is to keep Warfarin + Ray constantly on field and using Ray’s massive range + permanent bind to keep red king in place while farming damage. Because you’re using physical damage against 6250 DEF, though, this combo when performed perfectly still only does more or less half of red king’s health after 5 cycles.
As such, you need at least doubled damage from +ATK relics, +ASPD relics/foldartals, +physical damage (or equivalent -HP) relics, and so on, to make her your main red king solve. It is definitely something to keep in mind though, since this is technically very hope efficient in terms of red king solves.
There are, of course, more operators that can farm red boss from the right side. Ebenholz is another crowd favourite, helping with bottom left while chipping away at the boss.
Yellow King
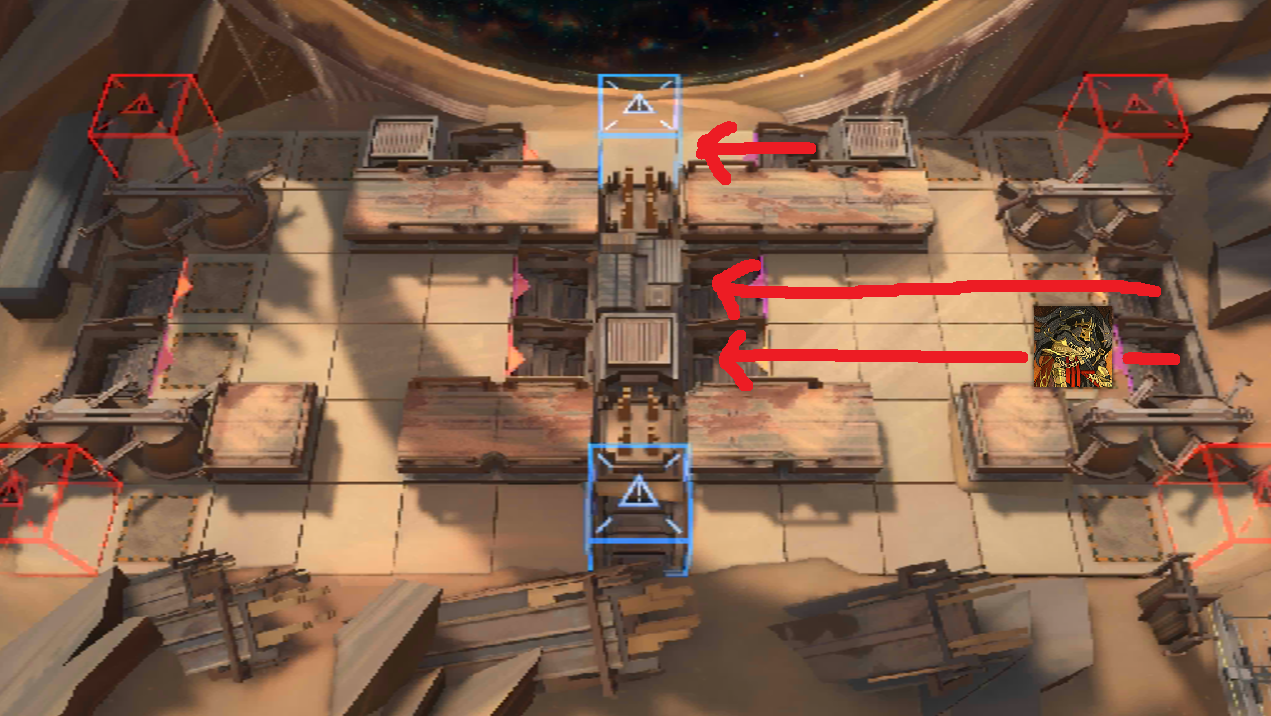
Section titled “Yellow King”From the introduction of yellow king, we had an inkling that it’s best to tank yellow king while controlling red king’s cannon to be away from our operators. But how exactly might we do that? SGL#1 winner VaporVenus first proposed a liberator cycle which does that consistently:
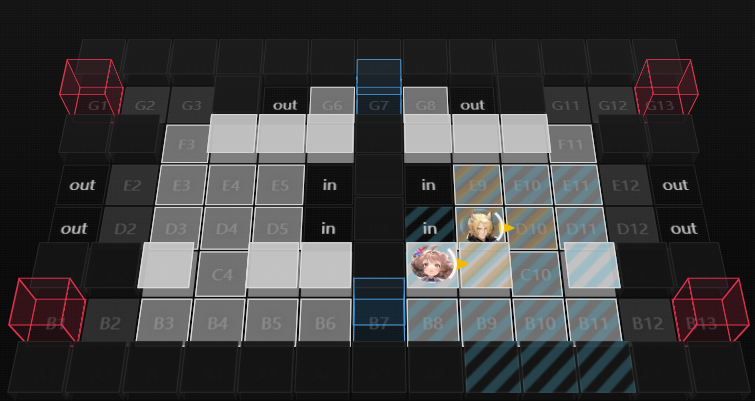
The caveat is that there is a very specific deployment timing to line everything up. You must allow yellow king to complete an entire cycle before placing your liberator. That is, allow yellow king to go from D12 to D8, teleport to E13, walk to E8, and teleport to D13, only then do we put down our tanking setup. Note that when yellow king is at row E, he can’t actually reach any operators placed on B8-B12, so you’re free to put down your bottom right solution after the first teleport.
With this, as long as you don’t mess with movement in ANY way, either via relics like “Cloud-Moving Totem”, operator talents/abilities like Ines talent, or blocking him to trigger his Crownslayer blink, his pathing will always result in red king spawning cannon on him at E12 or D12, out of range of our main setup on columns 8 and 9.
As we don’t want to ever block the boss to avoid triggering the blink, with this setup you want to activate Młynar when yellow king is at E11, so when he eventually arrives at D10, Młynar skill would’ve ended already, and you wouldn’t trigger the blink.
Note that if D9 is somehow not desirable due to dominion placement, tanking at E9 is mostly equivalent, though he can’t help with bottom right if facing right, so use your judgement – if facing bottom he can help with B9, but he gets a little less space to damage yellow king. The biggest difference with E9 setup is that you get one less cycle in, but you gotta do what you gotta do when dominion bans your tile.
Let’s now talk about some alternatives to the standard setup. With yellow king’s DPS of around 750 arts damage per second, your healing can be whatever you want as long as you can outheal that – let’s say you have relics that boost healing output like “Healer’s Path – Keen Hands”:

A normally mediocre relic that’s surprisingly very strong for ending 4
You can totally use healers that have less healing output as they’ll still have the requisite healing to sustain your tank. Interestingly, because yellow king teleports to E12/D12, out of range of your tank, you actually have some moments to breathe every single teleport, so your healing doesn’t even need to reach dynamic equilibrium. For example, one relicless solution to Sands of Time took Ptilopsis as the sole healer with Shu helping occasionally, way less than the theoretical consistent healing required.
Although, like I alluded to before, in Enter Eternity, due to the significantly increased peak healing pressure from Armorless Union Third/Cleanup Squads and Tiacauh Ritualists, the required peak healing is also significantly higher. One idea is to switch to Eyjafjalla the Hvít Aska’s S3 for increased burst healing, but I found even that is inconsistent when your relics are atrocious.
A more consistent idea is Quercus S1 (which is like basically medic Eyja S1) + Nightingale S3, Quercus provides the consistent healing to reach dynamic equilibrium, and Nightingale provides the peak “healing” via cage to tank croc casters/dodge attacks from NL snipers, buying time for your fast-redeploys to take out all the ranged threats.
The interesting thing to consider is that while obviously Nightingale + Quercus is more hope than only Eyjafjalla the Hvít Aska, Nightingale has a much better matchup into Sentinel (ending 3 alter) while Eyjafjalla the Hvít Aska has a much better matchup into Ice-Cold Image (ending 1 alter) and has a slight edge over Nightingale in Hollow Visage (ending 2 alter).
With regards to the tank used, it could be Młynar, who is generally more or less enough damage if you get all 4 cycles in, but if you think your ranged operators can deal enough damage, you can totally replace him with Tequila. He won’t do nearly as much damage due to the worse range and worse DPH/total damage, but the cycle is the exact same with Tequila.
Another alternative you could consider is to tank on C9 with, say, Lin or Carnelian. Due to yellow king’s extremely high RES, they’re not expected to deal significant damage, but they can tank until red king is killed, and participate in the “perma CC” setup (as mentioned before, enraged yellow king moves significantly slower due to stutter-stepping between attacks, block-shifting during attack animation can’t trigger the blink, so continuously block-shifting with fast-redeploys is basically perma CC), or they could potentially work as a replacement to Tequila, where they’re just there to ensure pathing, while your other DPS farms yellow king.
Regardless of your intentions though, there is a little detail that must be stressed about this setup. Due to the placement being a little different from the standard D9 tank, yellow king gets one less auto attack in per cycle, meaning he will desync eventually. You can choose to bait one attack every cycle to make up for this, or block to deliberately trigger blink to realign cycle – totally depends on the situation.
On variations of yellow king cycle
Section titled “On variations of yellow king cycle”This is all well and good, but it assumes the base case of absolutely zero variables that affect pathing. In actual play, you’re bound to mess up or miss details, so here’s how to pre-emptively spot variations, or at least pivot when things don’t quite go to plan.
Concorded “Silence”
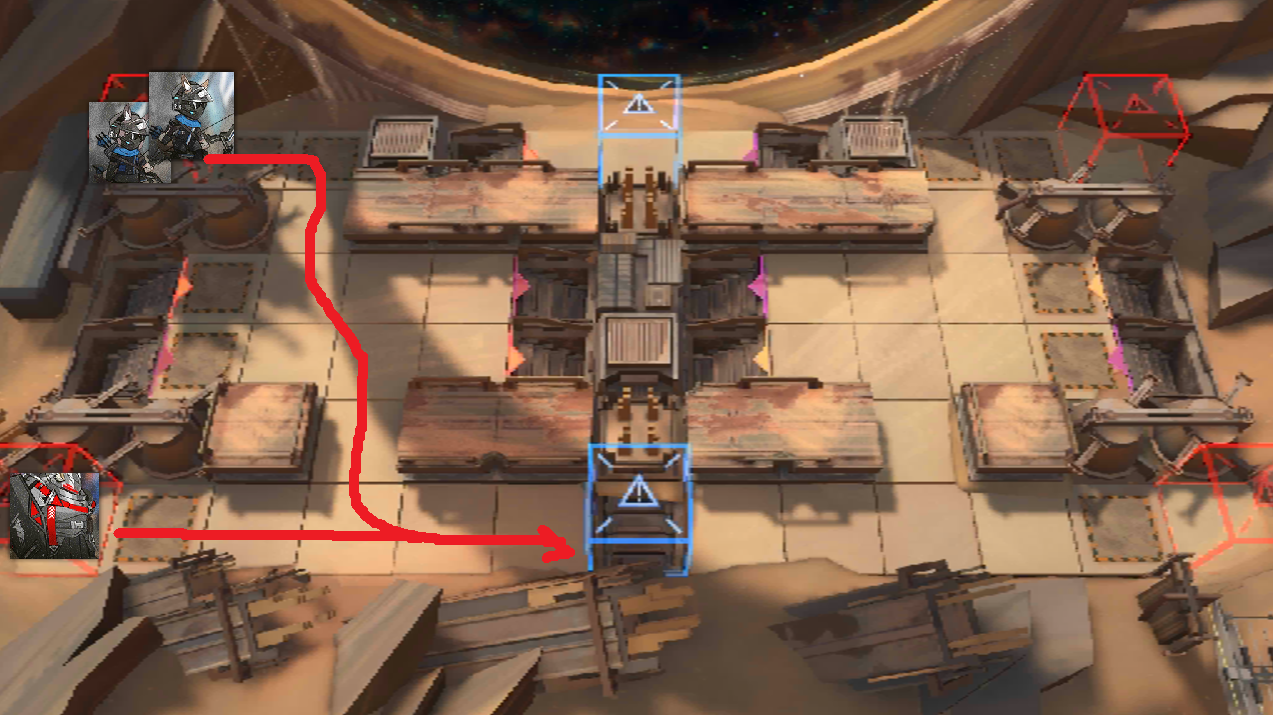
Section titled “Concorded “Silence””The proposed standard D9 tank cycle expects yellow king to fully walk one cycle without any interruptions before placing down everything, but concorded Silence generates two shieldguards at G6 and G8, which he will be attacking even during the first cycle:
Don’t panic! Remember that he performs the Crownslayer blink when blocked? We will use that to our advantage. Because attacking the shieldguards slows him, we need to deliberately bait out a blink to speed up his walk cycle to align with the standard D9 tank variation.
Seems somewhat daunting, but the way to realign cycle is actually fairly easy, after his second auto attack on the shieldguard, bait blink via any blocker. That’s it! Since he’s expected to start hitting your D9 tank after teleporting back to bottom, shieldguards are irrelevant to yellow king after the first cycle.
I fucked up, and the cycle is completely out the window now
Section titled “I fucked up, and the cycle is completely out the window now”It be like that sometimes – again, don’t panic! We should draft for this inevitable outcome anyway. Depending on the way that you deviated from the standard cycle, there are still ways to stabilize.
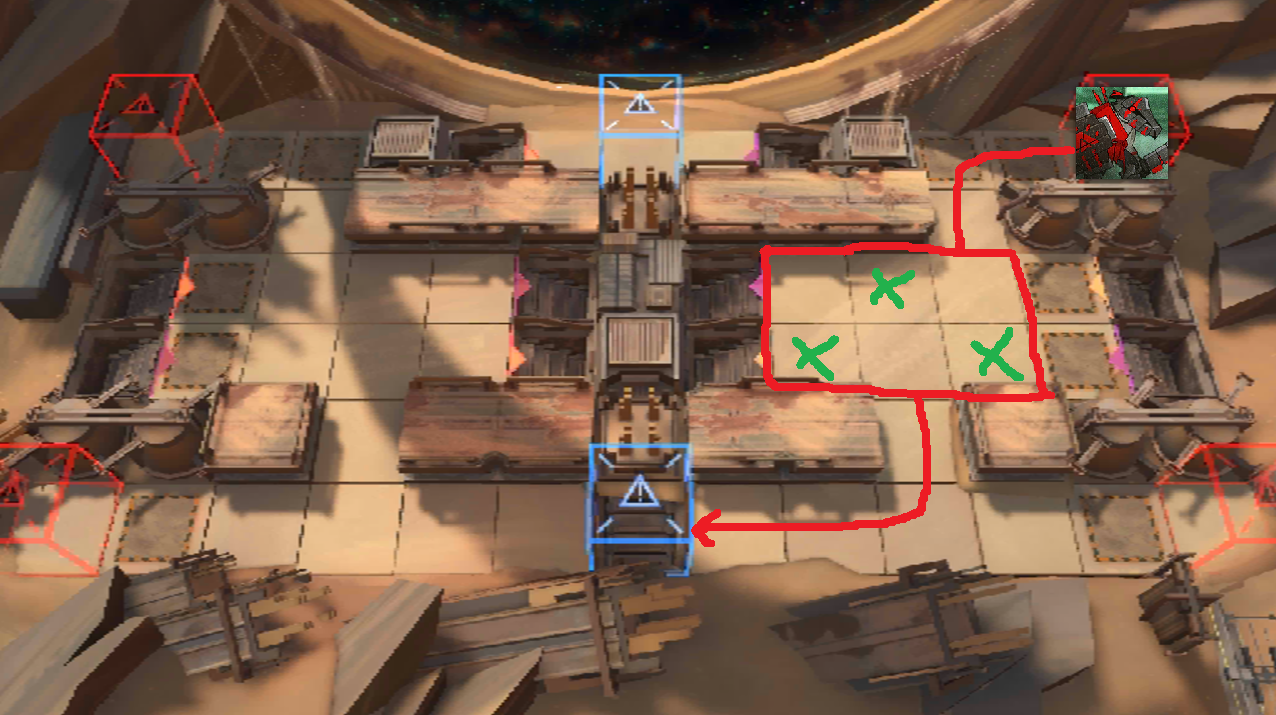
Remember how I stressed that red king’s cannon priority actually first considers the operator blocking him, THEN yellow king? We will abuse exactly this to remove the cannon threat from right side altogether. This method was popularized by a player from CN server’s Theurgy Cup #5, where they used Gravel to remove the need for right side cycle:
Outstanding move, red king
You might be thinking “hold on, why do we even care about the standard D9 cycle to begin with if we can just do this?”, and you’d be mostly right, but this strategy is risky in that with bad timing, your Gravel may need to eat two hits instead of one hit followed by cannon, and you need some survival relics to achieve that, especially with Injury/Crisis Trigger. If your Gravel dies somehow, then the cannon goes on yellow king, and you’re boned. We discuss this just as a backup plan in case the standard plan fails and you must pivot to a riskier one.
If the way you affected yellow king pathing is via slowing/binding instead of accidentally triggering blink when not supposed to, you can do an ad-hoc blink bait completely based on vibes and your own judgement to attempt to realign cycle, similar to how to realigned cycle when yellow king’s movement was slowed by shieldguards.
TLDR: Gravel good, draft Gravel. There is a reason she held the highest pick rate of any operator in Theurgy #5 (I’m being a bit disingenuous due to the tournament format, but please indulge me this one time).
Enemies that go bottom left
Section titled “Enemies that go bottom left”In Sands of Time, only Khagan’s Shades and Bloodboil Knightclub Elite goes left, so the pressure there is probably low enough that you don’t have to draft operators just to counter it, and you can just use whatever unused operators leftover from red/yellow king/bottom right for this.
I like to draft Ines for IS#4, so she generally ends up going there along with the occasional fast-redeploy to clean up higher pressure waves, but really you can kinda just do whatever and get away with it.
In Enter Eternity, bottom left pressure ends up significantly higher due to the inclusion of Elite Knight Shielders, and the higher DEF of shielders make Ines not quite enough to hold bottom left in this variant, so you do have to consider either accepting some leaks or dedicating some hope specifically for it.
Personally, Zuo Le works wonders in bottom left of Enter Eternity due to the enemies having good pressure for activating his talent for maximum SP generation, his S3 is enough DPH to punch through shielders’ DEF too, so no worries about that – bonus points if you have Crisis Trigger to immediately trigger maximum SP generation. Ascalon works similarly if you’re taking spec/cast, but you expect to leak a little without external help.
For the Armorless Union Third/Clean Squads, you generally want to take one of Texas the Omertosa S3 or Kirin R Yato S3 to quickly take them out before your main tank dies of cringe, though I would wager you probably drafted one of them regardless of ending 4 anyway.
Enemies that go bottom right
Section titled “Enemies that go bottom right”In Sands of Time, while Tiacauh Rippers technically walk bottom right, you don’t actually really care about them as they die to random AOE anyway, and even if not, they die to any fast-redeploy deployment. The biggest concern lies in the constant trickle of Royal Companions.
In Barometric runs, you generally only have enough DP to set up the standard D9 tanking configuration and whatever solution for bottom left before the first lion arrives. Thus, similar to Musical Disaster’s first enemy: no need to make it hard on yourself, just leak the first lion to buy time. Of course, if resources are not permitting, you can choose to not only leak the first one, but also ALL of the lions.
Even after leaking the first lion though, you need a game plan for the remaining 7. Due to the interval of lions arriving being way shorter than most skill cycles, you generally expect your bottom right solution to handle maybe 2 out of 3 cycles (first and last), while the rest of your team handle the second lion with crowd control or fast-redeploys (Gravel goated once again).
The most popular solutions for them include Degenbrecher and Ela, in fact I sometimes take both for bottom right duty. Ela can flex into fragile/crowd control duty for red king when her mines are not needed to take care of lions.
Enter Eternity is not so different, there are 6 lions total instead of 8, and arrival intervals are a little more lenient than Sands of Time, but the idea stays the same.
The one thing to be careful of are the Tiacauh Champion waves, where both waves have one champion AFK on D9 before moving on. With their high ATK stat paired with yellow king, your D9 tank is EXTREMELY likely to die if you activate skill with them still on D9, either bring crowd control solutions or kill them before activating your tank’s skills.
Bro just wants a hug methinks, a slightly lethal one at that, but a hug nonetheless
Something else that may come up once in a while are Tiacauh Ritualists. In Warfarin Ray compositions, we know that Ray tile is completely safe from harassment from ritualists, but Warfarin tile very much is not. You might want to divert some resources their way to protect your Warfarin.
Putting everything together
Section titled “Putting everything together”The entire point of the previous section talking about each of the four threats in this stage separately, is that you can mix and match any combination based on your situation (chosen squad, existing Collapse effects, previously drafted picks for specific endings), whatever.
Let’s take a look at a contrived example to see what I mean by this. Let’s say you just came out of Ice-Cold Image barely alive (5 HP left) with a comp like this because you didn’t really have a clean solution for left side spider/cleavers:
You’re up against Sands of Time, so maybe RNGesus is smiling upon you after pummeling you to the ground with ending 1 alter, but what do you still need to have to take on Sands of Time?
Let’s go through the list:
-
Bottom left enemies: this one is easy, with the relatively low pressure and low DEF values, Ines can mostly handle it, when it seems like the pressure might be too high, drop a Kirin R Yato to help her out
-
Bottom right enemies: Degenbrecher somewhat fits the requirements, but we know that she can’t quite cycle in time, so we need to draft additional help. Typhon can help out a bit with the crowd control, but we can’t realistically expect Typhon to actually kill the lions. Fine, keep a mental note that you probably need to draft a Gravel.
-
Yellow king: On the topic of Typhon, while she’s often used for the right side to add damage to yellow king for making total damage more comfortable, her talent’s first-hit bonus applying sluggish is very annoying for lining up the standard cycle. While this might not immediately cause a desync on first skill activation, two skill activations might be an issue. We do have the standard D9 tanking suspects with Eyjafjalla the Hvít Aska and Młynar, so at least that’s no problem. Make another mental note to yourself to reserve a blocker ready for deployment in case you need to bait out a blink to realign cycle due to Typhon’s slows.
-
Red king: Fuck. Well, better hope the shop gives you some good vouchers, because you have zero solutions to deal with red king right now. Having multiple alternatives to deal with a given threat is a good thing specifically for situations like this. Let’s say you have a “Sing” foldartal ready for use, a -DEF relic, and “Fatal Bolts – Crossfire” (Snipers have +40% ATK but -40% HP), that’s likely enough effective combat power for Warfarin + Ray to work for red king. But let’s say the shop doesn’t actually offer you sniper vouchers and instead only offers caster vouchers, you would have to lean into Ceobe instead. Finally, if there are no crowd control options available to help Ceobe deal damage, you might choose to assign Ines to red king duty, and just accept the occasional leaks bottom left (hopefully you’ve healed up enough by then).
As a side note, since bosses get enraged when the other dies, it’s often best to sync up kill timings.
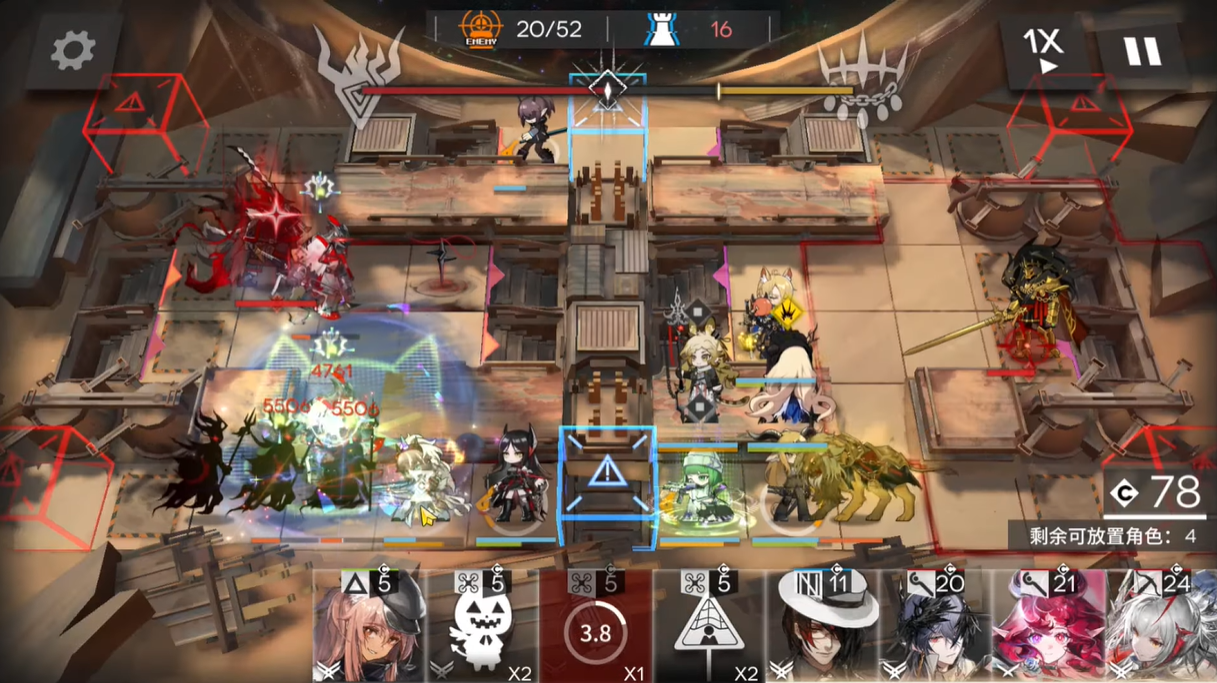
A sample placement, then, might be something like this:
Ceobe/Suzuran are just to indicate that they’re in the squad, the actual placements very much depend on red king routing as you’ll be deploying these as helidrop, just be careful to avoid yellow king cannon hitting your operators. Yato can help with bottom left, or maybe bottom right depending on the situation. Gravel is a fail-safe in case Typhon talent desyncs so you need to bait blink, or perhaps you want to pull off the trick with red king bombing himself.
Let’s perform the same thought experiment but for Enter Eternity instead. This hypothetical run probably can’t handle ending 4 alter since there’s just not enough resources unless cracked relics, but let’s assume we somehow have infinite resources:
-
Bottom left enemies: Ines is nowhere close to enough, due to the low RES of shielders, a Texas the Omertosa might be just fine if you rotate fast-redeploys, you can even get Texas to help with lions bottom right. Alternatively, if the run has barometric, then your DP is never keeping up with constant Texas deployments and Ceobe helidrop, so a solution that saves more DP long-term like Zuo Le might be better in this case. The increased healing pressure from NL archers likely also means you need to draft another healer, perhaps Quercus.
-
Bottom right enemies: Not significantly different, maybe something for the Tiacauh Champions that sit on D9 like saving Kirin R Yato S3 for when they start walking to their AFK positions in the middle.
-
Red and yellow king: Same as before
The moral of the story, I think, is not to force a pre-set team every run, but pivot to solutions that best suit your needs depending on how the run is going. That’s how I found the most success with ending 4 anyway.
Closing remarks
Section titled “Closing remarks”I once again have no clue what to put here. The “Love in Sami” artwork in the title page is made by cynik, discord handle “78x” at the time of writing. Word on the street is that he has a massive cock.
Please message discord handle “tsunderekermit” if any changes need to be made, cheers.