Izumik: Slaying the Ocean
A Dummies Guide to Slaying the Ocean
Section titled “A Dummies Guide to Slaying the Ocean”
Foreword
Section titled “Foreword”Glory of Humanity is one of the hardest stages ever made in Arknights. It features absurdly tanky enemies and a boss who is both tanky and has several mechanics that must be played around. On release, consistently beating this boss was no mean feat, requiring you to learn multiple different strategies and adapt to the rejections and tickets that were provided to you. Thanks to the increasing power level of operators as well as advancements made in strategies, we now have multiple strategies that are viable. This guide will give an overview of the enemies, the stage and the solutions that have been developed as of the end of 2025.
Enemy Overview
Section titled “Enemy Overview”To understand how to conquer this stage, we must first understand the enemies. Thankfully, there’s only 3 different types of enemies so understanding how they work must surely be easy right?
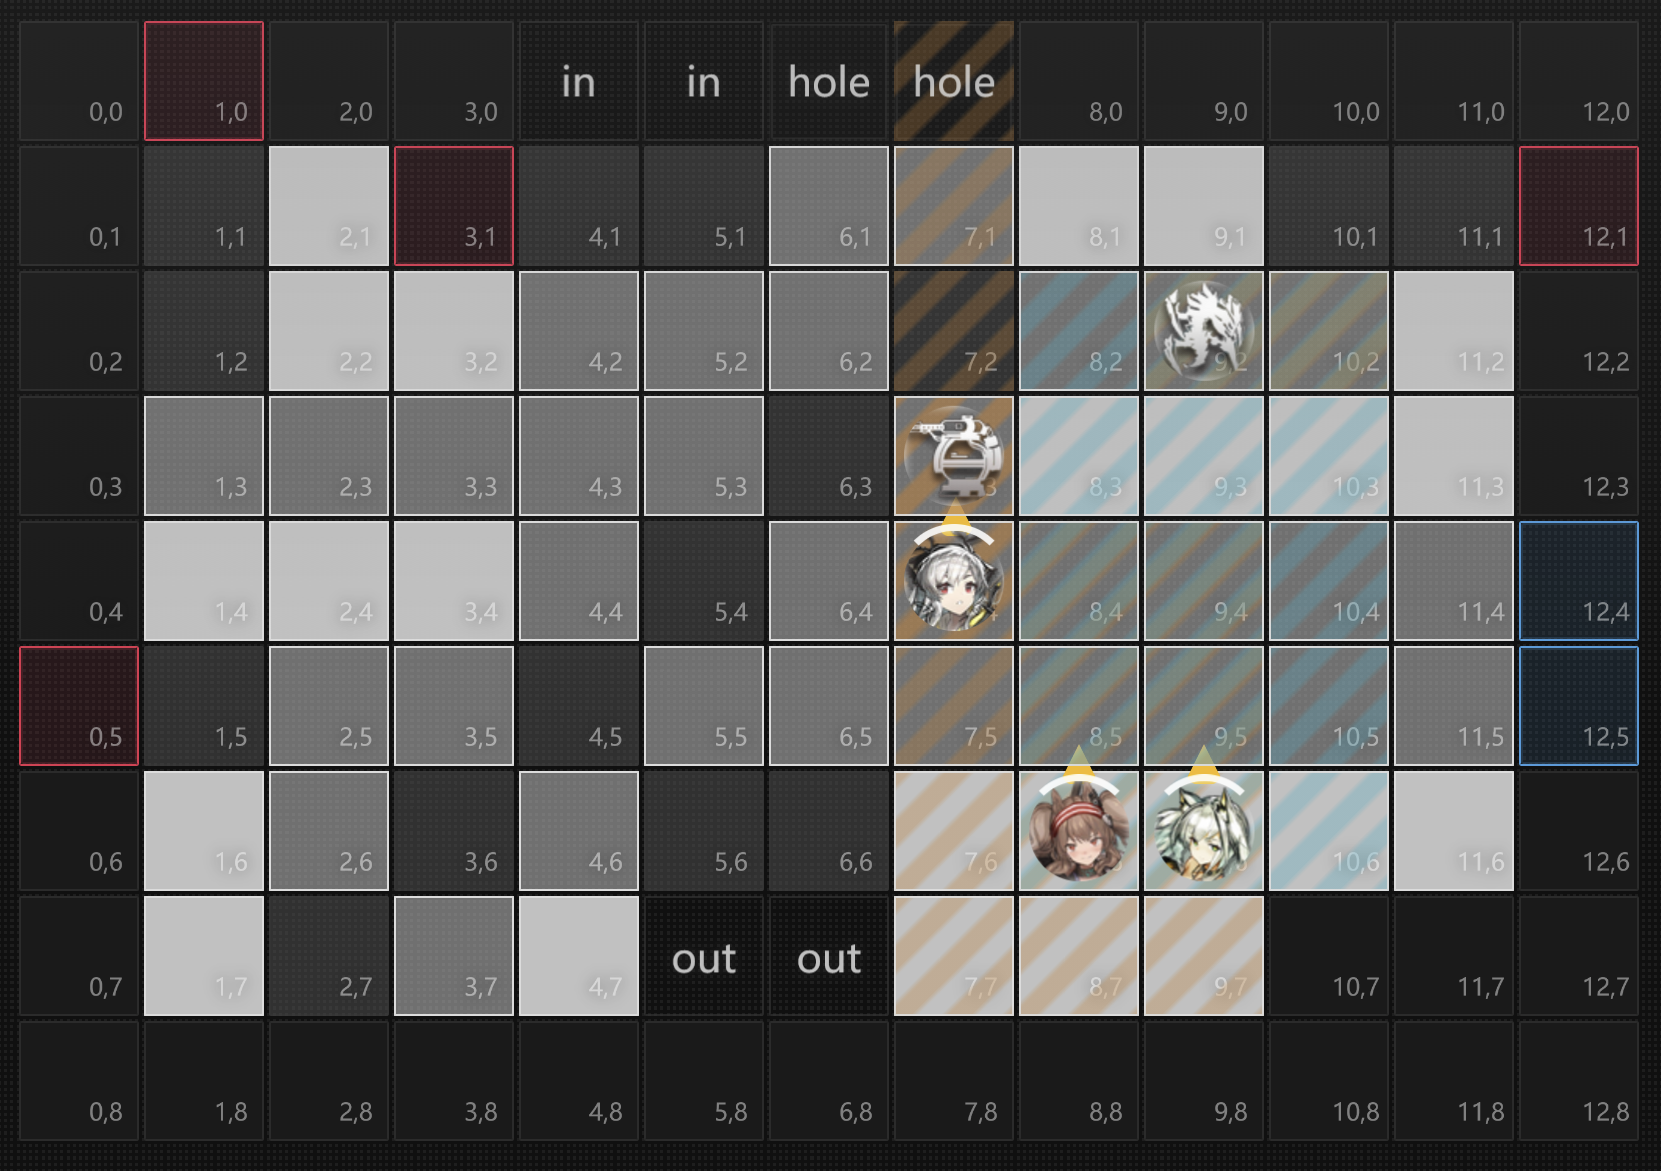
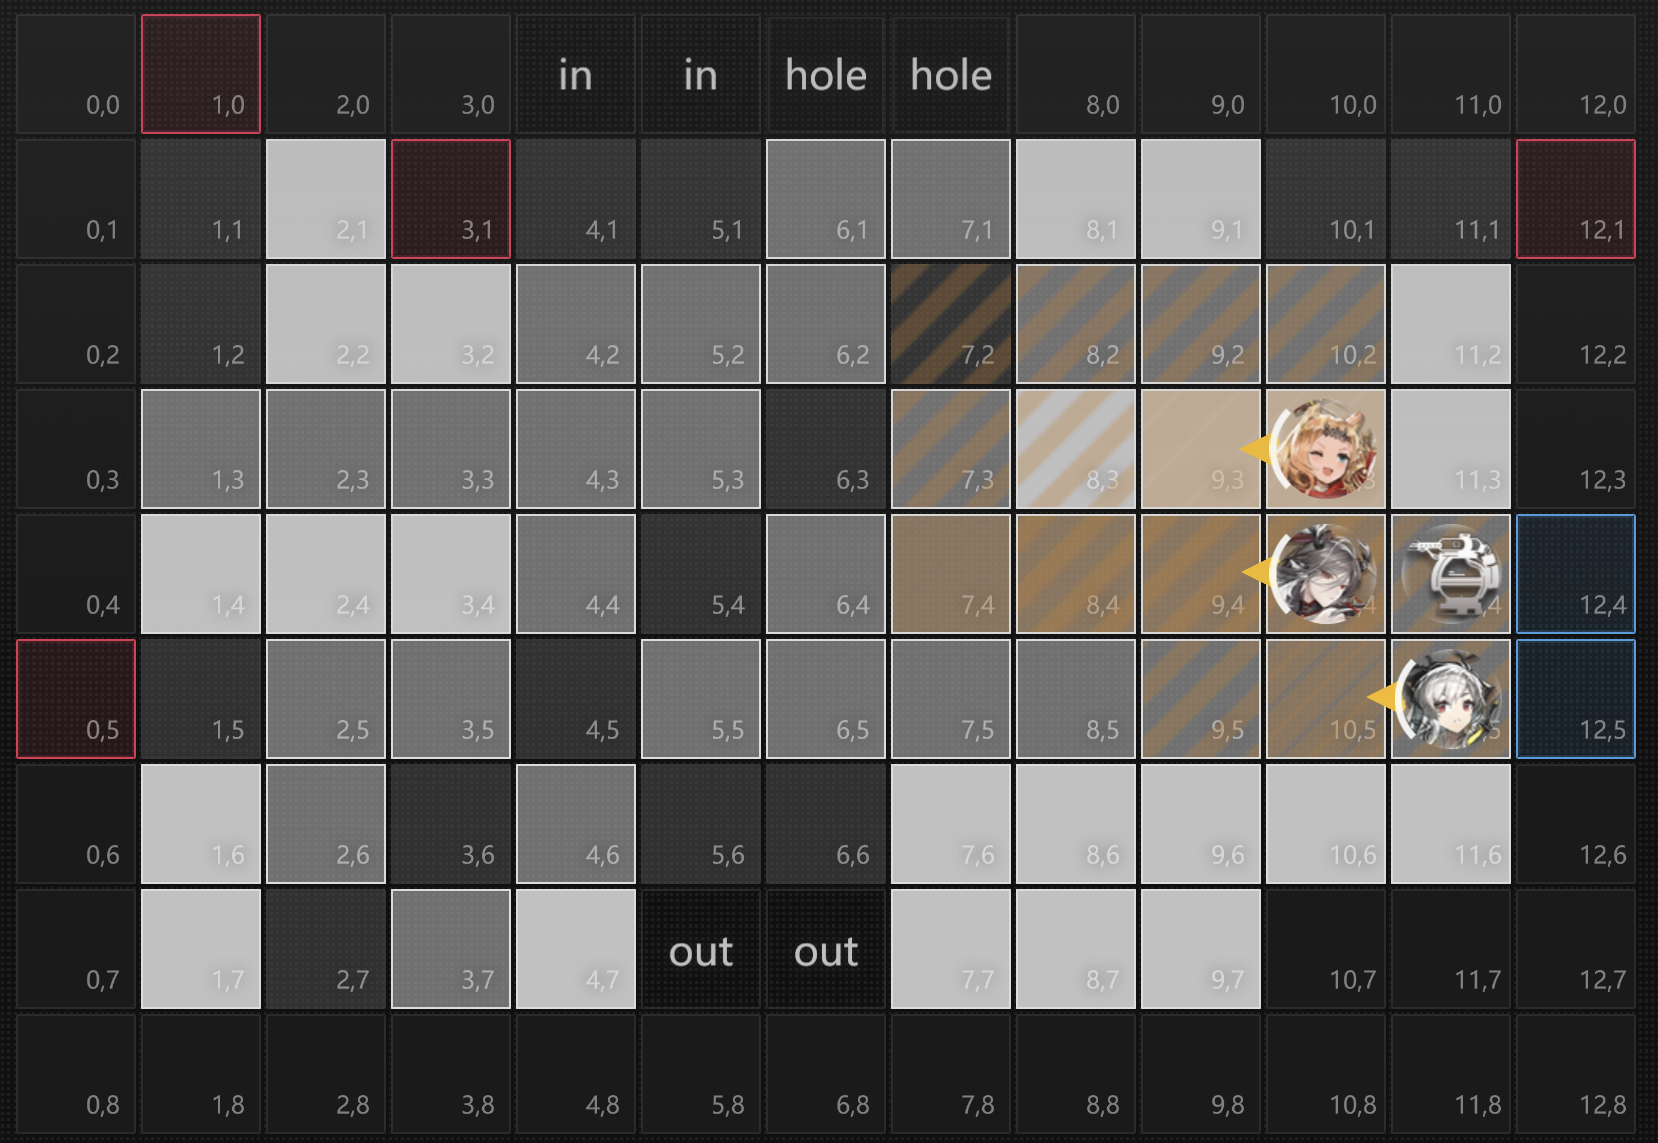
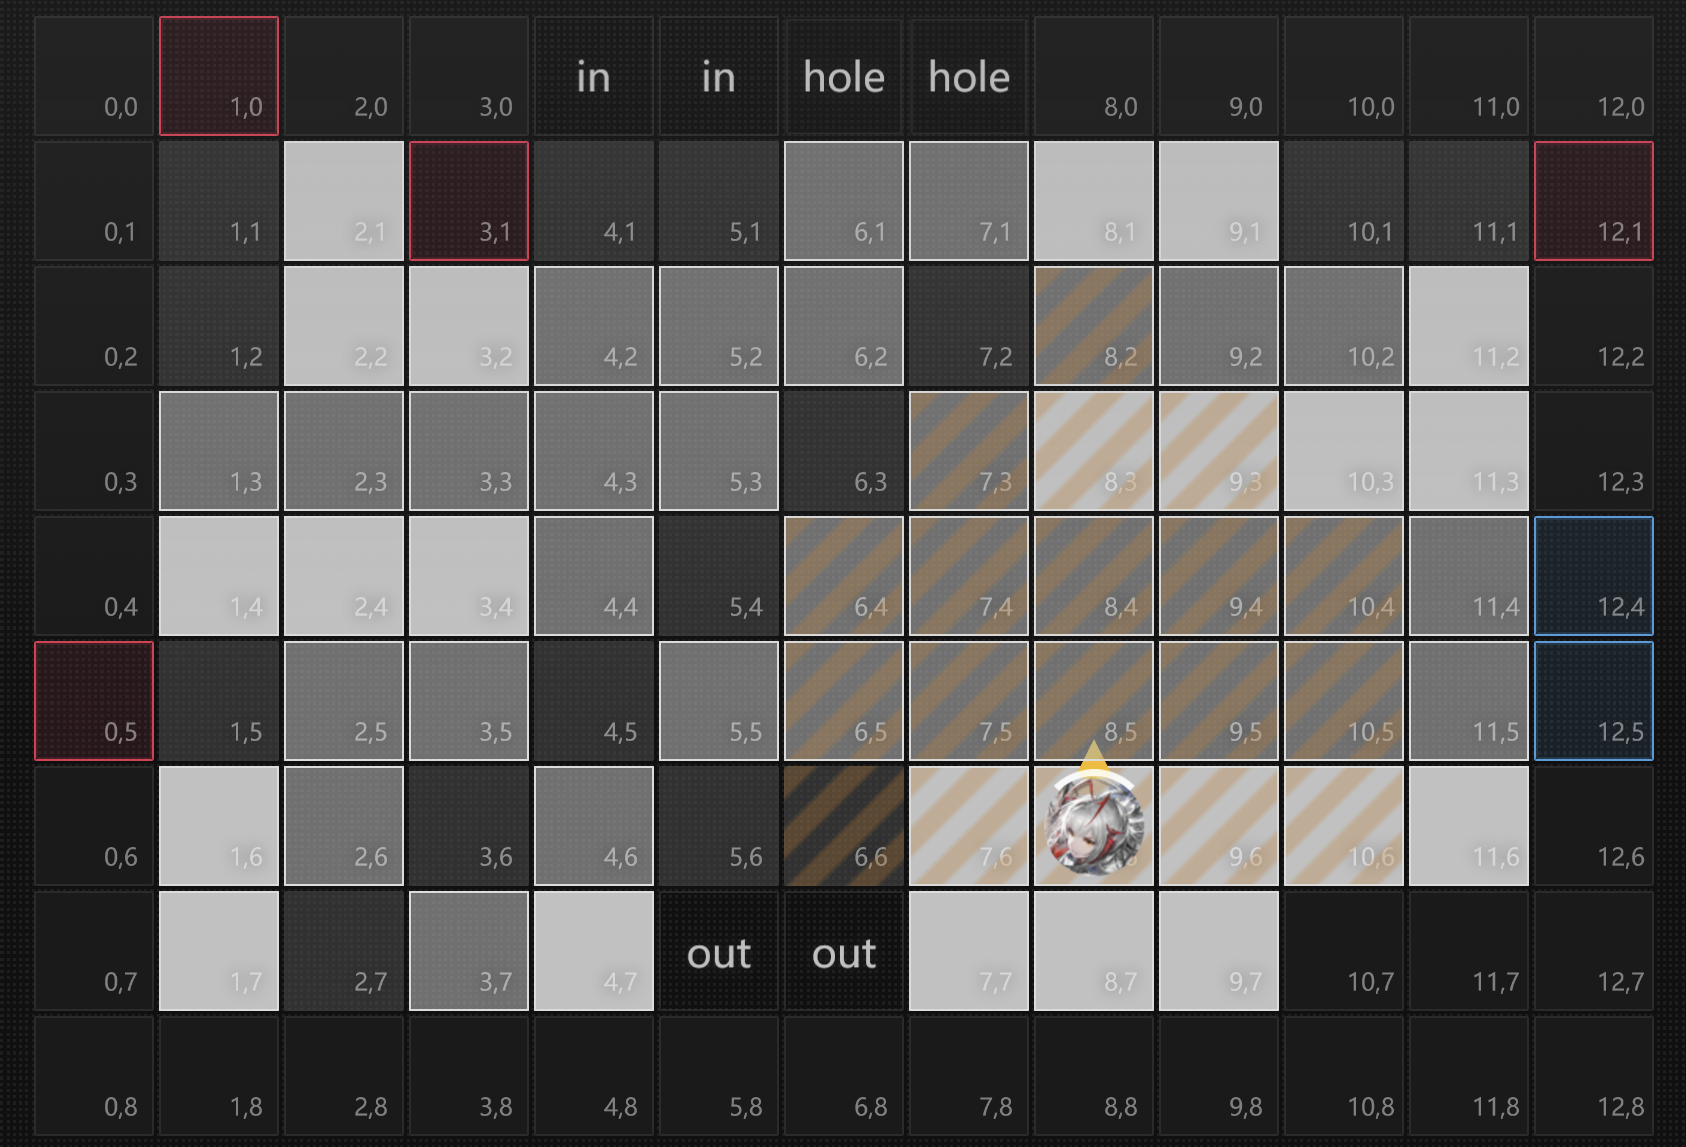
We will be using the coordinate system in this map to refer to enemies.

Izumik, Source of Ecology
Section titled “Izumik, Source of Ecology”
His name is a mouthful, so we’re just calling him Izumik. Mizuki really took it personally when we said he’s bad. Maybe if he had his IS module back in 2023 he wouldn’t have been clowned on so much!
This boss is a little complicated. Not only that, Izumik and his interactions with the enemies are impossible to separate in an explanation! As such, we will first describe the boss by introducing the mechanics as they would naturally come up if you were to play blind (there will be a page that lists the mechanics introduced at the end as well).
Izumik: Phase 1
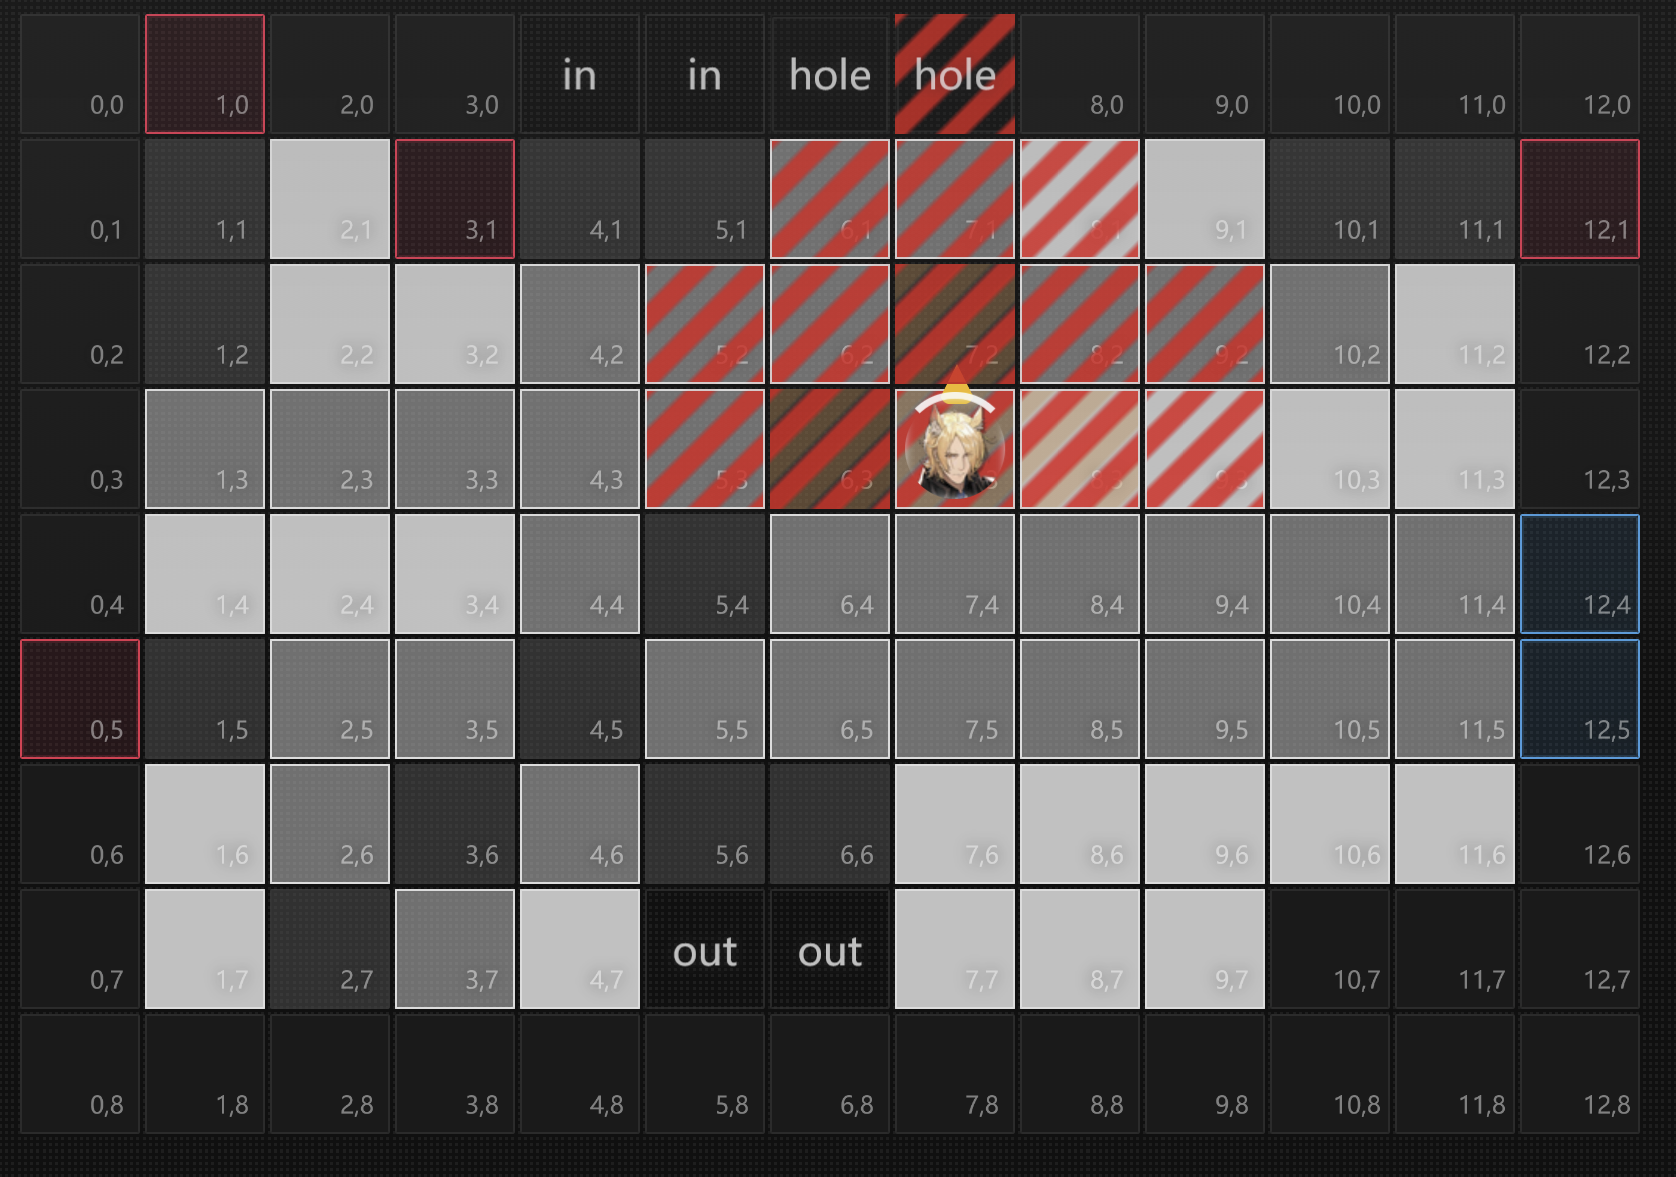
Section titled “Izumik: Phase 1”The Map:
Section titled “The Map:”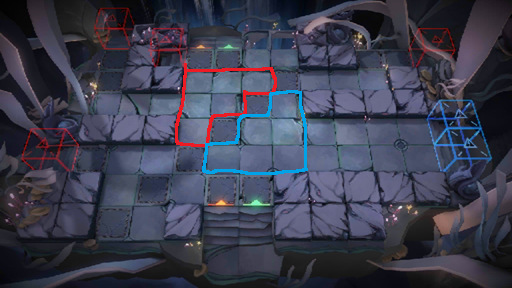
When Izumik uses Summon Jellyfish, he spawns the group in one of two zones randomly
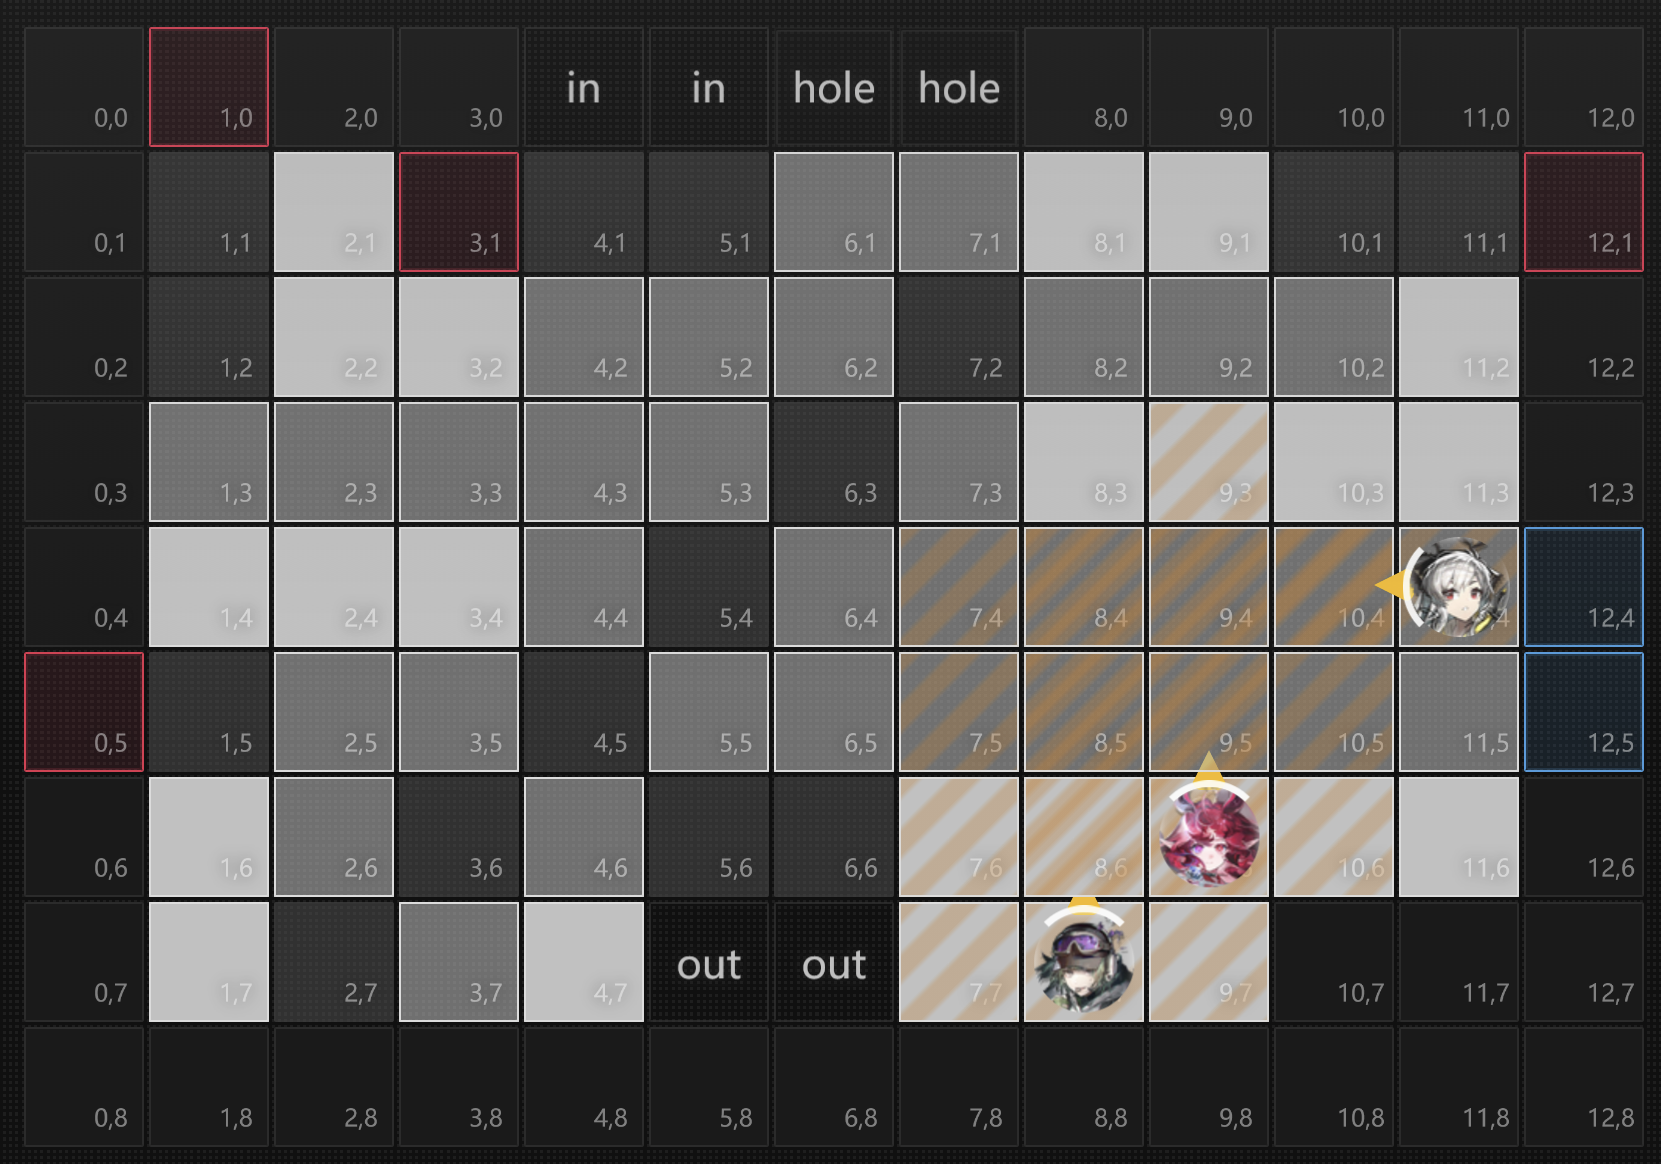
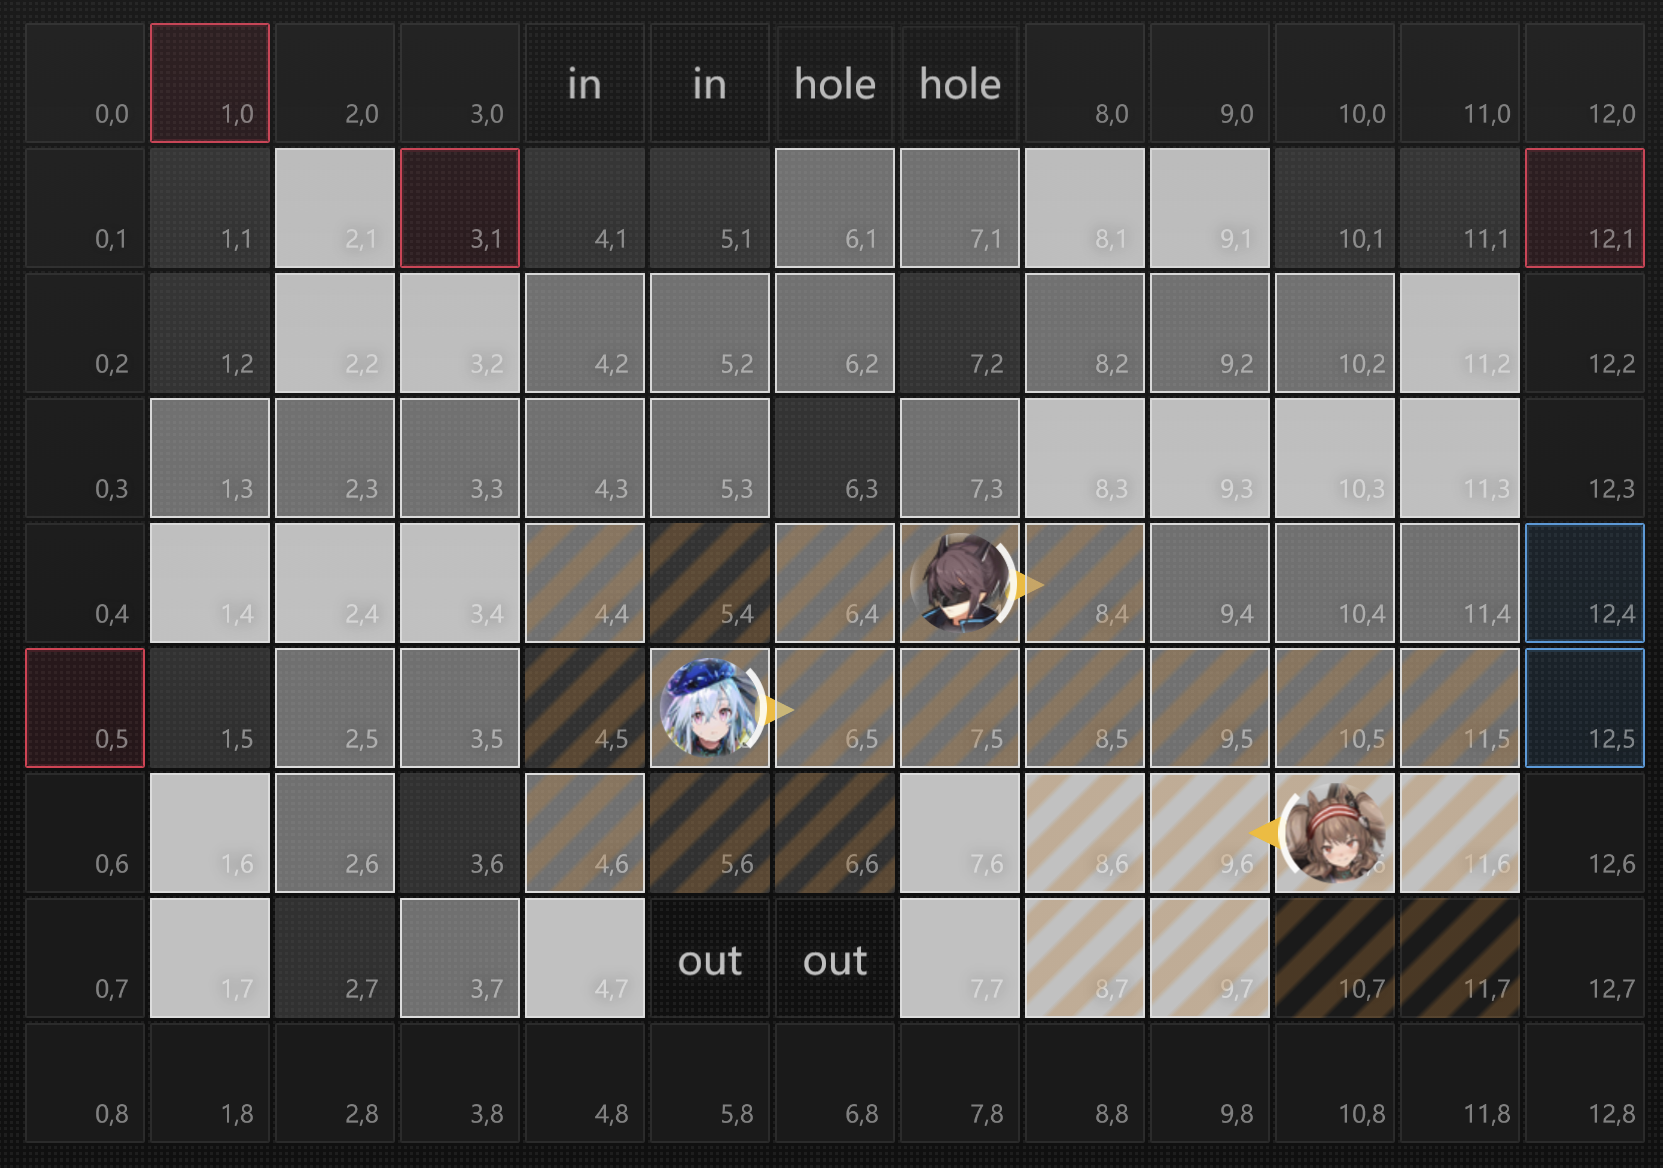
Upon entering the map you will notice a few things. Only Izumik is on the map and he’s chilling at 2,7. He is completely invulnerable. And he’s at 40% hp. We call the phase where he’s invulnerable phase 1 (p1 for short). As soon as the map starts, he will cast his first skill: summon jellyfish. He will spawn 6 of these suckers in a triangle in one of two spots randomly. This skill costs 120 sp for him to use. This means every 120s he will cast it until he enters phase 2. The red triangle is one possible spawn, the blue triangle is the other one. These jellyfish will start to move after about a minute to the stairs.
Speaking of jellyfish, this is as good a time as any to introduce you to the main enemy on this stage:
Izumik’s Offspring (Jellyfish)
Section titled “Izumik’s Offspring (Jellyfish)”
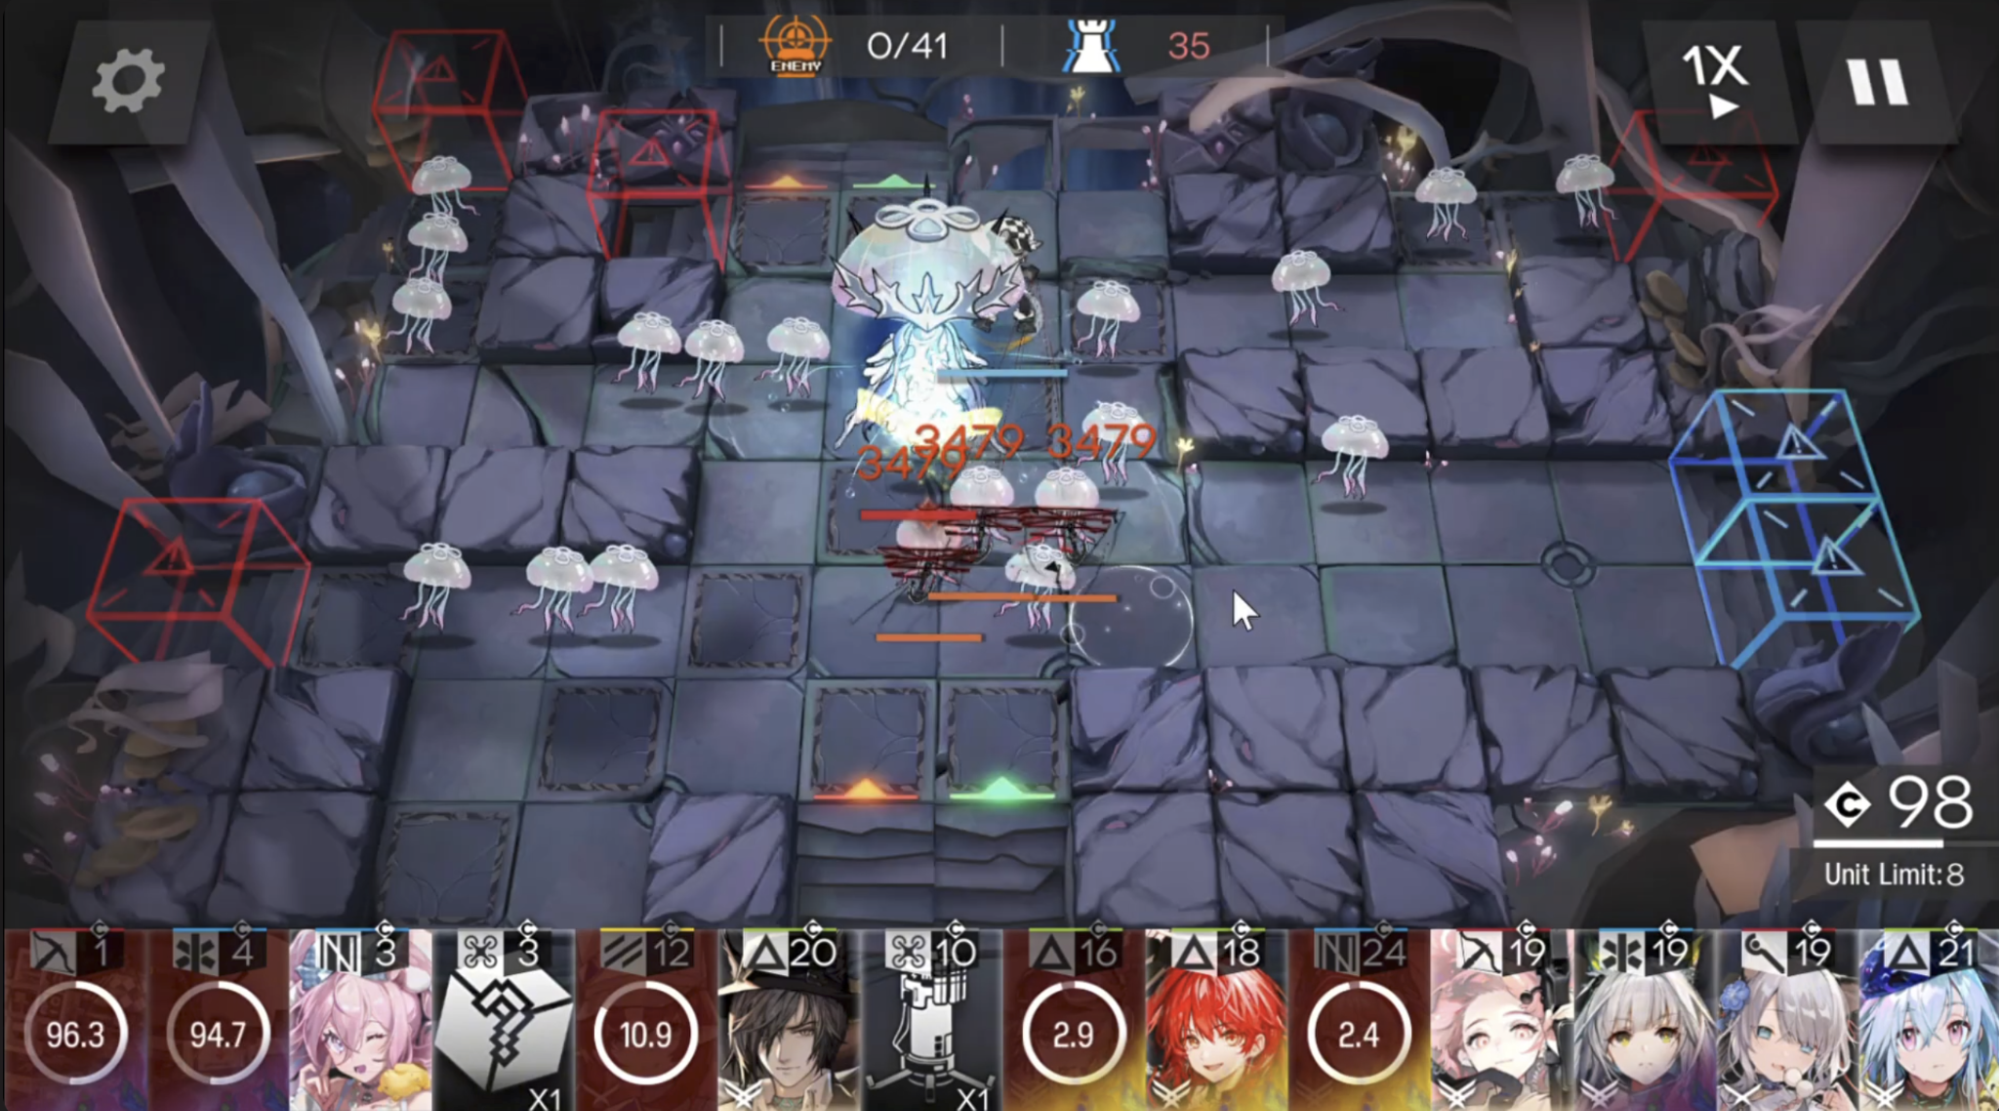
These little buggers are way too cute for how evil they are. At d18 they have 96536 hp (46261 at d15), 2000 defence and 90 res. Notably, they also have 0 weight (very important)! They are immune to Stun, Silence, Sleep, Freeze, and Levitate. Jellyfish are regular enemies and spammed constantly through this stage. At any given time you may be dealing with 10+ of these! They’ll come out of every red box with this routing:
They don’t attack, but they have a nasty surprise waiting for you if you try to block them. When a jellyfish is blocked, they turn into an enemy that is randomly pulled from a preset pool. These enemies range from Bone Sea Drifters (lol) to Imperial Strikers (not lol). The pool of enemies is different from each of the 4 red boxes and the pool of enemies will change as well. At the start you’ll get mostly trash mobs, but at the end, blocking any jellyfish will quickly spell your doom when the lootbox reveals a Guerrilla Mortar.
So, blocking them is almost entirely out of the question. But they’re also inhumanly tanky. 2000 defence is nothing to sneeze at, and 90 res shuts off almost every caster. Not only that, we’re dealing with dozens at once! This leaves us with one very obvious solution. Remember when I noted that they had 0 weight? This means any pusher or puller is able to send them flying! This doesn’t just mean specialists (though they are very very important). Casters such as Mint (who works at e1) and Mostima can keep jellyfish at bay for your dps operators to handle them! Wildmane is a notable mention here for her s2 which can also push jellyfish away. Not only that, jellyfish are vulnerable to slow and movement speed down effects. This means supporters really shine in this fight (or Ela). Operators like Ela, Lucilla, Suzuran and Earthspirit provide a valuable slowing effect for the jellyfish. What this means is that the fight against jellyfish is about cycling your skills, pushing or pulling the jellyfish away from the blue box, then slowing them down with your other operators to buy enough time for your pushers/pullers to be able to push again. While this is happening, we use our dps operators to kill the jellyfish. Speaking of which, we should probably introduce our candidates:
Since we are dealing with dozens of jellyfish at once, there are two traits that our dps operator must have. The first is that they must have a high dph (damage per hit). 2000 defence is a lot after all! The second condition is that they must be AOE. If they weren’t then we’d be eventually get overwhelmed by the swarm of jellyfish (and get goobed by the boss)

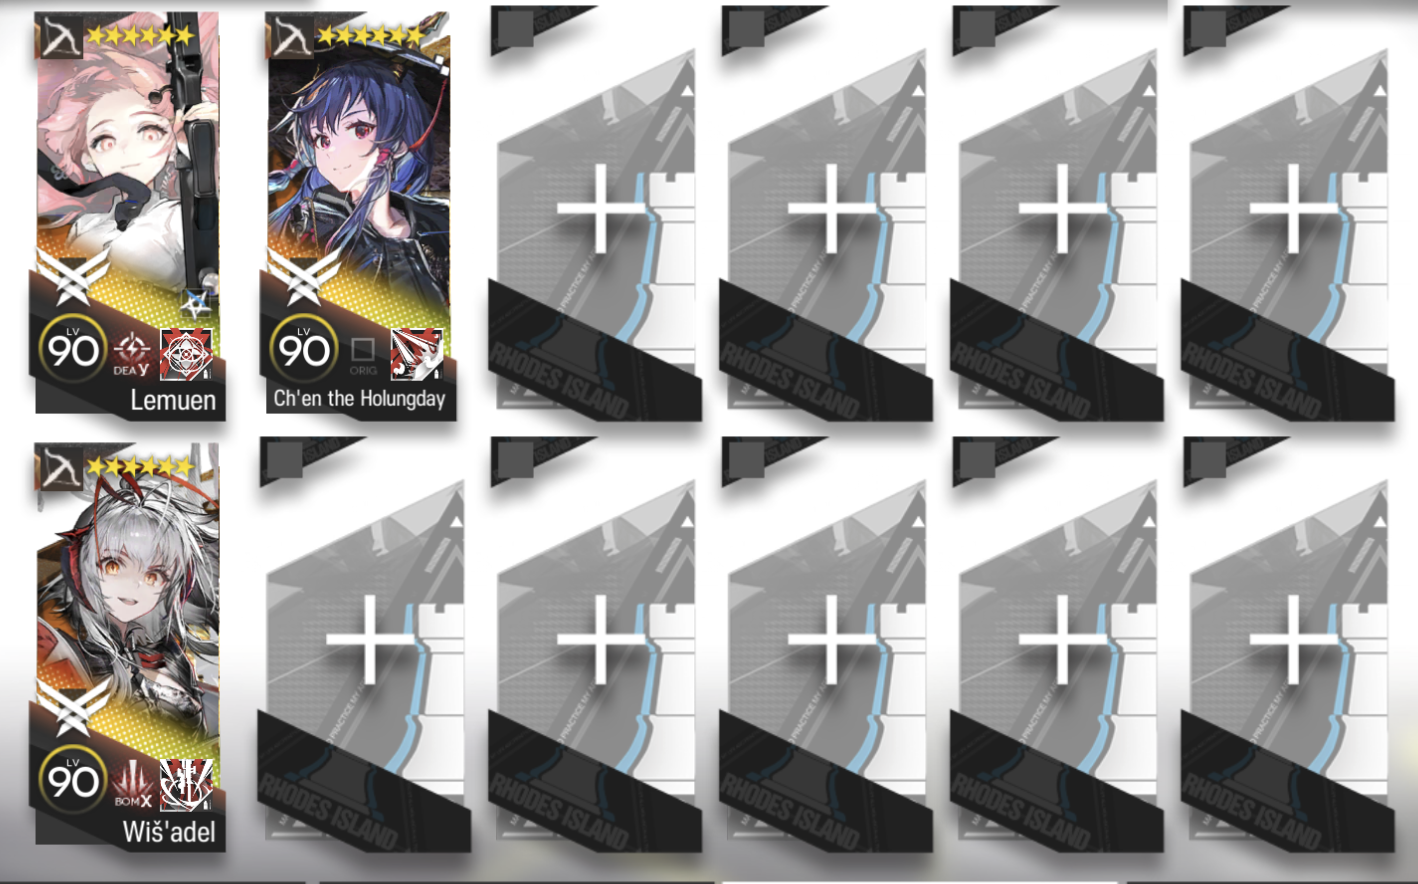
Enter the new queen of dealing with jellyfish and Izumik himself. Lemuen has ridiculous dph and excellent aoe. Since we clump the jellyfish together tightly in order to maximize the value of our pushers, Lemuen really gets the maximum value out of every s3 (skill 3) activation and easily demolishes the jellyfish even on d18.
It’s beautiful
Of note is that unlike the other options on this list. Lemuen also has a talent which gives her global range which allows her to hit Izumik constantly. This is extremely potent since it means that she’s able to chip away at the boss while still dealing with the main threats on the map. A particularly ingenious clear actually used Lemuen facing a wall so that she would only target the boss, they then pushed the jellyfish into Izumik each time so they’d get hit by the splash of the attack!

Here comes contestant #2! Ch’alter used to be the premier choice for dealing with the Jellyfish in 2023. Not only did she hit hard, her attacks are true aoe and have a movement speed down effect. She’s perfectly serviceable even now, though Lemuen is better than her in almost every aspect.

The roach has breached containment. Wisadel has excellent dph just like Lemuen. However, her cycle is problematic and lower dph means that she’s not nearly as good at dealing with jellyfish as Lemuen is. This is made up for by how extremely strong she is en route to the boss, easily cheesing most stages. Even in Izumik, she remains an important operator for both adding more damage onto the jellyfish as well as having camouflage (more about why that’s relevant later).
Now let’s get back to talking about the boss.
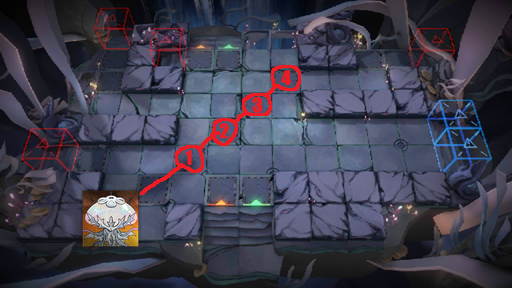
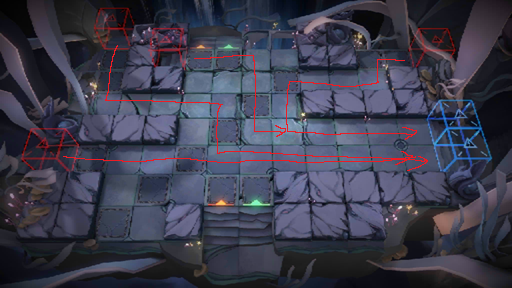
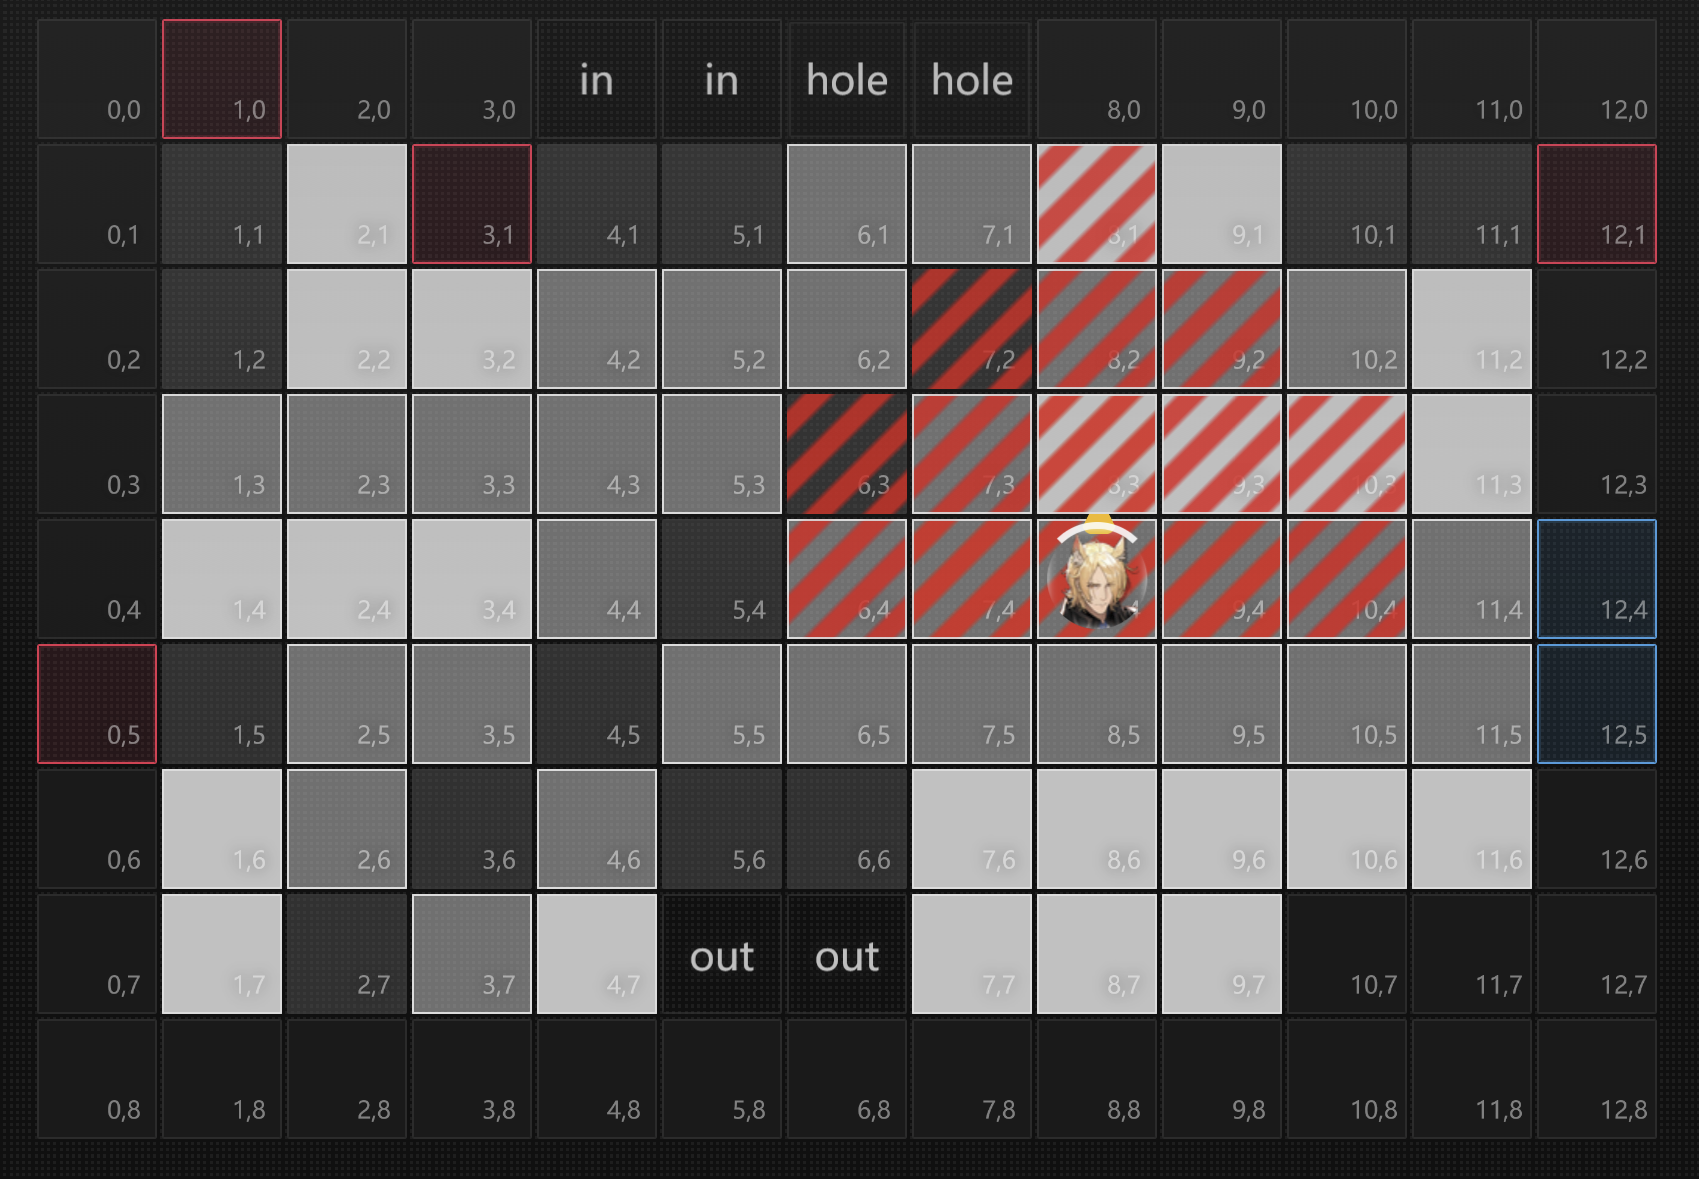
So the first part of his routing looks like this. Bro will idle for 15s at the start, then about 10 seconds at 3,6 and then go to stop #1. He will patiently wait there for 75 seconds before moving onto #2 for 15 seconds, then #3 for 15 seconds again and then finally #4 for 65 seconds.
During phase 1, he will not attack and is unblockable. You might then be asking what we’re actually supposed to be doing. Very soon after he reaches #1, jellyfish will spawn from the bottom left red box and book it straight at him. Much like how a male anglerfish will fuse itself to a female anglerfish, the jellyfish will get eaten by Izumik if they collide with him. This leads us to Izumik’s main mechanic in P1:
For every 5 jellyfish he gobbles up, he’ll unleash a global explosion that does 100% of his attack as arts damage that ignores camouflage, he can do this a maximum of 4 times. He will then restore 15% of his hp and gain 40% more attack. The explosion is extremely powerful, easily killing any operator on the field. Izumik starts off with “only” 4,945 attack and 417k hp, but after exploding 4 times he’ll have 12,856 attack and 1,042,591 hp!
There are 2 ways phase 1 can end. The first way is for Izumik to eat 20 jellyfish. This means he’ll explode 4 times and enter phase 2 with maximum stats. The second way is for 360s to pass without him having eaten 20 jellyfish. This’ll forcibly phase him to phase 2 with whatever stats he had at 360 seconds. We’ll discuss more about what this means for us when we get to the strategy section.
If we don’t interact with the stage at all, some of the jellyfish will steadily flow into him until he phases at #4, though while that’s happening all the jellyfish from the top left red box will be booking it to the blue box! As such, we need to handle them or they’ll leak. This is challenging since Izumik will explode ever so often, demolishing all our operators. As such, our approach to phase 1 becomes clear. We deploy only the minimum number of operators to either stall the jellyfish or kill them, then retreat operators just before each explosion happens.
Of note is that this is where the boss fight will start to diverge significantly depending on your actions. Some strategies for Izumik will have Izumik phase on #3, others will just let him naturally phase at #4, and there is even one where we keep all the jellyfish away from him for the entire 6 minutes so that he phases with his lower initial stats! But since we’re walking through Izumik as if we’re playing blind, we’ll assume he phases in the first part of this route. So let’s talk about phase 2 of Izumik.
Izumik: Phase 2
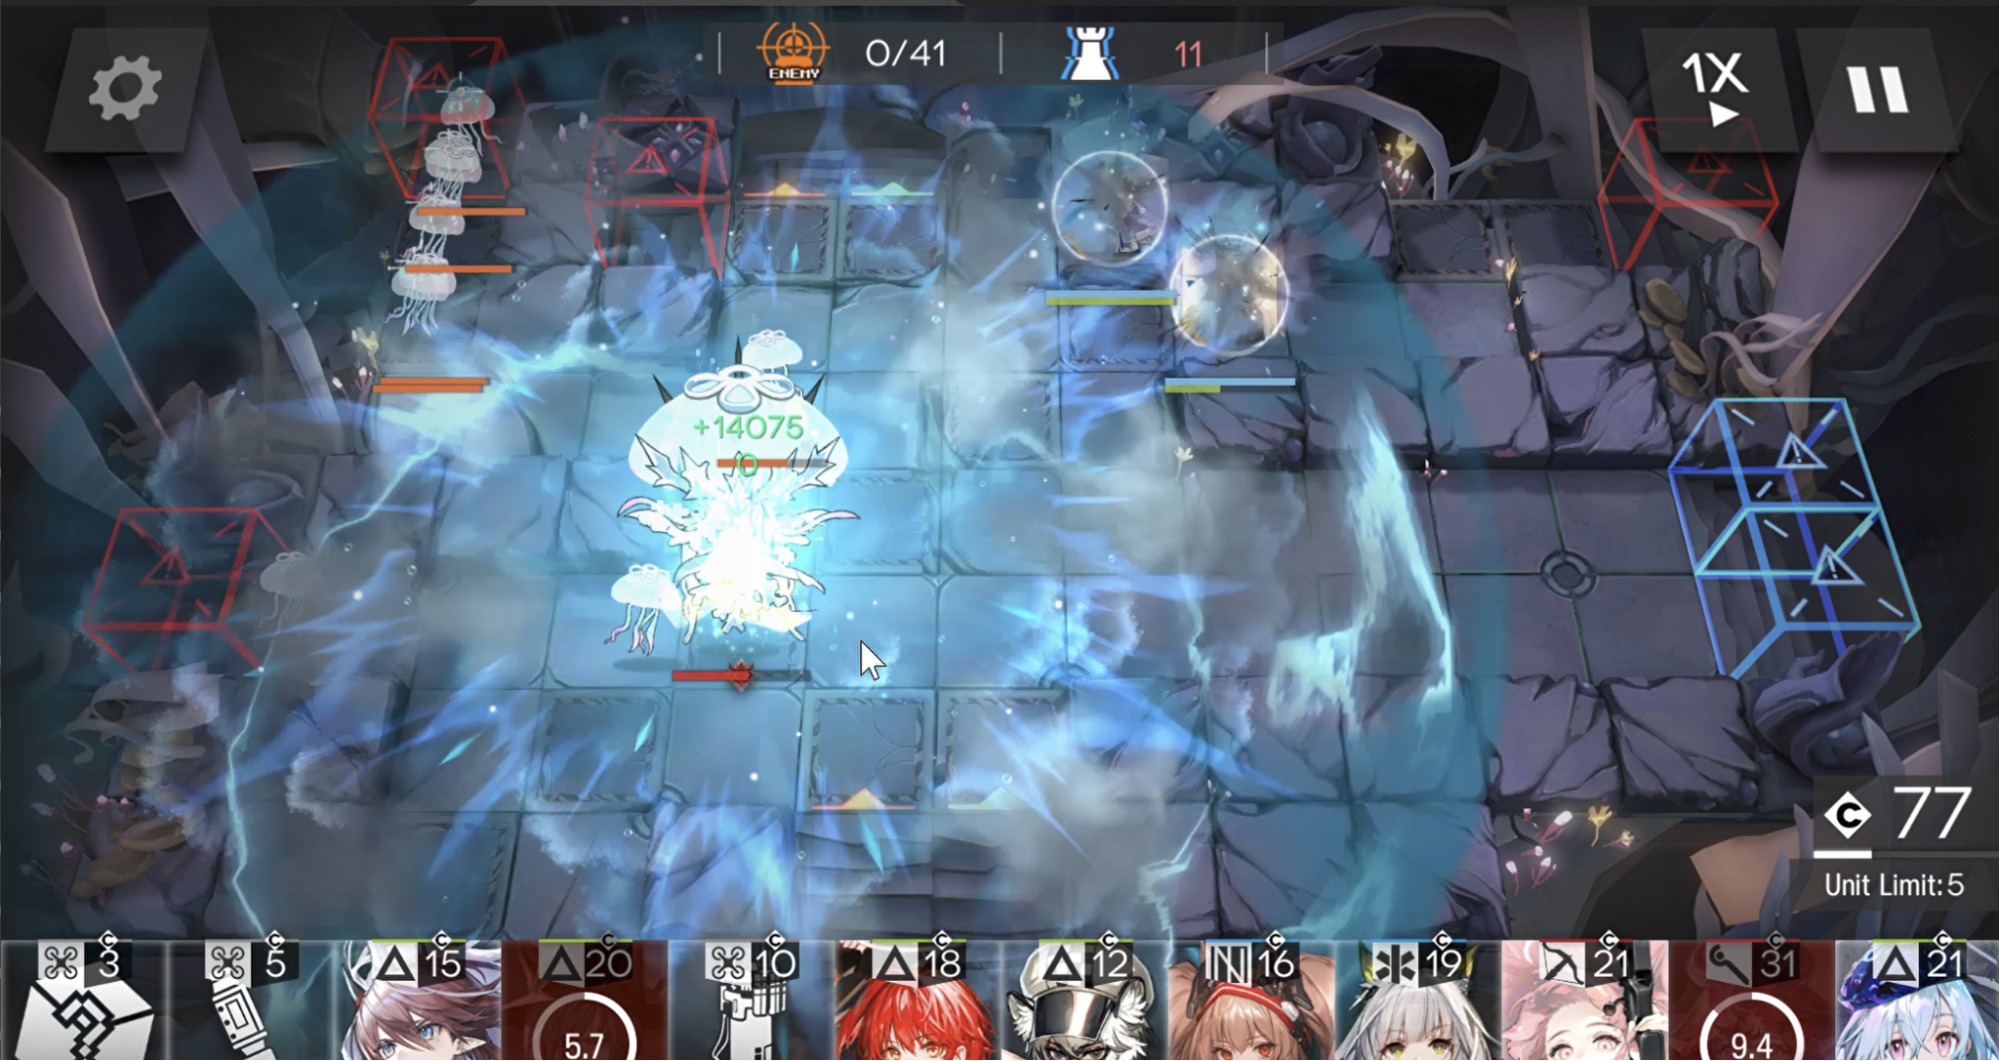
Section titled “Izumik: Phase 2”Upon eating his 20th jellyfish, Izumik will unleash one final explosion and then transition to phase 2. If phased this way, his stats at d18 will be 1,042,591 hp and 12,856 attack. He is now blockable and will attack your operators that are within 1.5 tiles of him.
Bye bye Ethan
To add insult to injury, Izumik doesn’t just hit once per attack. His auto attack does 2 hits, one is arts and one is physical. As such, nothing will be able to survive his auto attacks (unless they have 2 shields like with medicine sticks). What this means for us is that while Izumik is blockable, we can’t actually realistically tank him. The good thing is that him simply being blockable opens up a lot of options. The simple ability to blockshift him back half a tile is important since it enables certain stall options like wavebreaker/metastatic yato.
Izumik is also immune to Stun, Silence, Sleep, Freeze and Levitate, just like his jellyfish bros. What is very different from regular jellyfish though is that he has a weight of 6. What this means for us is that unlike his jellyfish bros, Izumik is way harder to infinitely stall with our pushers. The good news though is that there are still ways to push him a decent distance, and pushing him into a hole is the most popular strategy on d18. Enough rambling though, let’s get to what actually makes Izumik one of the hardest bosses in AK history.

Help
In phase 2, Izumik replaces his old skill (Summon jellyfish) with a new one which we’ll call Acid (because your operators will melt away when he uses it). This skill has a sp cost of 30, meaning that every 30s he’ll use the skill. How it works is that Izumik will lock onto every allied unit on the map, and then begin casting his skill. You can tell it’s about to happen by the black particles that appear around him and then him bobbing up.

Top 10 haunting photos taken moments before disaster
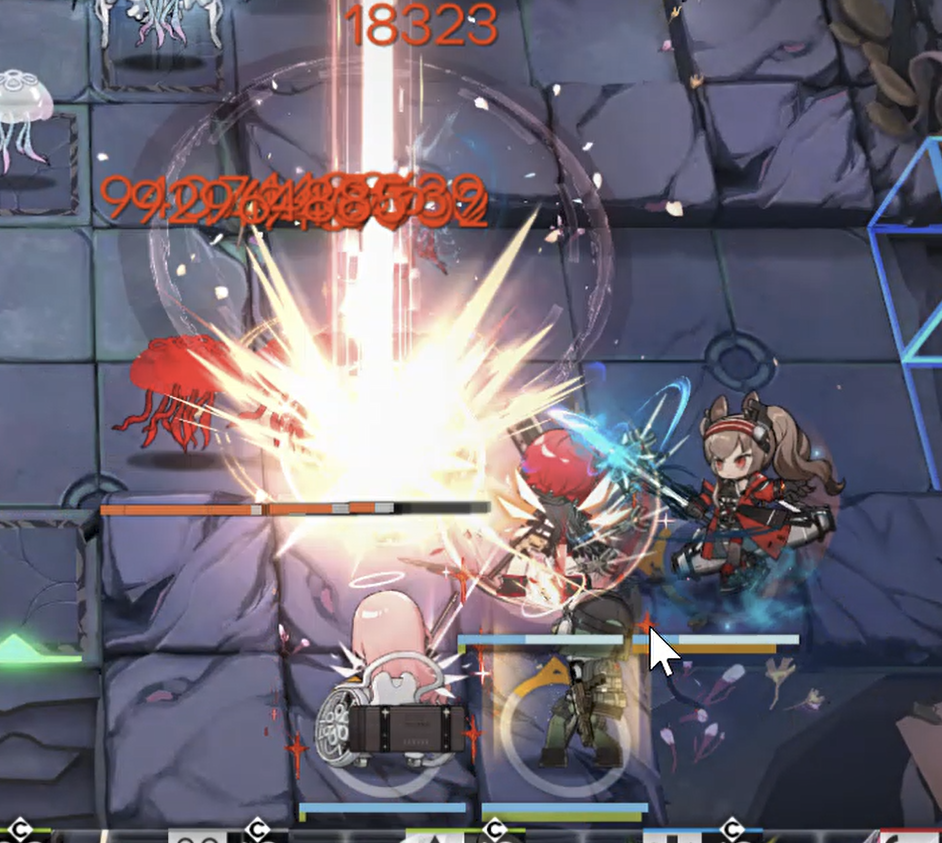
He then applies a 8s stun to all targeted operators, and for every second the operator is stunned, they will take 12% of Izumik’s attack as arts damage. 12% doesn’t sound like a lot, but remember Izumik’s attack is 12,856 so your operators will be eating 1,542 arts damage a second. Note that since Izumik must target an operator, camouflaged operators will not be affected by this skill. Note that the camouflage must be active before he decides his targets, otherwise they’ll get hit anyways. As such, Wisadel with her permanent camouflage is able to somewhat bypass this skill since as long as her revenants are alive, she cannot be targeted by Izumik. This attack is basically unsurvivable otherwise at d18 (d15 is a different story). This attack being effectively unsurvivable (or extremely challenging to survive on d15) is what all the strategies for Izumik must develop around, and the solves for doing so range from simple to quite creative.
Aside from the acids he does when his sp gauge reaches 30sp, he will also use his acid skill when his hp drops to 75%, 50% and 25%. This acid skill has no special properties beyond that, it’s just that it’s forcefully activated at the hp thresholds.
Astute readers might’ve noted my weird phrasing about Izumik’s skills. I keep bringing up sp instead of just saying the cooldown. There are two reasons for this, but the first one that we’ll cover now is that Izumik’s sp bar carries over between phases. Suppose p1 Izumik hasn’t used his skill for 97 seconds and then the 20th jellyfish runs into him and he phases. P2 Izumik will then have 97 sp, but the acid attack costs 30! As such Izumik will spam the skill 3 times in a row until he runs out of sp. This mechanic of sp carrying over and his skills being skills (and thus having sp lockout) will be very important later. For now, we simply note that upon entering phase 2, he’ll use his skill as much as possible based on how much sp he had entering the phase.
Those are the basic enemy details about Izumik done, now let’s return to the blind walkthrough (assuming the player lived this long).
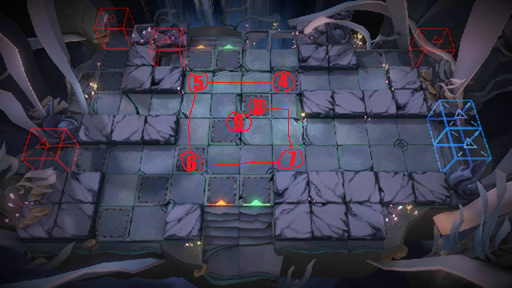
This is the second part of his routing. From #4, he will go to #5, #6, #7, #8, waiting for 5s each time. Finally, he goes to #9 for 75s (55+20). The reason I’m saying 55+20s for checkpoint #9 is because if 20 jellyfish haven’t been eaten yet, 55 seconds into waiting on #9, he will phase forcefully into p2. Note that this timing is not exact. Remember that while he moves around the map, he’ll still be using his skill whenever possible. In p1 that means summoning jellyfish every 120s, in p2 it means using the acid skill every 30s.

The final part of this routing. He’s finally decided to stop messing about and starts approaching the blue box. From #9 he’ll go to #10, 11, 12 and 13 for 10s before booking it to the blue box.
Of note is that the row of ranged tiles (x,6) and (x,3) can be attacked by Izumik as he gets closer. The bottom 3 ranged tiles (x,7) are always safe from Izumik’s auto attacks.
With this, we’ve finished talking about Izumik’s mechanics and his routing. We will have a quick mention about the last enemy on the stage, then summarize what we’ve covered so far, and then dive into the strategies that have been developed.
Skimming Sea Drifter (mantas)
Section titled “Skimming Sea Drifter (mantas)”
What does bro even do here
1 manta will emerge from each red box (4 in total) when Izumik is around checkpoint #6. Honestly, if you’ve made it to Izumik you probably don’t need me to tell you how they work. They’ll afk for a bit and then head towards the blue box. Make sure to knock them out of low altitude hovering with one of the many cc (crowd control) options you’ve brought and they shouldn’t be much of a problem. The only thing of note is that they can mess with your skill cycling of pushers and slowing since they have a weight of 4, so they don’t move nearly as far when pushed compared to jellyfish.
Summary
Section titled “Summary”Izumik
Section titled “Izumik”| Phase | Traits |
|---|---|
| 1 | Invulnerable, Unblockable, Does not attack Every 5 jellyfish eaten, restore 15% hp, +40% attack and unleash an explosion that does 100% of attack as arts Skill: Summon jellyfish Summons 6 jellyfish in a triangle in one of two possible locations. 120 sp cost. Will transition to phase 2 after eating 20 jellyfish (4 explosions) or after 360s have passed. |
| 2 | Vulnerable, Blockable, Attacks Immune to Stun, Silence, Sleep, Freeze, Levitate Stats: 1,042,591 hp, 12,856 attack, 2760 defence, 90 res, 6 weight Has an attack range of 1.5, autoattacks do 2 hits, 100% Phys + 100% Arts Skill: Acid Targets all allied units on the field, stuns them for 8s and for each second stunned, deal 12% of current attack as arts damage. This skill will also be cast at 75%/50%/25% hp. |
Jellyfish
Section titled “Jellyfish”| Stats | Traits |
|---|---|
| HP: 96,536 DEF: 2000 RES: 90 Weight: 0 | Immune to Stun, Silence, Sleep, Freeze, Levitate Turns into a random enemy when blocked The enemy is pulled from a preset pool which changes depending on which red box it came out of and how much time has passed. |
Mantas
Section titled “Mantas”| Stats | Traits |
|---|---|
| HP: 139,012 ATK: 1792 DEF: 300 RES: 60 Weight: 4 Range: 2.6 | Attack deals 50% of ATK as Corrosion Damage Low-Altitude Hovering Attacks changes to melee when grounded |
Strategies
Section titled “Strategies”Now we can finally get to the main section of the guide. This part will detail the common strategies I know. We will first cover the first 3 dominant strategies that were found in 2023. They were developed for the meta and operators at the time, and as such they were made for d15. Even though they don’t have much relevance in d18, it is important to understand them since the vast majority of players do not play on d18, and they’re what future strategies are built on. After the 3 main strategies found in 2023, I will then cover other strategies in decreasing order of viability.
The Acid Tank Strat
Section titled “The Acid Tank Strat”D15 only
This was the first strategy discovered and used to clear Izumik. By getting the +15 light per perfect combat cleared relic, we are able to get to 90 light. By doing so, we get the relic Determination which gives an extremely large hp and res buff. Izumik does about 9500 arts damage over the course of 8 seconds at d15. Of course, this isn’t normally survivable even with Determination, but then we discovered that Shamare’s doll works on Izumik to halve his attack, and Whisperain’s status resistance halves the duration of the stun. This made it so that Izumik would only do about ~2400 arts damage which is very reasonable to survive with determination. This strategy while possible on d18 has a few issues. Mainly that Izumik’s extra 3000 attack adds a lot of damage onto your operators, and that his hp stat is still gigantic. Since this strategy depends on killing him in time before he goes into the blue box, both his hp stat and attack stat pose a large obstacle and make this strategy less viable on d18.
Operator Requirements:

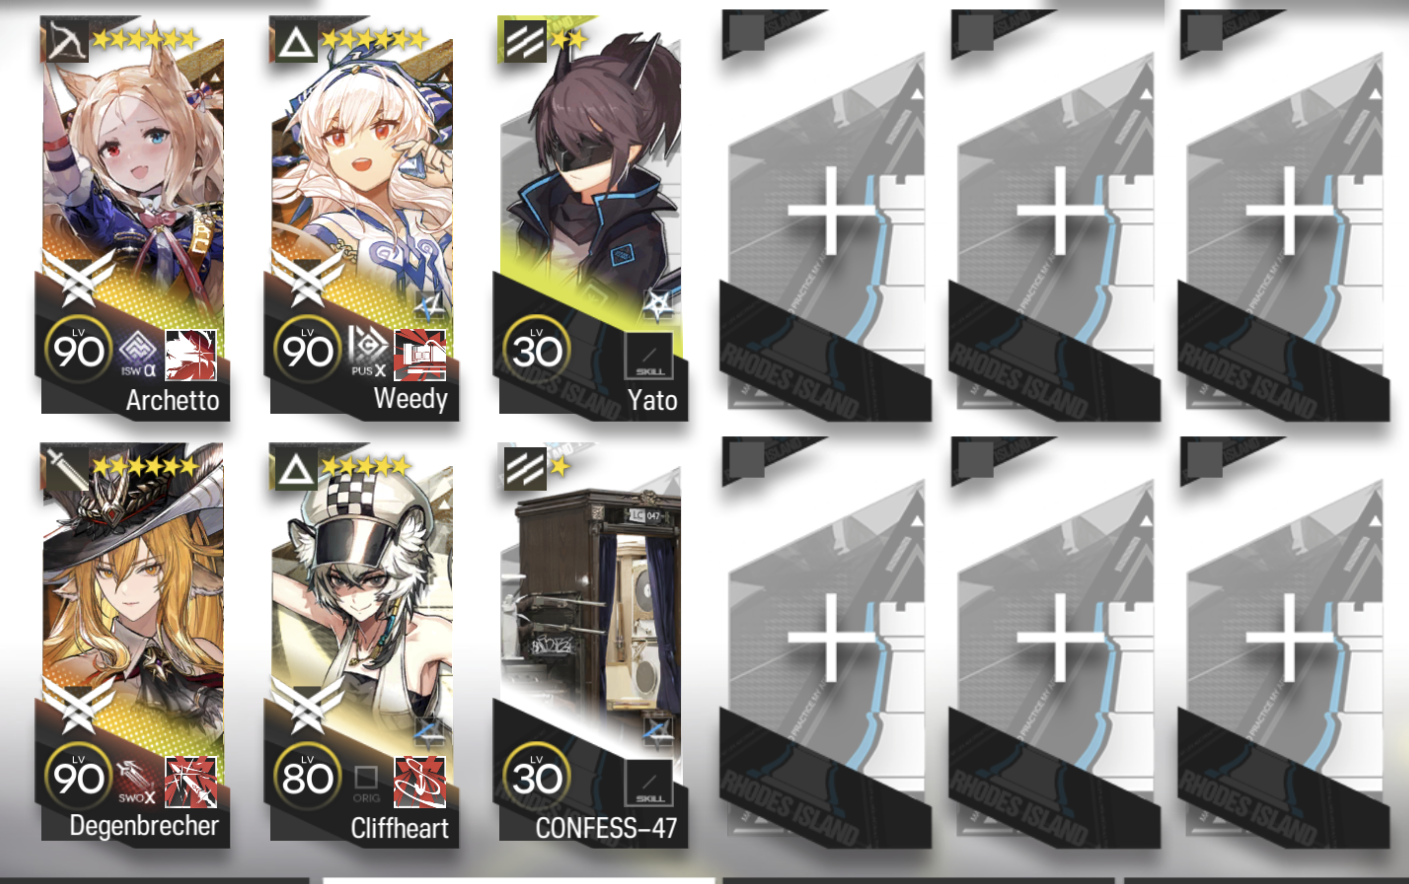
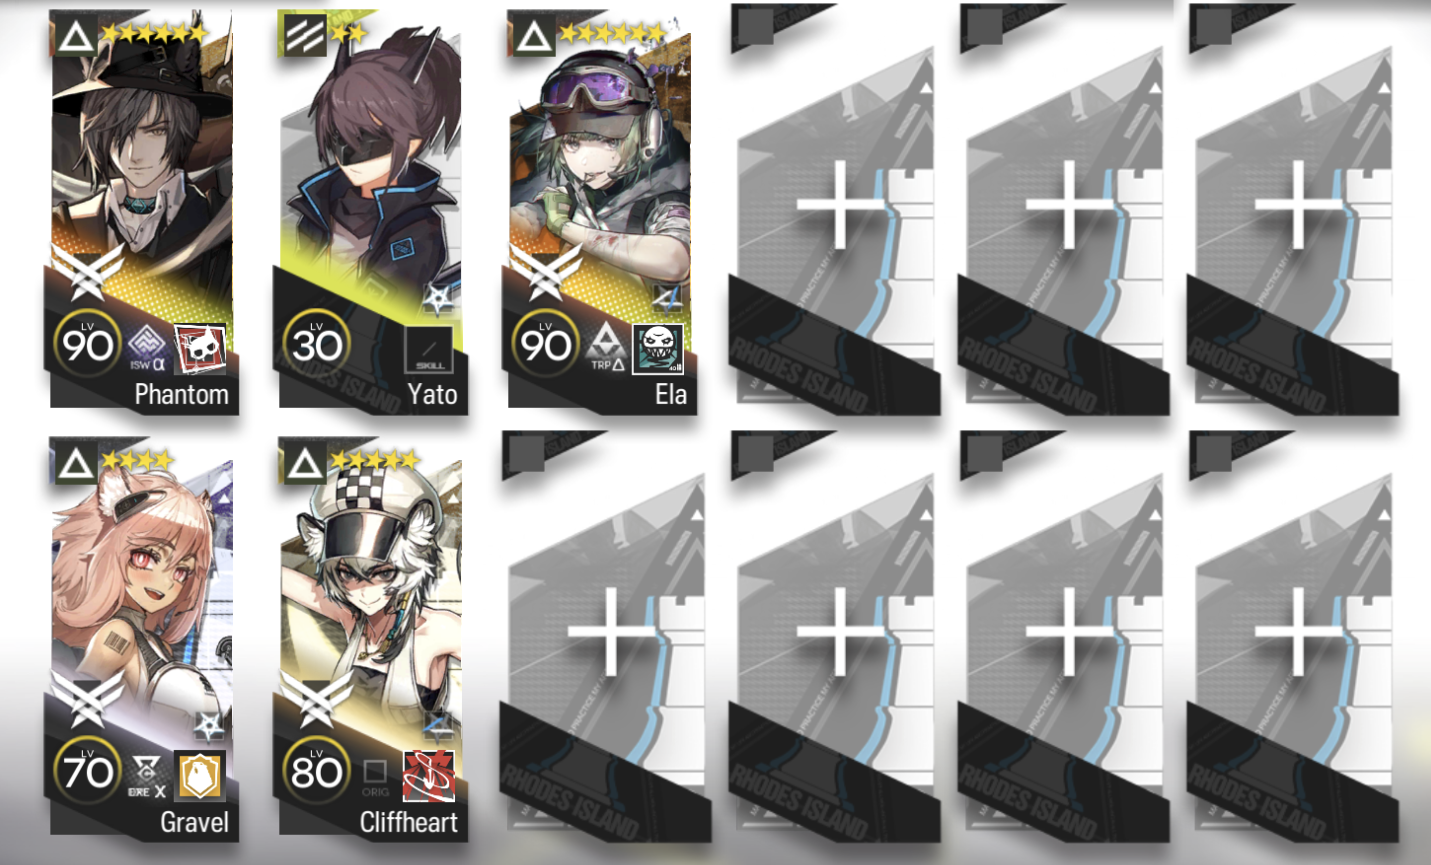
This was the core used back in 2023. Shamare is the only one which is truly irreplaceable. Chalter can be replaced with Wisadel or Lemuen. Mylnar can be replaced by adding another one of Wisadel or Lemuen as well. The point is just to have two operators who can do big aoe damage. Whisperain is important for giving status resistance, however Nightingale or Lumen can also be used to fulfill a similar role (note that they are more expensive and generally worse though). You will of course want other operators to help deal with the waves.
Procedure:
When we start the map, there are two possible positions where jellyfish can be spawned by Izumik’s skill.
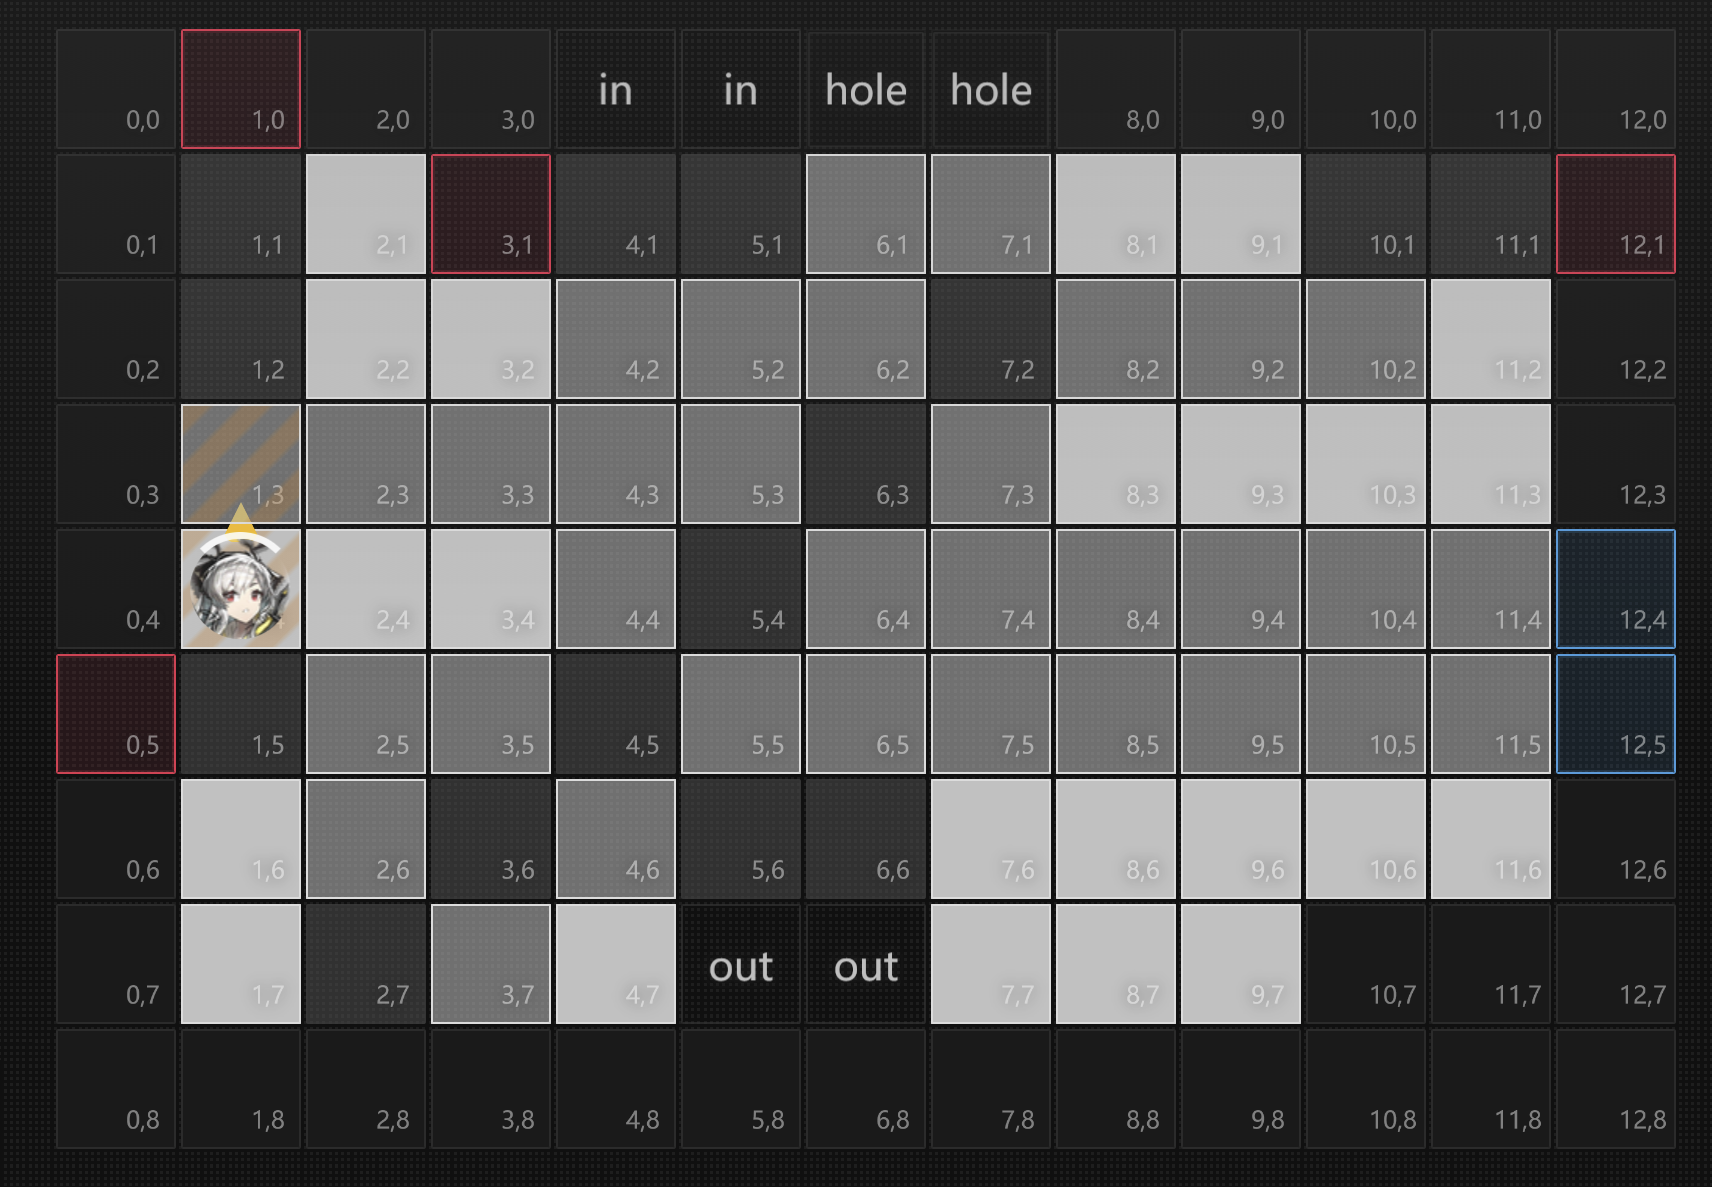
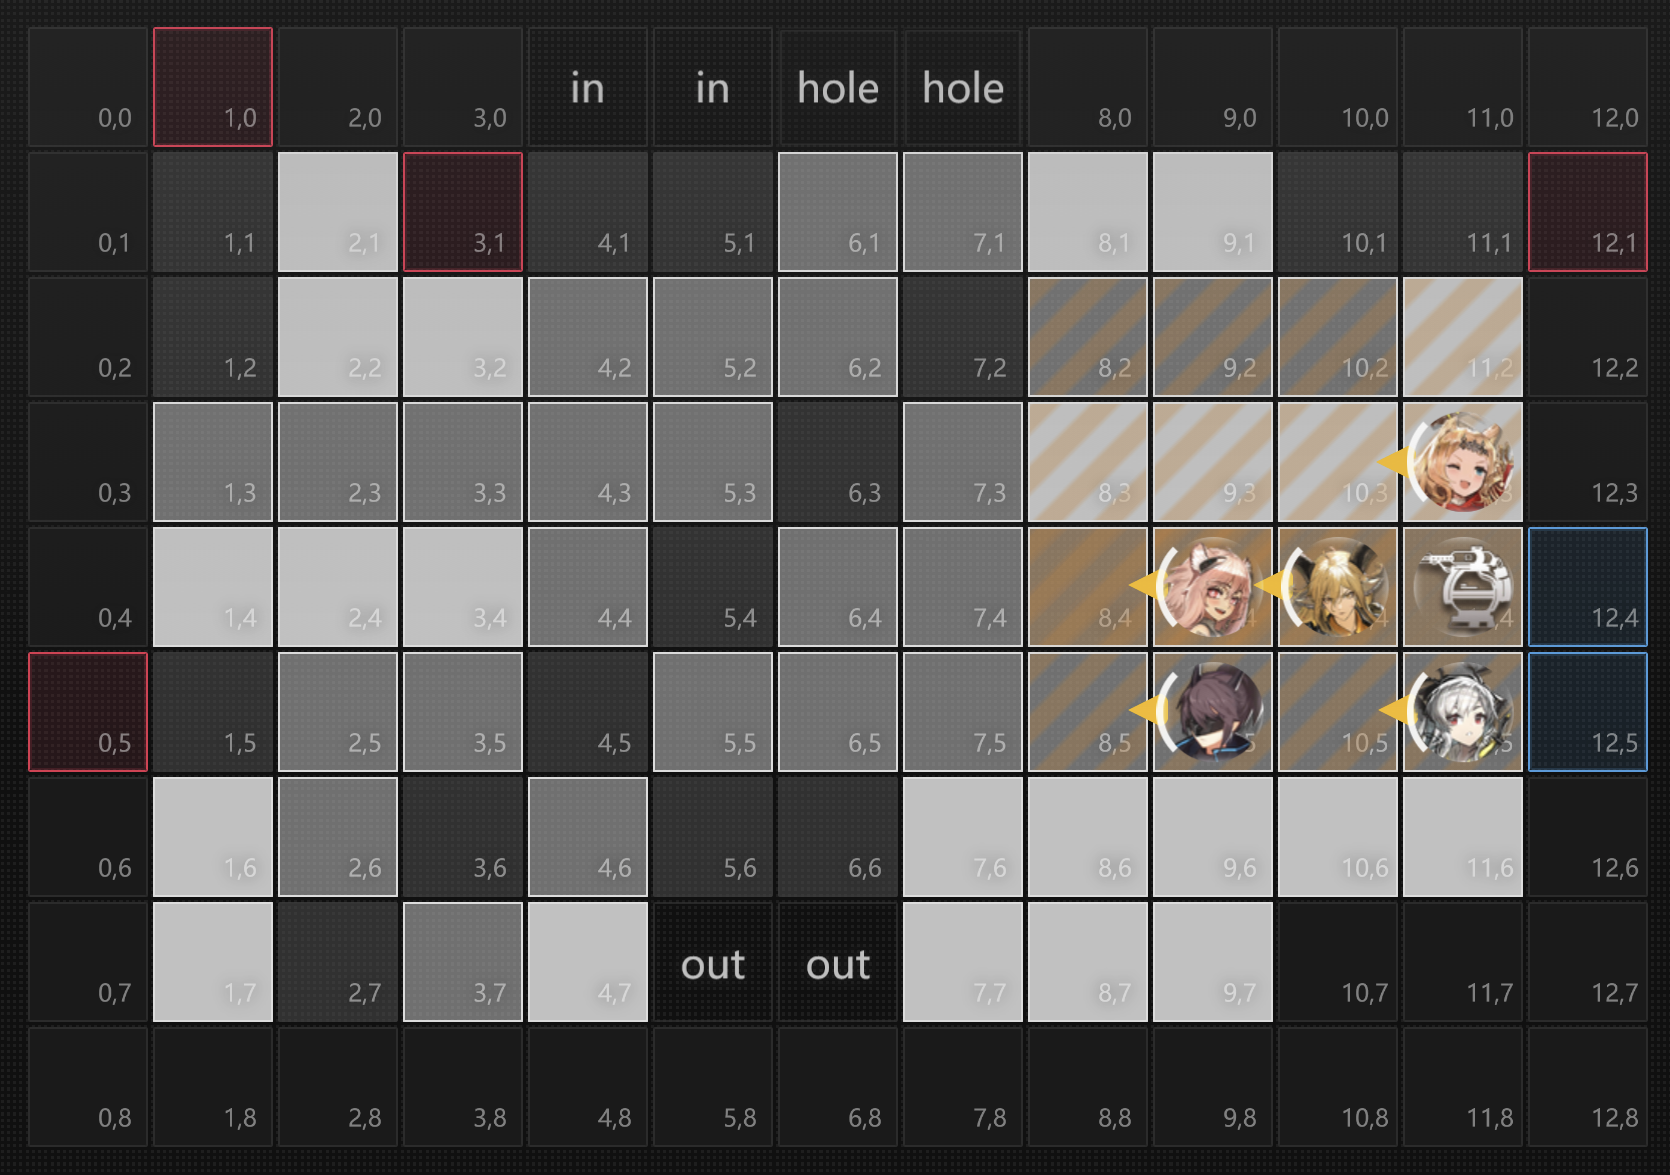
We will place Mylnar to kill 3 of the jellyfish that won’t naturally enter Izumik.
This is the Mylnar placement for top left jellyfish spawn.
This is the Mylnar placement for bottom right spawn.
Let Izumik naturally eat the jellyfish. You can speed up the process by using pushers, slowers and pullers to get more jellyfish into him faster. The jellyfish from the red box 1,0 will not naturally enter Izumik for the most part so you need to either kill them, leak them, or stall them so that they enter Izumik. The objective is to get him to phase 2 as fast as possible so that we can place down our operators without him exploding.
After he phases, make sure to wait until he uses all his saved up sp if he didn’t recently do his summon jellyfish attack. Then place down your operators like this:
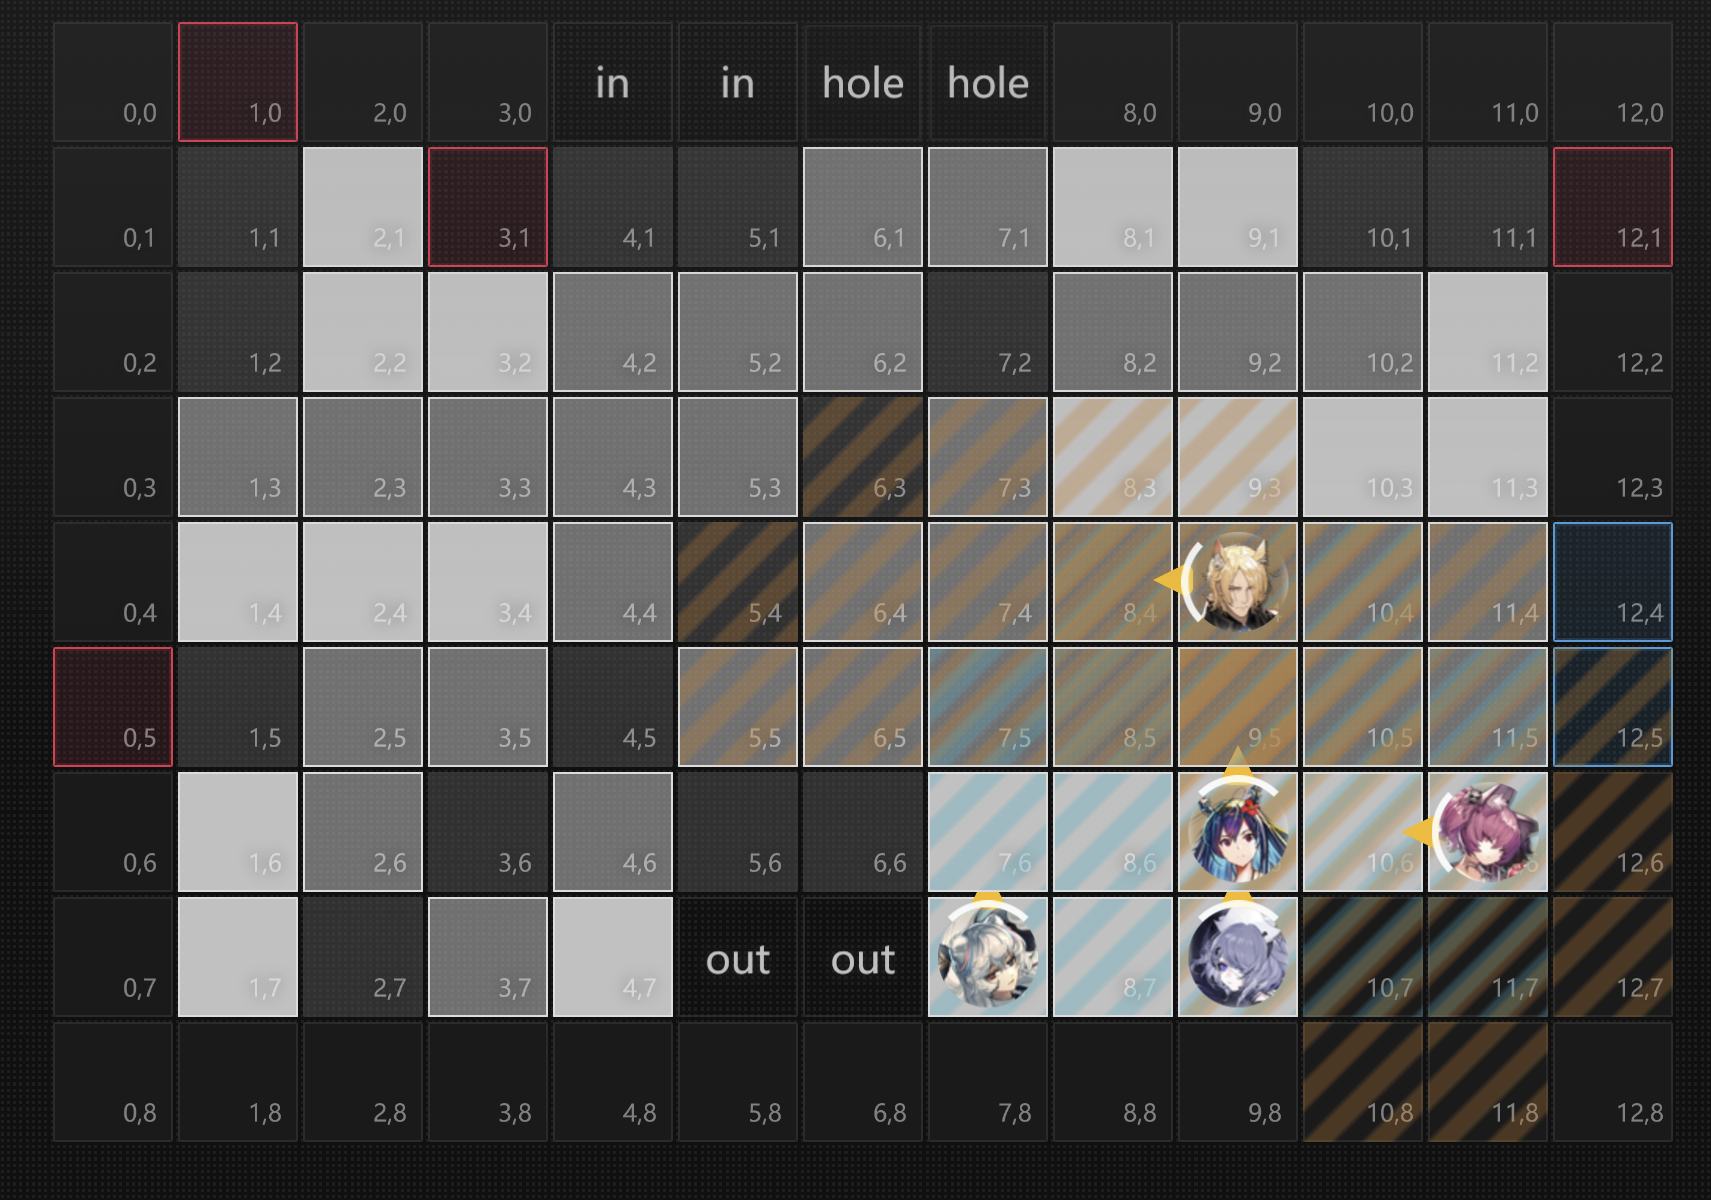
Rosa is here to add extra damage to help kill Izumik. After this, you just cycle your operator skills to kill jellyfish and Izumik. Make sure to put the Shamare doll right beside Izumik when he starts to do his acid attack.
Here is a link to an example kill: https://youtu.be/dB7pp75SRXM
The Push Strat
Section titled “The Push Strat”D15 and D18
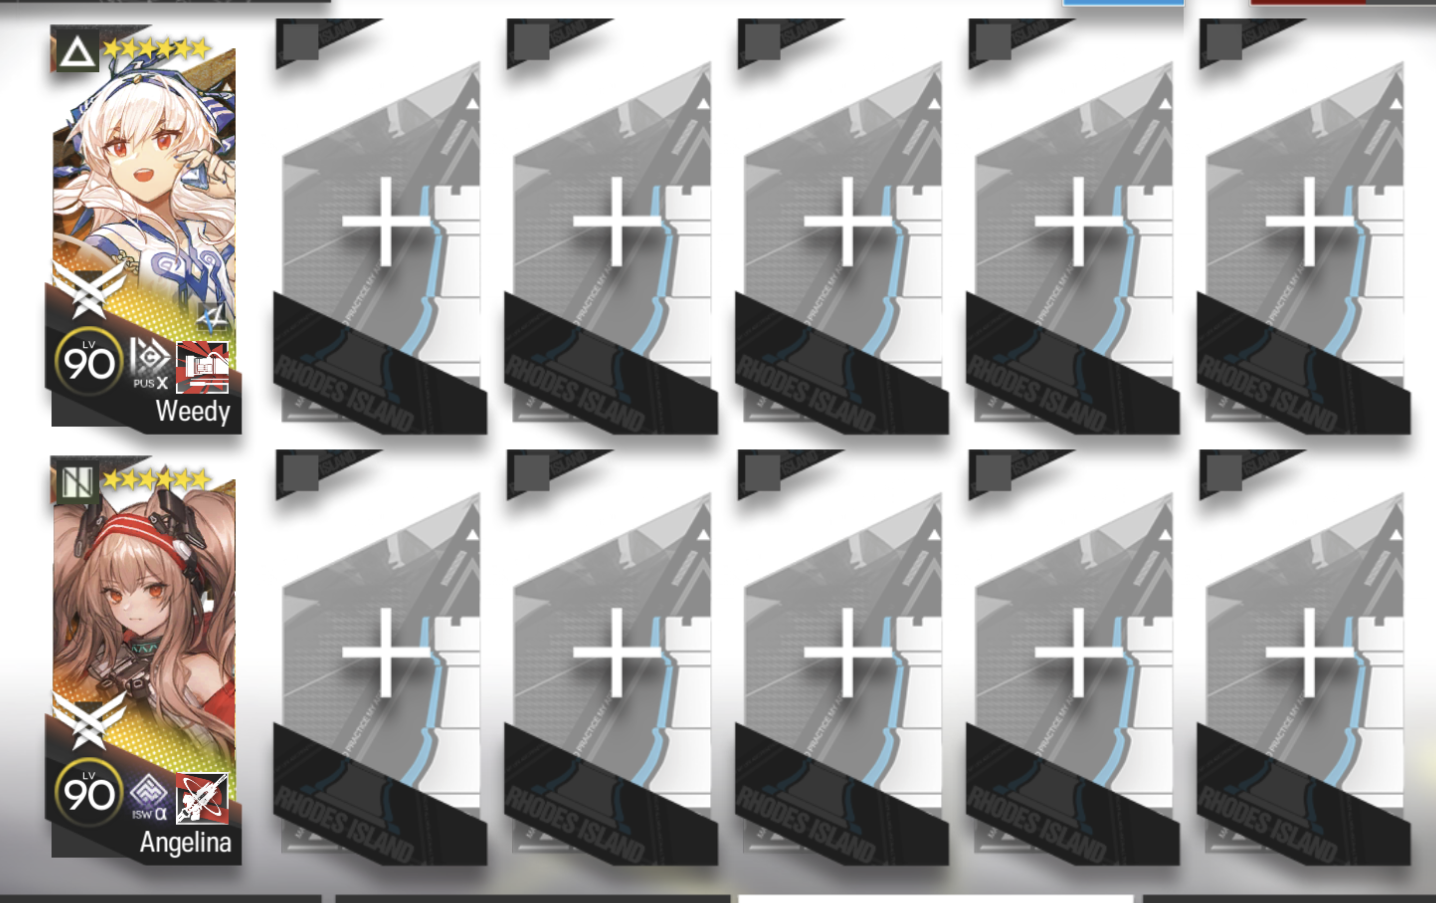
As anyone who has played is3 before would tell you, getting the light relic to hit 90 light is quite inconsistent. But the tank strat is basically impossible without it, so what should we do? Enter SGL#1 winner VaporVenus, the man who pioneered the push strategy with Weedy to push Izumik into the hole. This strategy was revolutionary because it drastically reduced the requirements needed to beat Izumik. All of a sudden, as long as you were able to feed Izumik quickly and kill jellyfish, the map would be winnable! As such, after the discovery of this strategy it quickly became the most popular one. Thanks to the Angelina Module, it is now easier than ever to execute because Weedy will push Izumik into the hole in a single s3!
Operator Requirements:

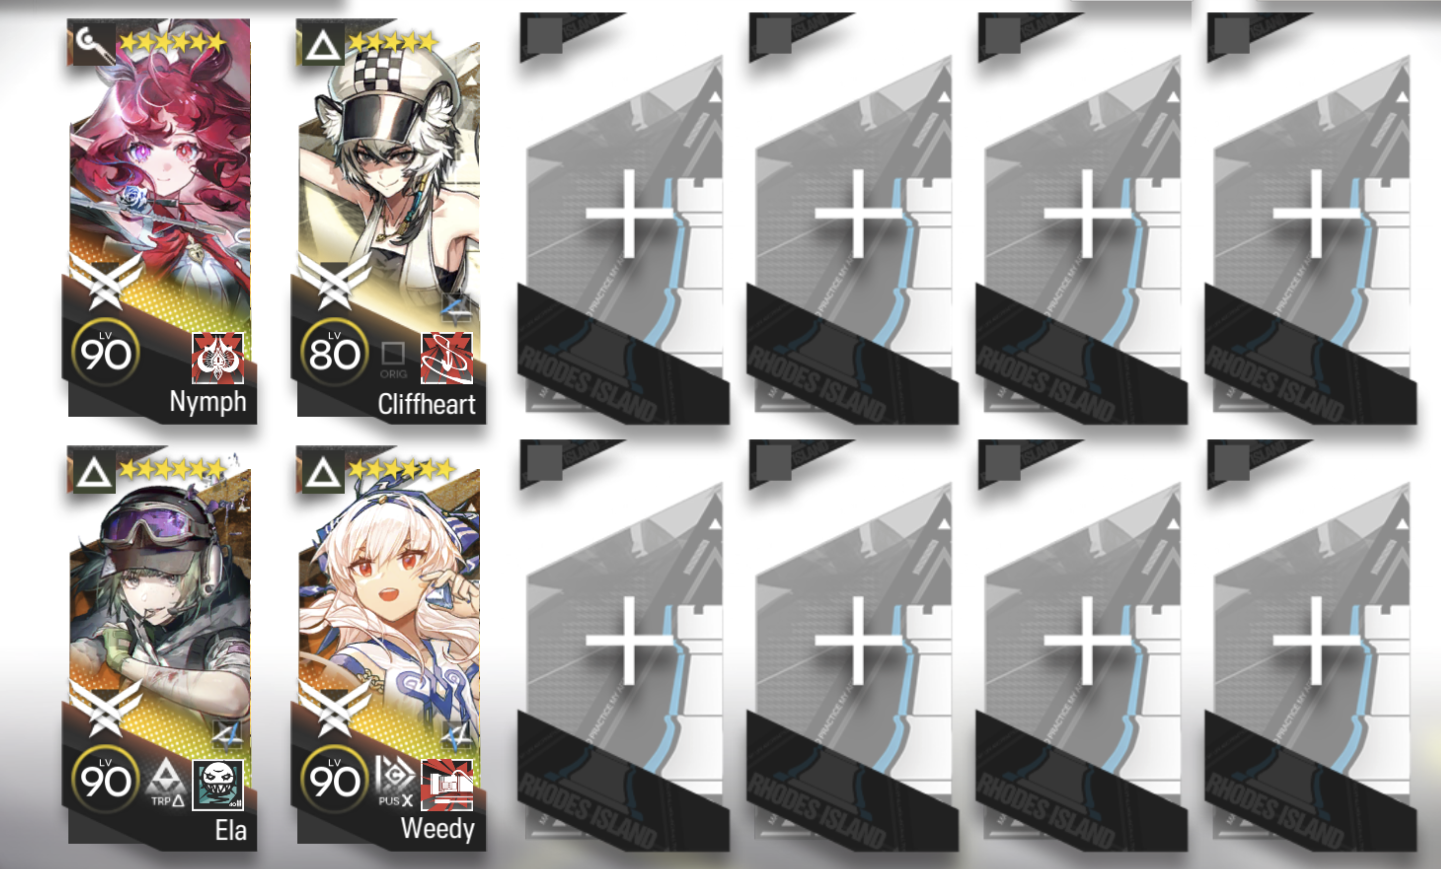
To single push without any relics, Weedy and Angelina are hard requirements. If you’re fine with a double push, you can use Ho’olheyak instead of Angelina. Ela is one of the best operators in is3 for her mine utility and excellent damage. In Izumik she serves the crucial role of slowing down the jellyfish enough after Weedy pushes them in the top left so that they flow into Izumik. She is replaceable with any decent slower or pusher.
Procedure:
There are a lot of variations of how to set up the fast feed.
As such, we will explain the general principles and walk through the key points to watch out for.
It will be up to the reader to then adapt the explanation to the operators they have on hand.
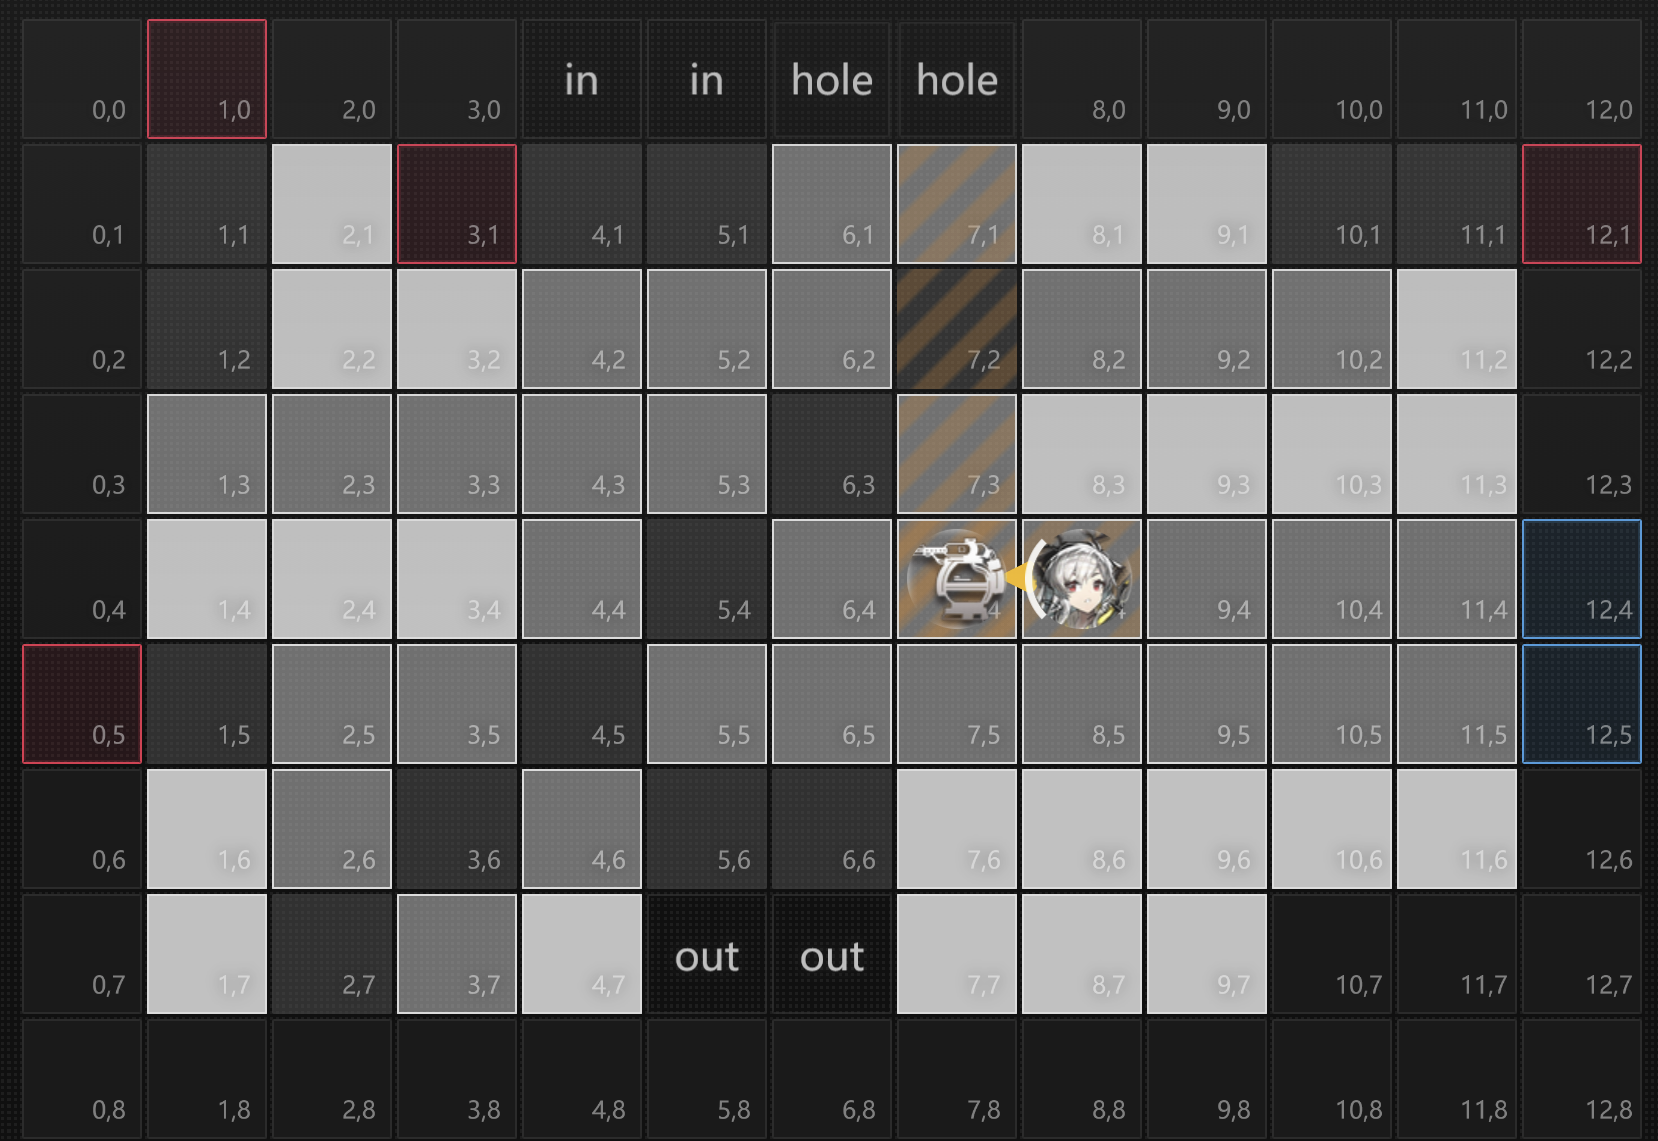
To start off with, we will deploy Mylnar to kill the 3 jellyfish that don’t go into Izumik. See the Acid Tank strat section for how to deploy Mylnar. We will then deploy Weedy like this:
We wait for the first jellyfish to reach 1,3. We then activate Weedy skill. Then when the next jellyfish is about to reach 1,3 again, we place down the cannon facing upwards. This will stall and bunch up all the jellyfish. Finally, we watch the jellyfish that Izumik summoned (either 4,4 or 5,5). We want to activate Weedy s3 and then retreat her as they start to move into Izumik. Izumik will then explode. After the explosion, immediately place down your slower/pusher/puller to charge their skill. We then stall the jellyfish that are coming down now. This part you will usually need to gauge through experience and by eye. If you stall the jellyfish for too long, then Izumik will walk away before they run into him. If you don’t stall enough, they’ll run past him before he reaches 5,4. The window is fairly generous since he stays there for 15s. A good way to gauge how far in the map you are is to look at the top right red box. Once the jellyfish start spawning out of that box you only need to stall a bit more for them to go into Izumik. Izumik will then explode for a second time and then a third and fourth in quick succession if you’ve successfully bunched up the jellyfish. Finally he’ll phase.
Upon phasing, he’ll start using his acid attack, wait until he’s finished using all of them (expect 3 in a row, and a 4th in 15 or so seconds). Then deploy your operators except for Weedy. Most importantly, deploy your Angelina to start charging her skill. We also need to kill or stall the jellyfish coming from the top right because they’ll run over where Weedy wants to be. The enemies from the top right will be ice spiders when blocked.
Finally, once Izumik goes to 7,2, we will make sure Izumik isn’t about to acid and then deploy Weedy. If it’s a single push we can place down her cannon to gain some sp. Then activate Angelina s3 and activate Weedy s3 and Izumik will go into the hole and instantly die.
If it’s a double push, the process is a bit more complicated. We will require sp generation of some sort (0.3 sp/s minimum). We place Weedy down and do not place the cannon down. We then wait until Izumik starts his animation to do the acid attack and immediately place down cannon, activate Angelina skill (if you’re using hool she should be on 9,1) and then activate Weedy s3 to interrupt the acid attack. With 0.3 sp/s (achievable with Ptilopsis), Weedy will barely be able to get a second s3 off before the cannon disappears, so activate s3 the moment it comes back up. We must then frame advance until the projectile from Weedy’s cannon hits Izumik, then retreat Weedy. This gives Weedy’s projectile hitscan properties and so both Weedy and her cannon’s projectiles will be calculated as having pushed at the same time. This barely pushes Izumik enough for him to go into the hole.
After the push is complete, we can then do the rest of the stage as normal. We can redeploy Weedy in front of the blue box and she can send jellyfish flying on both lanes with her and the cannon. I would strongly recommend checking the links for a demonstration of how the push strat is done.
Here is an example of what the double push looked like in 2023: https://youtu.be/U_7ywn3VUaU
Here is an example of how easy it is now: https://youtu.be/pWpK8UJfhpk?si=hdOQgrWNGlt18VBZ&t=4876
No Feed
Section titled “No Feed”D15 only
Despite the popularity and prevalence of the push strat in 2023, there were still a few flaws with it. Mainly that if Weedy got a bad rejection such as concentration disorder, it was almost completely bricked. It also required you to get Angelina or Hool, both of which were deadweight back in 2023 (Angelina is now amazing en route with her IS module) and cost a lot of hope! There was no guarantee we’d be able to get the Hool or Ange needed to pull off the push, and no guarantee we’d be able to get Determination to do the tank strat. As such, the 3rd popular strat was established: No feed. Do you remember when I mentioned the second possible condition for how Izumik could transition to phase 2? If Izumik does not eat 20 jellyfish then after 360s he will forcibly transition with only the stats he had in phase 1. As such, by preventing Izumik from eating jellyfish we can make him start phase 2 with only 40% hp and 3830 attack on d15! This attack stat is high, but it’s low enough that the acid attack won’t kill your operators as long as you have some healing.
(insert writeup by someone who has actually done this strat properly)
The 3 strategies above were the main ones found and established in 2023. There are many other strats, however they tend to be more gimmicky and relic dependent. We will now cover the other strategies that exist. For the sake of brevity we will only cover the strategies that are d18 viable (with the exception of one). But before we do so, we must introduce one of the most important discoveries that was made about Izumik.
Acid Cancel
Section titled “Acid Cancel”We will now explain the second reason why Acid and Summon Jellyfish being skills matters. But to do so, we must explain SP lockout.
Enemies in the game have skills and these skills are just like operator skills. Some have auto recovery, some have offensive recovery and some have defensive recovery. What almost all skills have in common though is that during the animation that they’re being used, the sp bar turns orange and the unit will be unable to gain sp: SP lockout. What this means for us is that if an enemy tries to use their skill, their sp is consumed and they will be unable to gain sp while trying to cast their skill. Now we ask the question that players had back in 2023: What happens if Izumik is in SP lockout when he’s forced to enter phase 2?
Izumik here only needs a few more jellyfish to enter phase 2, he is trying to cast his skill Summon Jellyfish and is thus in SP lockout. We then pull jellyfish into him with Cliffheart to forcibly phase him while he’s still trying to cast his skill. It turns out that when you do this, Izumik will not cast his Acid skill because he still cannot gain SP! Well, not completely. He can still cast his hp phase Acid skills since they’re not based on SP.
What this means for us is that if we pull off the Acid cancel, Izumik will become far more manageable. He’ll still have his stats and be able to auto attack, but he won’t be spamming the Acid skill every 30 seconds. Instead of needing to deal with Acid constantly, we’ll only need to deal with them once every 25% hp!
Operator Requirements:
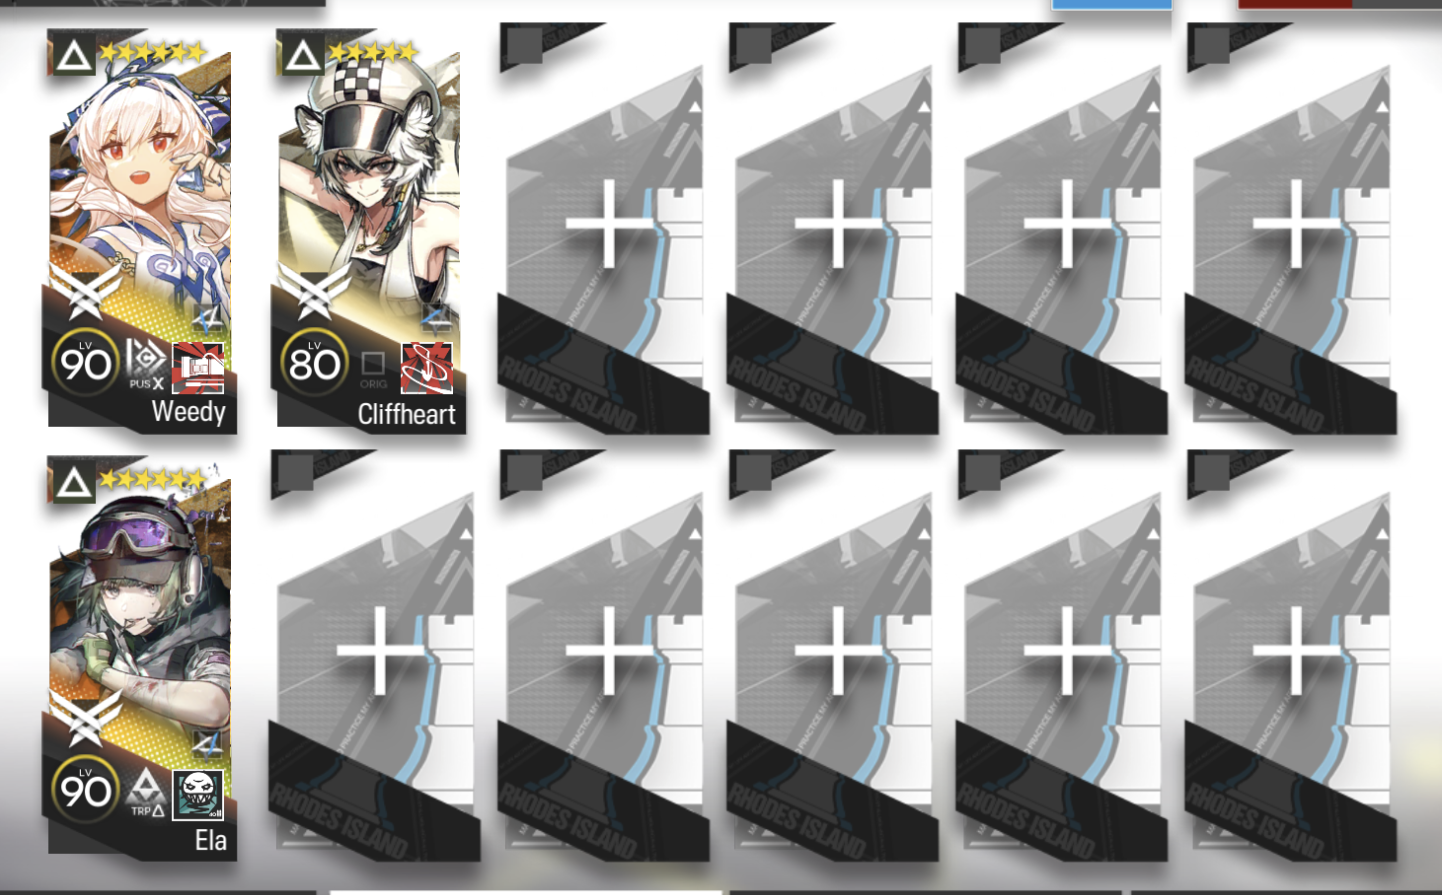
One of the big selling points about acid cancel is that it is quite flexible with the operators you can bring. The only one which is mandatory is an operator to pull or push jellyfish into Izumik as he casts his skill. Cliffheart is the easiest one to use for this purpose because she targets 3 and her pull is one of the faster ones to come out. Other pullers will also work but require more strict timing. Weedy and Ela here aren’t mandatory but are simply put here because it’s an easy way to set up the fast feed for the top left. Despite this, I would recommend drafting Weedy anyways. We can use Weedy to interrupt Izumik’s hp phase acid attacks. She is the only operator who can do it with no other support from other relics or operators. We can also use Angelina + any 2 force pusher/puller (like Cliffheart), but that’s a 2 operator solution compared to the efficiency of Weedy.
Procedure:
To execute this, you must first become comfortable with the fast feed strategy that is used for the push strat.
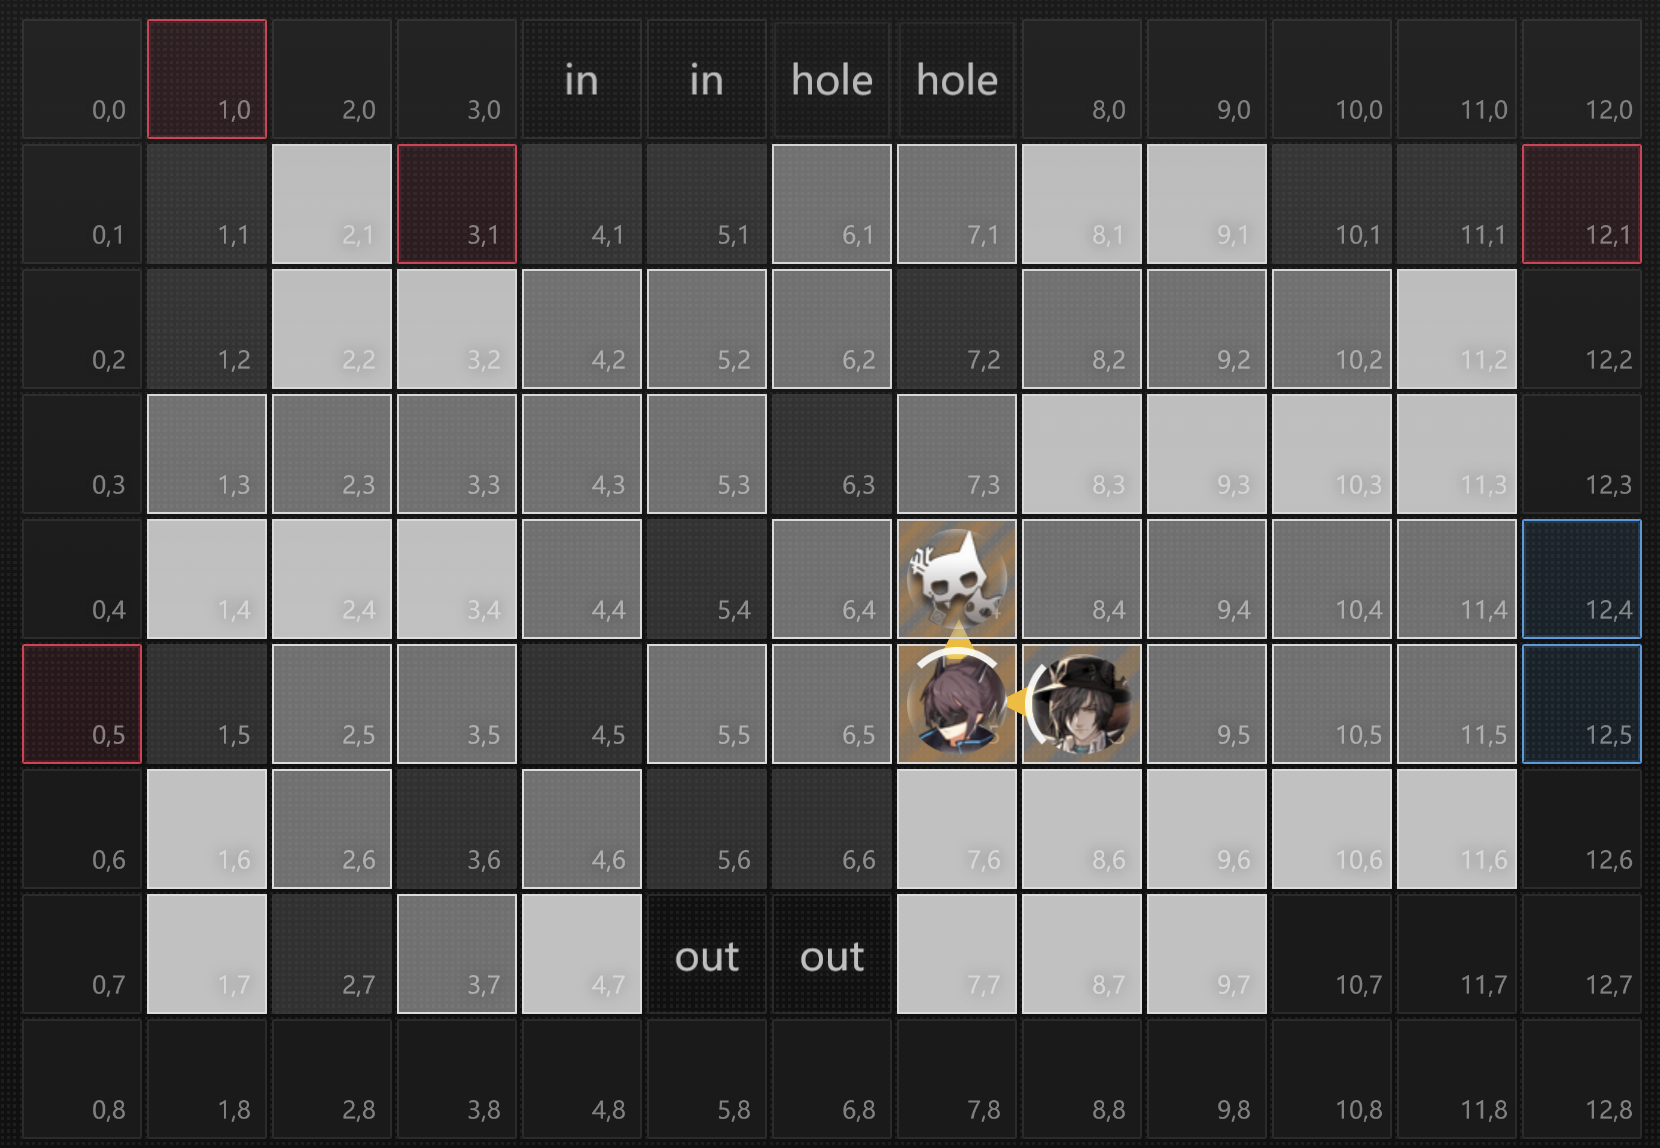
We will execute the fast feed strat as normal, except instead of killing only 3 out of the 6 jellyfish that spawn when Izumik uses his skill Summon Jellyfish, we will kill all 6. By doing so, Izumik will still be in phase 1 when all the jellyfish from the top left go into him. After the 3rd explosion we then place down Cliffheart:
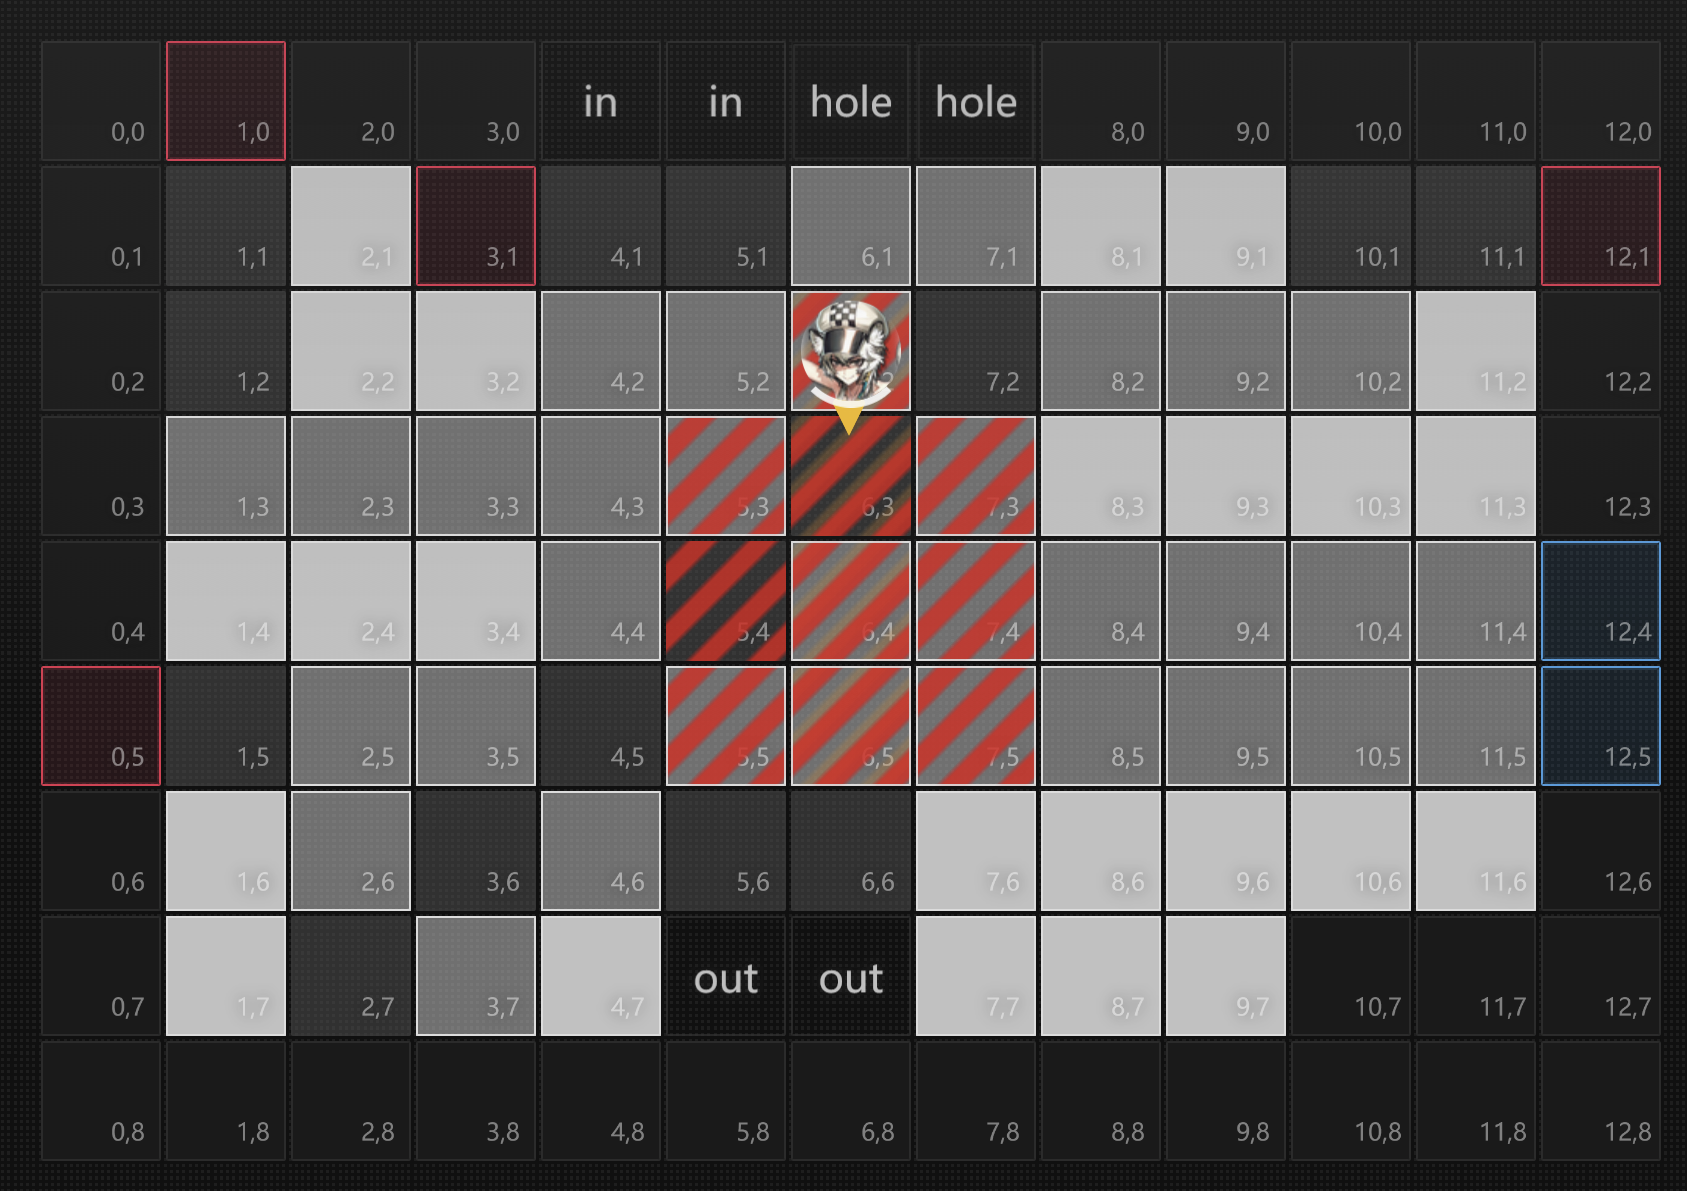
Izumik will stop between 5,4 and 6,3 or be at 6,3 and then start to use Summon Jellyfish. We know when he’s doing it because he makes a squelching sound and bobs up. The moment you hear the sound, activate Cliffheart s2 to pull the jellyfish into him to forcibly phase him. If done correctly, Izumik will immediately explode and no jellyfish will be summoned. With this, the acid cancel is complete and you may now set up the rest of your comp safely.
You can see a demonstration of the acid cancel as well as interrupting Izumik’s hp phase Acid skills here: https://youtu.be/__k2uM9YRHg
Interrupting Izumik’s Acid
Section titled “Interrupting Izumik’s Acid”Something we’ve brought up a few times is the idea of interrupting Izumik’s acid skill. It turns out that when Izumik is shifted when trying to cast his skill, the skill will be canceled. The procedure to do this is very simple, we watch for him to begin to cast his skill (he will stand up straight and black spots appear around him) and then shift him. So what operators can actually shift him? For Izumik to move at all, the difference between the shift force of the skill and his weight must be greater than -2. So we need an effective shift force of 4. This is out of reach of most operators, but as mentioned before, Weedy can do it. Another consideration is that the operator should be out of range of Izumik but still be able to reach him. Otherwise Izumik will kill them before they’re able to cancel his skill! Here’s a table of some candidates:
| Operator | Notes |
|---|---|
| Weedy | Does it with no outside support, simply place down cannon and press skill. The skill is near instant so the timing is lenient. |
| Cliffheart | Needs Angelina or shift force+2 relic. Because of the startup time on the skill, you have to immediately press it the moment Izumik starts his skill. |
| FEater | Needs Angelina or -1 weight or shift force+2 relic. It’s pretty fast to come out so timing is lenient. |
| Gladiia | Needs Angelina or -1 weight or shift force+2 relic. It’s super slow to come out so you need to preemptively activate it. Not recommended. |
| Ray | Needs Angelina. Untested so no comment on feasibility beyond “it theoretically should work”. |
| Degenbrecher | Needs Angelina. Same problems as Gladiia. Not recommended. |
Strategies Continued
Section titled “Strategies Continued”With these 2 new tools added to our skillset, our options for solving Izumik expand dramatically. We will now cover a bunch of solves and discuss their feasibility. It is once again important to reiterate that it is not feasible to cover every combination of every solve, so it falls upon the reader to determine what operators can substitute in for the solution.
Archetto + Qiubai lock
Section titled “Archetto + Qiubai lock”D15 and D18
With Archetto’s module, we are now able to generate sp for offensive recovery units quickly. This opens up two ways to lock down Izumik. The first is through Qiubai’s bind. By using Qiubai s1 with Archetto, we can keep him permanently bound in place. This strategy is fairly easy to execute. The tricky part is the acid cancel and the interrupts, but the actual stall itself is afk. The problem with this strat is that it uses two operators who are off meta and both are 6*. This is a significant hope investment for 2 operators who ultimately aren’t very good en route, which is the main problem you face in is3.
Operator Requirements:

Archetto and Qiubai are the main ones who are mandatory here. We will need to acid cancel Izumik as well as be able to interrupt his hp phase acids. As such, Weedy and Cliffheart are efficient operators to draft to fulfill these purposes. We can of course use other operators to do so as well. We technically also don’t need to interrupt since we can use Heavyrain who has a skill to camouflage our operators.
Procedure:
First we must acid cancel Izumik. Then deal with the jellyfish so that Izumik is the only enemy left. We then can set up in a variety of ways, the only condition is that Qiubai and Archetto must both be able to hit Izumik at the same time. When Izumik is about to use his acid skill, deploy the cannon and click Weedy s3 to cancel the skill. Repeat until dead.
Example kill: https://youtu.be/qz0rsrHtgis?si=ngR-45L4JZdBKK7U
Archetto + Degenbrecher lock
Section titled “Archetto + Degenbrecher lock”D15 and D18
Since Qiubai is a pretty bad operator in is3 and not worth the hope, let us turn our attention to an operator who is pretty good. Degenbrecher is a fairly strong operator en route, and notably solves quite a few stages with Archetto such as Avoid Unsafe Roads and locking down Pompeii in Water Fire Union. Even though this combination is still not quite meta, it is quite strong. For Degenbrecher to lock an enemy down, she must use skill 2 on a blocked target. This will prevent them from doing any auto attacks. Of note though is that Degenbrecher being a good operator can backfire since she can do too much damage. This can cause her to do 25% of Izumik’s hp before Weedy’s skill comes back up if your relics are good. Be aware of this and don’t spam her skill too hard until Weedy’s s3 comes back.
Operator Requirements:
Archetto and Degenbrecher are the mandatory ones. See Archetto+Qiubai section for explanation on the rest.
Procedure:
Gravel and Yato here are any two melee bodies that can block. We will once again begin by doing the acid cancel and then dealing with the jellyfish. Deploy Archetto and have her skill charged up. Once Izumik is the only enemy left on the field, we wait for him to be part of the way into 8,5 and then block with our first body and then immediately place down Degenbrecher. Activate Archetto and Degenbrecher skill immediately. If your first body dies immediately, place down the second to keep Izumik blocked. When Izumik is about to use his skill, place down the cannon and use Weedy s3 to interrupt it. Be wary that Izumik might get pushed out of being blocked by Gravel so you may want to put another body to block on 8,4.
Nymph lock
Section titled “Nymph lock”D15 and D18
Nymph has incredibly powerful single target locking potential, easily being able to fear lock any single target with just a bit more support. This is because fear lasts for 5 seconds but her skill only costs 12 sp. This means when she casts her skill, the enemy will run away for 5 seconds and then take another 5 to come back which gives her a 10/12 coverage. This of course has some caveats. The main one is that Nymph’s range is fairly small, meaning that if the enemy outranges her, she’ll get hit before she can apply fear! Ultimately though, this strategy is quite hope efficient since she also serves as a solution to the Last Knight and she’s a strong operator en route! If you’re willing to work with her limitations, she can easily be your Izumik solve.
Operator Requirements:
We will need to acid cancel and interrupt Izumik, hence Weedy and Cliffheart. Ela is here for her mines, since Ela is extremely strong we will almost always have her. By mining Izumik when he starts to come back to Nymph, we extend the amount of time it takes for him to get back. As such, Nymph + Ela comfortably permalocks Izumik. Nymph can also easily permalock with relics solo as well. Sp generation and stun extension relics like Victory horn all work to make her permalock. We can even just block Izumik to stall him enough for Nymph s2 to come back.
Procedure:
Acid cancel, wait until Izumik is the only enemy left. Izumik will repeatedly go to 8,4 where we will then use Nymph s2. Ela mine Izumik when Nymph needs to get more sp. Use Weedy to interrupt. This is the idea and it’s relatively simple and quite stable, but to explain how it can go wrong, we will need to explain how fear works.
Fear Mechanic Explained
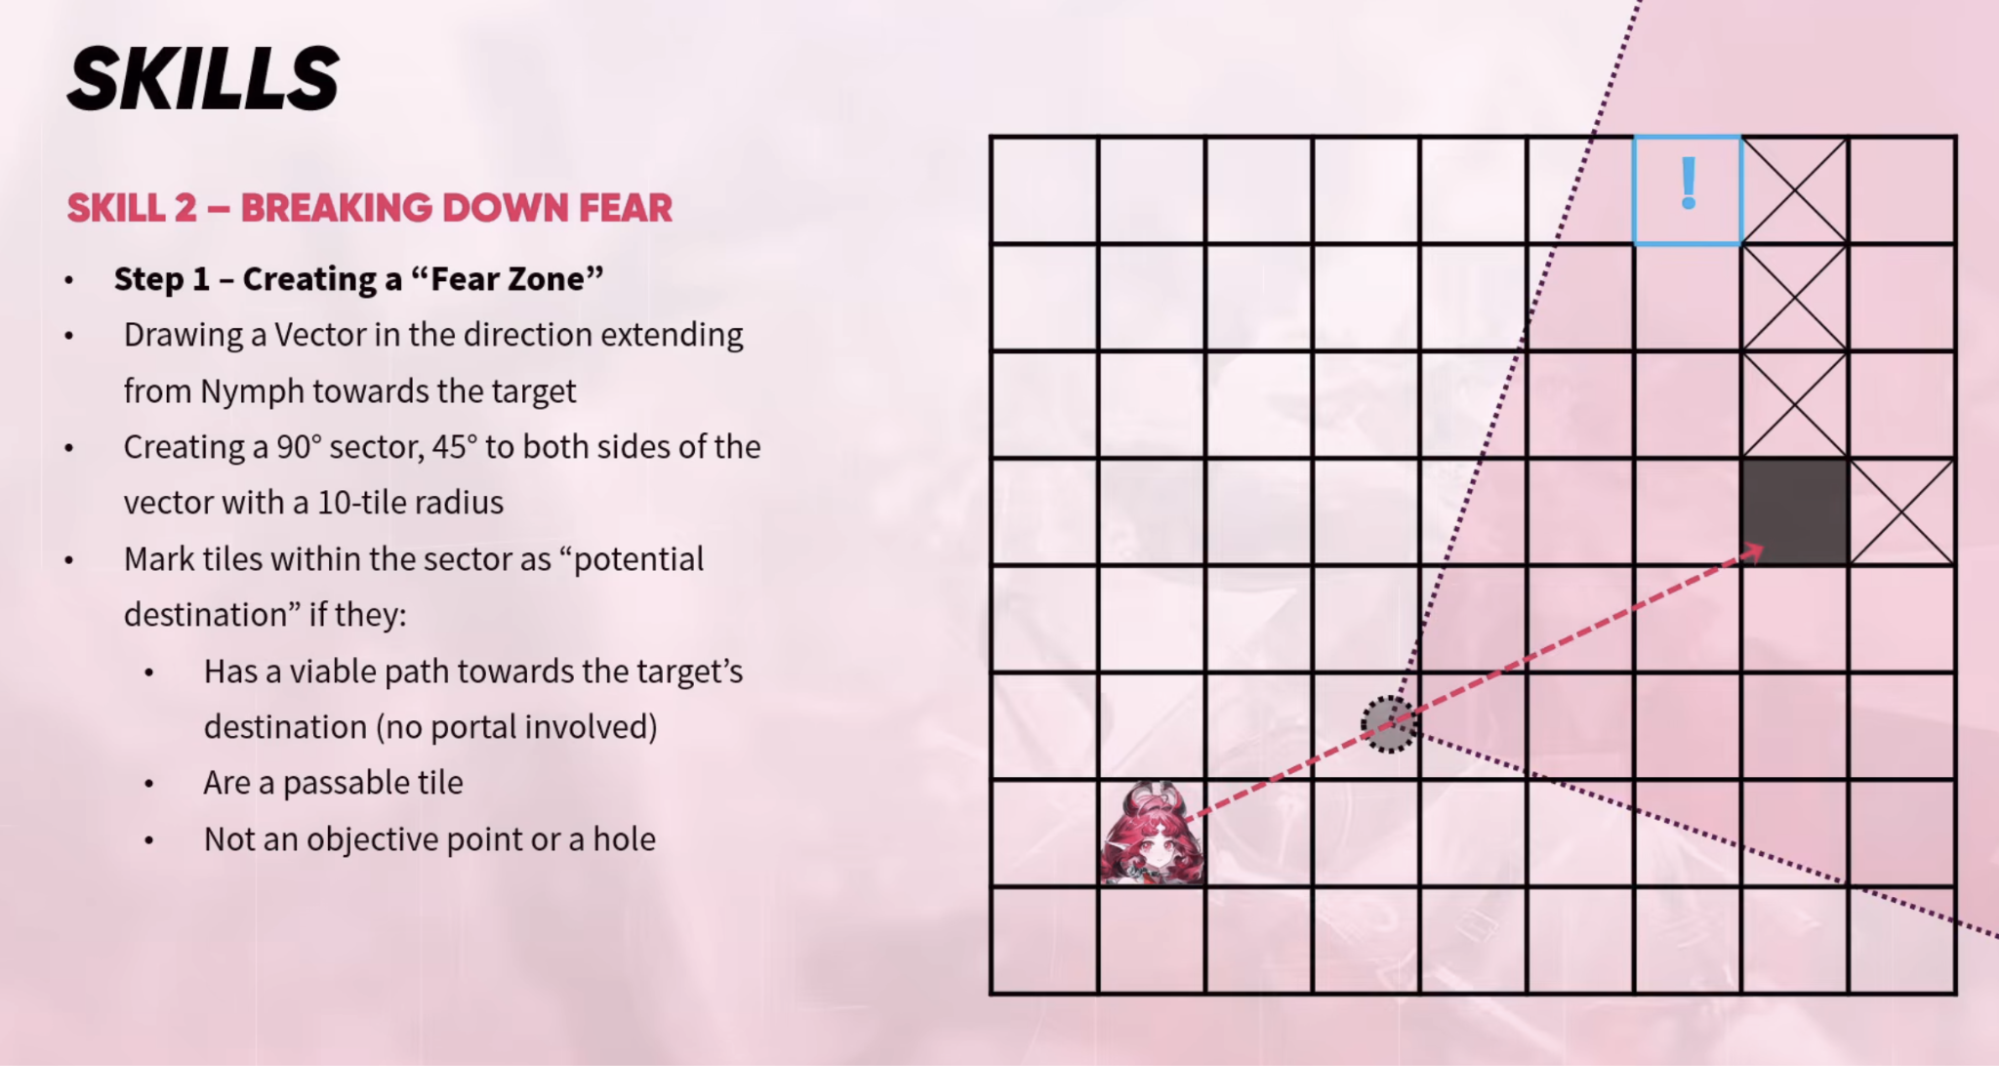
Credit to DragonGJY for this graphic. I highly recommend checking out his videos: https://youtu.be/61OknUrvWNE?si=9A__dT42PmXk_oZj
When Nymph fears a target, a straight line is drawn between her and her target. The enemy then randomly decides a location to go to within the 90 degree angle that is bisected by the line. Why is this potentially a problem? Well:

So here Nymph has just cast her skill and has drawn the vector. Do you see how the bottom line is slanted slightly downwards? This means that with poor enough rng, Izumik can randomly decide to go ever so slightly downwards. Not a big issue by itself, but what if each time we cast Nymph skill, we get unlucky and he chooses to go slightly more down? Well, he’d eventually start approaching Nymph from the bottom and enter Nymph’s range at 8,5. In other words, he’ll be able to attack Nymph at the same time she can attack him!
To be clear, the chances of this happening are extremely slim! Nevertheless, it can happen and so we must discuss what to do in such cases. If we have Victory Horn, the solution is simple. Since the fear will last 10s at minimum and thus give us ~17s of stall time (20 seconds normally but Izumik attacking wastes 3 seconds), we can simply place a fast redeploy operator to bait the hit that Nymph would take and cast skill 2. Eventually we’d expect Izumik to go back upwards and thus fix the lock.
The second option is to simply redeploy Nymph and try again by redeploying her one or two tiles to the right. Since Izumik must go to his checkpoints, he’ll go to the correct position for the Nymph lock to begin anew. This of course requires us to be able to stall him until Nymph comes back. However, if you have proper awareness that the Nymph lock is failing then we can fear Izumik one last time and then retreat and start spamming Ela mines and blockshifting him back.
Ultimately the Nymph lock is a hope efficient solution that requires fairly precise timing and has a very low chance of failing. It is definitely worth considering and practicing if you’re looking for a good solution to Izumik.
Example kill: https://youtu.be/__k2uM9YRHg
Brute Force Strat
Section titled “Brute Force Strat”D15 and D18
This strategy takes advantage of the fact that Lemuen has global range and thus can constantly hit Izumik. Despite Izumik’s gargantuan hp pool, Lemuen is able to eventually kill him with minimal stalling. Each barrage from Lemuen s3 will do ~90k with Exu Alter and Ela mine. Note that this strategy is fairly hard to execute because of its precise timings and needing to interrupt Izumik while he’s moving around. Note that I am not experienced with this strategy so there will be no procedure section.
Operator Requirements:

We need to acid cancel and interrupt. As such Weedy and Cliffheart are standard inclusions. Ela’s mines and Exu s3 are very important for the strategy to work otherwise we cannot stall long enough for Weedy to come back. The challenge in this strategy is that we want to push the jellyfish into Izumik so that Lemuen can hit them while dps’ing Izumik AND we must also cancel Izumik’s acid with Weedy while he is still moving around the map. We have Lemuen pointed towards a wall so that she will only ever target Izumik. We use Exu to give Izumik the wanted mark.
Example kill: https://m.bilibili.com/video/BV1898ezuEjX?t=370
Relic Dependant Strategies
Section titled “Relic Dependant Strategies”Now that we’ve discussed the common strats that don’t require relics, we will now discuss some solves with relics. This section necessarily cannot be exhaustive, and you will note that many of the solves are similar to the above solves but with less operators. We generally consider relic dependent strats to be lesser than relicless strats because we cannot reliably plan a run around them. However, learning to adapt to the relics you obtain so that you can reduce your draft is important in order to achieve maximum consistency.
Flames of the Inquisition Weedy
Section titled “Flames of the Inquisition Weedy”D18 or D15
Let’s start off with a fun one. Flames of the inquisition gives +2 sp per damage instance done to a seaborn enemy. Weedy’s s3 has the property that gives all enemies hit by it a DOT (damage over time effect). What this means for us is that if we have enough jellyfish grouped up, Weedy’s s3 will recharge almost instantly! Since Weedy’s cannon has a shift force of 4, it is capable of shifting Izumik slightly. All of this means that if we simply spam s3 enough times, Izumik will fall into the hole!
Operator Requirements:
We still need to fast feed Izumik. Acid cancel is unnecessary since Izumik will be constantly pushed and as such he will get interrupted.
Procedure:
Fast feed Izumik. Group up the jellyfish in the same row as Weedy. Then place down the cannon and press s3 as often as possible. Make sure to be conscious of the fact that Izumik can cast Acid so be ready to interrupt it.
Example kill: https://www.youtube.com/watch?v=ZXp_w17FDdU
Feater Single Push with +2 Shift Force Relic or -1 Weight
Section titled “Feater Single Push with +2 Shift Force Relic or -1 Weight”D15 or D18
Its Weedy single push strat but with Feater.
Operator Requirements:

Feater has a shift force of 3 at e2, 2 at e1. As such, there are a few combinations that work to single push Izumik:
Procedure:
Fast feed Izumik, then push.
See The Push Strat section for more details.
Example of a single push: https://youtu.be/HTyBV8xDYp4
Note: I acid canceled here. You’ll have to be more precise about when you place down Angelina and Feater if you don’t to avoid the Acid.
Flames of the Inquisition/Bloodbath Qiubai/Degenbrecher
Section titled “Flames of the Inquisition/Bloodbath Qiubai/Degenbrecher”D15 or D18
It’s Archetto+Qiubai/Degenbrecher but without Archetto. This is huge since Archetto is pretty bad en route. As such, these relics make for an extremely efficient solve to Izumik.
Operator Requirements:
You will need to Acid cancel Izumik still. Exu Alter here is another solution to work around the hp phase Acid attacks that opens up with this strat. We can simply phase Izumik, undeploy Qiubai and then redeploy her with Exu s3. If you don’t have/want to use Exu alter, you can use all the old methods of interrupting instead.
Procedure:
See Archetto+Qiubai/Degenbrecher section.
Example: https://youtu.be/-pASBX8R—4
Wavebreaker/Metastatic Yato
Section titled “Wavebreaker/Metastatic Yato”D15 with Metastatic/Wavebreaker, D18 with Wavebreaker
Regular Yato has a funny interaction with Wavebreaker. Thanks to her talent, her redeployment time is only 2 seconds! At d15 or lower, this works with Metastatic too. Unfortunately how rejections are implemented changes at d16 and up, so Metastatic doesn’t give her a 2 second redeployment time (it is still worth infecting her for the lower dp cost though). A 2s Yato is extremely powerful both en route and in bosses. Any relatively slow moving, blockable enemy is permanently stalled! This includes the Last Knight and Izumik! Just wait for them to walk in and blockshift them out repeatedly.
Operator Requirements:
Note that Yato needs to be p6. Also note that with Wavebreaker you’re dp negative blockshifting and retreating with her. As such, you should either give her metastatic and/or bring dp generation.
Procedure:
Blockshift on this tile repeatedly. Make sure to retreat her or you’re going to be bleeding dp.
Example Kill: TBA
Attack Speed Relics Mizuki
Section titled “Attack Speed Relics Mizuki”D18 and D15
Mizuki has a shift force of 3 with his IS module. Since Izumik needs a shift force of 4 to be shifted, we must have either Angelina or shift force relics. Mizuki also attacks too slowly to cancel Izumik’s attacks, so we need attack speed to do so. Overall a pretty bad strategy since Mizuki isn’t that good in the first place.
Operator Requirements:
Mizuki and Angelina are needed to lock Izumik. We want to place a body down to prevent the case where Izumik attacks Mizuki. In theory we don’t need to acid cancel, but you should do it anyways because it makes dealing with the rest of the map realistic.
Procedure:
Acid cancel Izumik. Once Izumik starts moving towards the blue box, bait his first hit with an operator, then place down Mizuki, Angelina and then your second bait. Replace your bait as needed for when Izumik attacks and Mizuki doesn’t cancel the attack. Save Mizuki’s s2 for hp phase acid attacks, activating it when you see Izumik do it to make Mizuki immediately attack.
Example kill: https://youtu.be/XH3eVyWCH6A?si=dP5cwelY6db3R1EL
Medicine sticks Phantom+2 Fast redeploy
Section titled “Medicine sticks Phantom+2 Fast redeploy”D18 and D15
Medicine sticks will block one auto attack from Izumik. Phantom IS module has the property to reduce the redeployment cooldown of his clone and his own redeployment time each time they attack. This means that in the time it takes for Izumik to finish off bait #1 and the clone, the clone will be immediately ready to redeploy! As such, we can permanently stall Izumik at a reasonable dp cost. While this is an efficient solution, it is also very slow to do because we must play in bullet time to retreat operators before they die in order to not bleed dp. As such, use this strategy as a last resort.
Operator Requirements:
We will need to acid cancel for this to work. A selling point of this strategy is that it doesn’t actually need us to interrupt Izumik at all. We can simply let him use Acid and then redeploy everyone. A simple, cheap setup to do this is with Phantom + Metastatic Yato + Gravel. We can also add in other melee operators instead of just using 2 frdp such as reserve vanguard.
Procedure:
Acid cancel Izumik. Once the rest of the map is dealt with, bait the first Izumik auto attack with bait#1. Then place down Phantom so that he can attack Izumik but is not blocking him. Then immediately place down bait#2 to block Izumik and the clone above Izumik blocking him as well. Izumik’s auto attack is ranged, so we can wait for his projectile to come out and then retreat the bait. The cycle becomes:
bait#1 tanks hit > bait#1 retreats once projectile comes out for the next hit, clone will be blocking now> place down bait #2 where bait#1 was> clone tanks hit > clone dies on next hit > bait#2 tanks hit > bait#2 retreats once projectile comes out for the next hit, clone will be blocking now > place down bait #1 where bait#2 was, clone tanks hit > clone dies on next hit, bait#1 is now blocking > place down clone > repeat cycle.
When Izumik uses acid, simply repeat the entire setup procedure.
Example kill to be added
Mind over Matter Wisadel/Yato Alter Solo
Section titled “Mind over Matter Wisadel/Yato Alter Solo”D15 only
This strategy stinks because you’re forced to use the Mind over Matter squad for it to work. Mind over Matter is a bad squad because it doesn’t help with your hope curve to get the operators you want, and it doesn’t help much with en route since you can’t rely on it. It also requires you to pray that rejections don’t land on Wisadel/Yato. Rant aside, the general idea for this strategy is that we accrue enough stacks for Wisadel/Yato Alter to easily kill jellyfish. This strat is not d18 viable because the jellyfish and Izumik have doubled stats so on top of needing a bunch of stacks we also need to highroll other damage relics.
Operator Requirements:
You can only bring either Yato Alter or Wisadel alone into the stage otherwise the Survival Contract is not guaranteed to land on them.
Procedure:
For Wisadel: Wait for Izumik to phase naturally (leaking a bunch), then place down Wisadel there. Make sure you always have a revenant alive otherwise Wisadel will die to the next acid. Activate Wisadel s3 whenever you feel like it, Izumik stops at 6,4 for a long time so there’s plenty of time for Wisadel to kill him.
For Yato Alter: You need p6 and a redeployment down relic for it to be viable without leaking a bunch. Just keep redeploying yato on s3 on the two lanes that lead to the blue box.
Example kill: https://youtu.be/BflOlDnYT1Q
Fincatchers Shawl
Section titled “Fincatchers Shawl”Fincatchers Shawl is a rare collectible that gives camouflage to all ranged operators. This is incredibly powerful since it means we don’t need to acid cancel or interrupt. The amount of strategies this relic enables is extremely high. As such, for the sake of brevity we will simply note that on top of most of the solutions previously mentioned, it also allows us to just dps down the boss without concern. Note that it does not protect you from the explosions in phase 1.
Putting it All Together
Section titled “Putting it All Together”So we’ve gone over some strategies for Izumik now, but we should now discuss what this all means for us. Obviously, some strategies for Izumik are better than others. Moreover, some strategies are better suited for certain squads compared to others! Here is a table listing the d18 strategies generally in order of best to worst:
| Strategy | Notes |
|---|---|
| Weedy+Angelina Single Push | Easy to execute and excellent on other maps. |
| Nymph lock | Requires an acid cancel. Execution afterwards is fairly easy. Low hope requirements and useful operator en route. Especially so when you’re playing Specialist/Caster squad. |
| Archetto+Degenbrecher/Qiubai | Requires an acid cancel. Execution afterwards is easy. Operator requirements are a little steep unless you play Sniper/Medic squad. |
| Metastatic/Wavebreaker Yato | Easy to do, just rng on whether you get the relic/rejection to do it. |
| Feater+Angelina Single Push | As easy to do as the Weedy one, but relic dependent. |
| Flames of the Inquisition/Bloodbath Degenbrecher/Qiubai | Same as the Archetto version, but requires a relic which makes it unreliable to depend on. |
| Medicine Sticks Phantom + 2 FRDP | Quite low requirement, but very taxing to do so it’s not recommended. |
| Attack Speed Mizuki | High requirements, Mizuki is pretty bad en route, not recommended. |
| Mind over Matter solo | Using Mind over Matter is a bad idea. |
Let us now put together a draft and explore my options. For the sake of this example we will assume we’re going for the Weedy+Angelina single push.
So for us to do a Weedy+Angelina push, we have a few things that we need to do. The first is the fast feed, the second is the push and finally we need to deal with the rest of the enemies.
So since we’re doing Weedy+Angelina, we will obviously be using those two:
For the fast feed, Weedy can stall the jellyfish for a large part of it. We do however need a second operator at least to help stall the jellyfish a little more. Here are some options:

Obviously not all of these options are equally good, but this is a demonstration of how varied your options can be. In general, any operator who slows/binds/inflicts movement speed down or pushes can be used as long as they don’t have a terrible startup time. We will often use 2-3 of these options so that we can keep the jellyfish stalled later on in the map as well.
Now that the fast feed and Izumik solution is done, we still need to deal with the rest of the map. First we should pick out 1 or 2 good operators to help kill the jellyfish.
There are other solutions like a rejection cured Logos, but these options are the most reliable for killing jellyfish.
We’d also need to deal with the Manta Rays:

If you’re planning on doing an Acid cancel, Cliffheart is strongly recommended. Otherwise Krooster is excellent for being on a less competitive voucher and being a cheap 5*. Texas is expensive and not recommended.
So our overall draft for Izumik could look something like this:

Now that we know what our Izumik solve looks like (vaguely anyways, we can change quite a few parts of it), we can then work backwards to see what we’ll need to beat every other map in the game. So for the Last Knight, we’ll want a medic to heal off the casters’ attacks as well as true damage for the boss himself. As such, Kal is a pretty good pick. The stall is already covered since Angelina+Weedy+Ela permastalls him. This squad is also lacking a strong starter, so we pick Exu Alter because of her crazy damage and utility. We should also worry about maps with high dp pressure like Avoid Unsafe Roads, so let’s draft a flagbearer like Myrtle as well. This gives us a final draft of:

Which comfortably does almost every map. By mysterious coincidence, the Exu, Ela, Kal, Angelina, Weedy core is the meta composition for the Specialist/Caster squad!
Closing Thoughts
Section titled “Closing Thoughts”Izumik is a tough fight. It demands you play around his acid attack and use tools that you normally would never consider in an IS run. However, Izumik exemplifies what makes is3 unique and excellent. Unlike other IS which are heavily focused on stacking damage to kill threats, is3 demands you adapt to its hostile environment. No other IS will demand you consider utility operators like Lee and Mint, but is3 will. No other IS will demand you to consider alternate solutions to maps because of rejections, but is3 will. These are not direct complaints about other IS (they have their own virtues), but an acknowledgement that Hypergryph’s first attempt at creating an endgame IS is truly special despite its flaws. Hopefully after reading this guide, you too can appreciate is3 in all its glory.