Getting Started with IS
How to get better
Section titled “How to get better”This article will be dedicated to going over some of the important mechanics of IS, starting from a basic down to the advanced level. Having a strong fundamental understanding of all these mechanics is imperative to winning consistently. If this is not what you are interested in, you can turn back after reading at least the next section.
Good habits/General tips Here are some quick general tips which may be helpful. Some of these are general uncategorized advice to get better, while others are good habits to get used to.
- Go through/knowing all collectibles before entering a stage
- Going in with a plan on clear the stage, regardless if it is a stage you cleared many times, or its a stage you never cleared before
- Check conditional difficulties (Hallucinations/Call of We Many/Collapsal Paradigms/Epochs) and plan accordingly to them
- Do not be afraid to take risks. IS gameplay is balanced around high risk high reward. Worst case you return back to Floor 1 and learn something new.
- Record/stream your runs and ask for feedback from experienced players.
Choosing a starter
Section titled “Choosing a starter”This section aims to aid players who are looking for a strong starting operator without any preferential bias. While the writers of this guide acknowledge that certain starting operators and squads are stronger and more meta than others, we by no means discourage readers to deviate from their preferred starts, nor do we force readers to conform to a defined meta. This guide will not be listing out certain operators that are strong in each IS theme for a variety of reasons.
- The list is too long to be fully inclusive (definitely not being lazy here)
- The meta shifts with IS expansions. Certain starting operators that are strong pre-expansion may not transition well post-expansion
- Players are biased towards certain operators depending on their gameplay style
- Some starters require corresponding starting squads to function. For example, some operators gain a huge power spike after being promoted and starting them unpromoted is unviable.
First we must address the elephant in the room. Why does picking a strong start matter? The answer is quite simple. In the earlier floors, it is unlikely that you would have a lot of operators available because there just isn’t enough vouchers available at the given moment to get more operators, even if they are reserve operators (being a throwaway body also counts as a role). More operators means more roles in a squad are fulfilled.
Here we will post some general criteria that a strong starter normally fulfills:
-
Gaining economy fast through obtaining stage resources This criterion is somewhat self-explanatory. Winning at IS is closely tied to snowballing early, the earlier the floor the better. How does one snowball? By being rich in resources of course! Maybe you got a chest here, killed the duck lord there, streaked flawlessly through the entirety of floors 1-3 as well. These little things could make a big difference. Maybe that two ingots you got is the difference between buying HR letter on the floor 1 shop or skipping it. Maybe the duck lord gave an old fan as a reward. Maybe the shields you got from your flawless streak early on meant you could pass emergency Out of Control with a sliver of lifepoints to spare. There is no telling what butterfly effect those early resources could do in the late game.
Here are some possible stage resources that are relevant and a strong starter should help you to accumulate:
- Earning money by breaking chests
- Earning plans by breaking spines in IS5
- Obtaining relics by killing animals on early maps
- Saving lifepoints and shields by performing leakless clears on early maps as a solo carry
-
Saving hope (more in the economy section)
- Being both relevant in early and late game
- Covering multiple roles in a team
Pathing
Section titled “Pathing”Node value
Section titled “Node value”Regardless of each theme of IS, one thing has not changed. Each map is structured into nodes and paths that link nodes together. The types of nodes are extremely varied and it would be silly to assume that the value of each node is the same. The value of the node can be thought of as the resources that your run can gain in order to maximize the chances of your run. Ideally, the resource yield of these nodes have low variance and are not detrimental.
Here is a quick summary of some nodes that are shared amongst IS themes and their corresponding value, assuming the conditions of a normal IS run (and in the case of nodes which require risks or a sufficient amount of development like Emergency combats, that you can safely clear the node.):
| Node | Significance | Value |
|---|---|---|
| Normal combat | Main source of command experience and ingots Source for recruitment vouchers Chance for collectible drop | Medium to High |
| Emergency combat | Even better rewards compared to normal combats High risk, high reward Extra guaranteed collectible | Very High |
| Rogue trader | Guaranteed 4 voucher choices including refresh Choice of impactful collectibles Value significantly tied to ingot count, the more the better | Medium to Very High |
| Scout | Removes one operator temporarily for the rest of the floor, to return promoted start of the next floor Aim to promote higher rarity operators to maximize value Saves a voucher, promotion hope cost, and yields other rewards depending on IS theme | Medium to High |
| Safe house | Choice of one out of three given options, with a total of 5–6 possible options Good place to hunt for promotion vouchers, vertical pathing resources or squad size Value is tied to how many desirable options can be offered | Medium |
| Lost and found | Exchanges a collectible or foldartal for another The exchanged collectible rarity depends on the rarity of the offered collectible Main purpose is to either obtain ending conditions or to exchange detrimental collectibles | Low |
| Downtime recreation | Gamble away your resources for other resources Very RNG dependent. Unstable resource yield, with some options being detrimental as well | Low |
| Encounter | Dominated with non-combat events with a small number of combat encounters Also somewhat unstable resource yield compared to regular combats Some encounters are related to endings | Low |
| Wish fulfilled | Choice of one collectible amongst a number of options | Low |
Pathing is arguably one if not the most important and hardest aspect in IS to master. In the simplest terms, an optimal route would path through the most number of high-value nodes possible. However, this greedy routing has flaws. The first being that vertical paths exist, which are explained in the next section. Choosing when to and when not to take these paths is not immediately obvious. The other flaw is that more experienced players would like to complete endings that are not the default ending. Obtaining these endings requires pathing into certain nodes to obtain ending items. Hence for these players the “value” of these ending nodes are higher. More on the strategy of pathing will be explained in a separate guide.
Node generation
Section titled “Node generation”A number of dedicated players have taken a significant number of samples of IS maps and generalized rules for the map structure of each floor on each IS. In essence, they manage to decode the node generation logic of the game. These generalized rules are helpful for pathing. Knowing which floors certain desirable nodes are more likely to appear means maximizing your success at hunting for these nodes at the ideal floor. Node generation will be explained in a separate guide as well.
Vertical paths
Section titled “Vertical paths”Why are vertical paths important?
Section titled “Why are vertical paths important?”Without going through any vertical paths, the number of nodes that you pass through the floor is equal to the minimal distance between the starting position of the floor and the end of the floor. Going vertically essentially increases the number of nodes that one can traverse before ending the floor, which increases the resources that you can obtain before advancing either to the next floor where harder stages exist or to tackle the boss at the end of the floor.
When should I take a vertical path?
Section titled “When should I take a vertical path?”Going vertically doesn’t come for free. Ever since IS3 where vertical paths are introduced, the advent of a new resource called keys unlocks the potential to pass vertically. In IS4 and IS5 they are called anti-interference indexes and plans respectively. Usually if there is no reason to hoard these resources to go vertically for other purposes, going vertically usually results in better economy. Here are a number of reasons why going vertically should be reconsidered:
- Saving a key for entering the Wonderland node in IS3
- “Going blind” on the next floor in IS4, because anti-interference index is tied to vision
- Saving plans for reaching ending nodes in IS5
- Pathing into low-value nodes
- Your development in the current floor is enough to tackle the stages on the next floor. This is because the combat yield at higher floors is generally better.
Wonderland/Bosky/Possibility
Section titled “Wonderland/Bosky/Possibility”Why are these nodes important?
Section titled “Why are these nodes important?”These nodes are essentially “mini-floors” containing a small number of nodes. Entering such a node places you into such “mini-floors” and reaching the end of the “mini-floor” brings you back to where you left off at the original floor. Similar to going vertically, going into a bosky increases the number of nodes past before reaching the end of the floor. However, instead of just a single node for going vertically, entering these “mini-floors” gives multiple nodes for the price of going vertically or less. This is a reason why the value of these nodes are so high, since they compress the value of multiple nodes into a single node. For the purposes of the Scout node, entering a mini-floor is considered entering a new floor. For the purposes of squad effects that give you some resources on each floor, some of these squad effects proc when entering these mini-floors.
However, the risks of going into a “mini-floor” are great. Tougher stages with tricky conditions may be encountered when entering these nodes. Here is a quick tabulated summary of what can be encountered in these mini-floors and their associated risks.
| IS theme | IS3 (Wonderland) | IS4 (Bosky) | IS5 (Possibility) |
|---|---|---|---|
| Type of nodes | Combat, Wish fulfilled and a boss fight | Combats and Non-combats | Combats, Face-offs and Wish fulfilled |
| Risks | Tackling a random boss unprepared Encountering combat stages that appear on higher floors | Combat conditions that alter/hamper the way stages are played | Combat conditions similar to IS4 but are also stackable across possibilities traversed |
| Example of possible risks | Tackling a dp intensive boss fight (Gravestone) without a vanguard | Doing stages with 2 deploy limit Defeating enemies with buffed defensive stats | Doing stages with reduced ally and enemy attack Doing stages with melee operators frozen on deployment |
Map familiarization
Section titled “Map familiarization”Map Familiarization Combats are a fundamental portion of IS, and to the game in general, since this is a tower defense gacha game after all. Combats, both normal and emergency (EM) have higher value than most non-combat nodes, which we explained in a previous section. A brief summary of the reason is as such: combats are one of the main sources of ingots, vouchers and command experience. Moreover, clearing boss stages is a requirement to clearing endings and completing a successful run. Quoting from Sun Zi, “If you know the enemy and know yourself, you need not fear the result of a hundred battles”. Knowing how each combat map works is important to successfully clearing combat stages. While experienced players can redirect newcomers to map resources mentioned previously, it is not intuitive how to convert enemy stats, enemy descriptions, timings and pathing into a working solution. Let us break down the situation step by step below:
Map characterization
Section titled “Map characterization”We begin by dividing maps into two non-mutually exclusive categories: Gimmick-heavy maps and Stat-check maps. Some maps are both gimmick-heavy and stat-check maps, and it is no surprise that those maps are usually the most difficult ones.
Gimmick-heavy maps
Section titled “Gimmick-heavy maps”Gimmick-heavy maps are defined as maps where the enemies interact with the stage mechanics, thereby making the stage difficult. However, if you play around the mechanic in your favor, then the difficulty of the stage can drastically decrease. On the other hand, failing to respect the mechanics often gets you steamrolled, Here are some example stages and their corresponding mechanics to respect:
| Stage | Mechanic |
|---|---|
| The Earth Wakes (IS4) | Boss has fragile when exposed to environmental damage Roadblocks for stage pathing |
| Musical Disaster (IS4) | Flux mechanic enables and disables enemy mechanics Flux mechanic hampers SP gain of operators |
| EM Simulated Skirmish (IS5) | Londinium cannon targeting operators emphasizes stage opening |
| Witch-Curse Alliance (IS5) | Tune variation mechanic to disable |
| Guiltless Paradise (IS5) | Chapter 14 Originium pollution mechanics |
The general approach to tackle gimmick-heavy maps is to first understand how the key mechanic of the stage works. To find more about the key stage mechanic, stage and enemy descriptions in-game give good insight to this. Online resources such as PRTS CN wiki and tomimi.dev are also accurate sources of information. Then one can go about understanding how conventional approaches to the stage work and design their own strategies. This can be done by asking around in corresponding IS channels and looking up stage clears of different squads in is-resources threads on our Discord.
Let’s walk through an example of this approach with The Earth Wakes map in IS4 The Earth Wakes features a boss, Elder Vinecreeps.
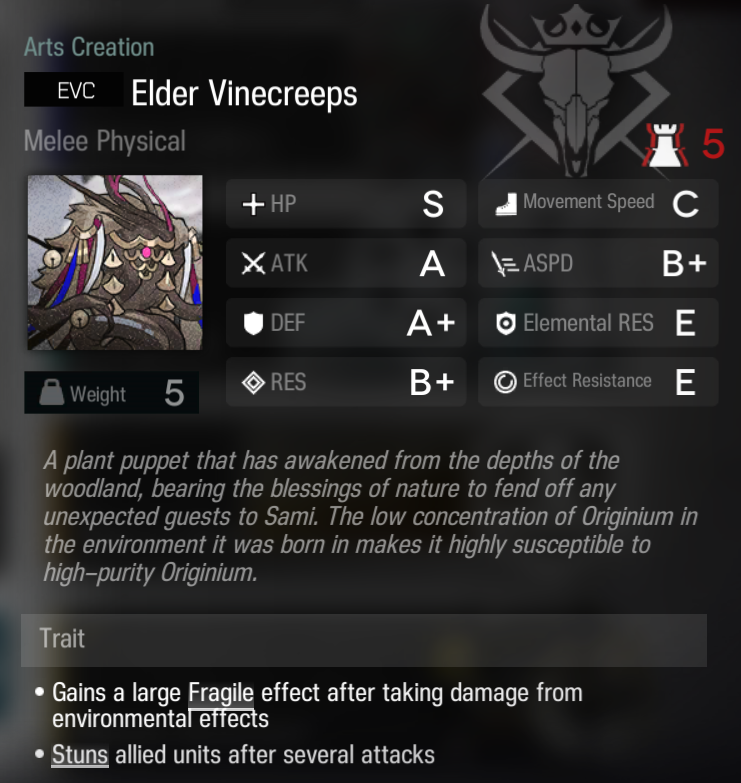
Given that the boss can stun allies after performing several attacks, dealing with it face on would be a problem. Moreover, we could leverage the boss’s trait where it gains a large amount of Fragile after taking damage from environmental effects.
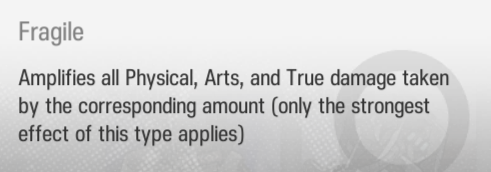
Let’s look at the map afterwards
The main enemies on this map are invisible snipers and casters. These enemies are usually not threatening by themselves. However, there are two Originium tiles on the map, which make these enemies much more deadly. The good thing is that the Originium tiles are classified as environmental damage. Another thing to note is that 5 roadblocks are available to modify the enemy pathing on the stage. We can use this to path the boss into the Originium tile so it takes more damage from our operators due to Fragile. Yet at the same time not let the other enemies path to the Originium tiles so they won’t destroy our units.
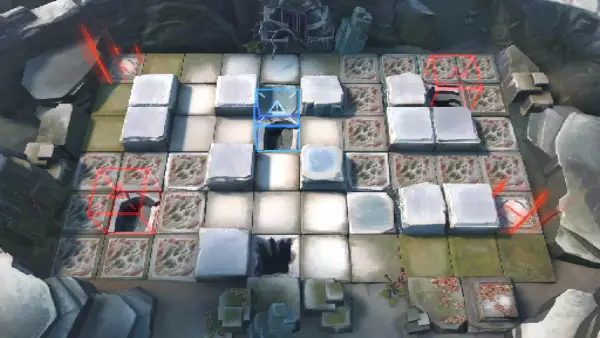
Now let’s look at a conventional box placement for this stage
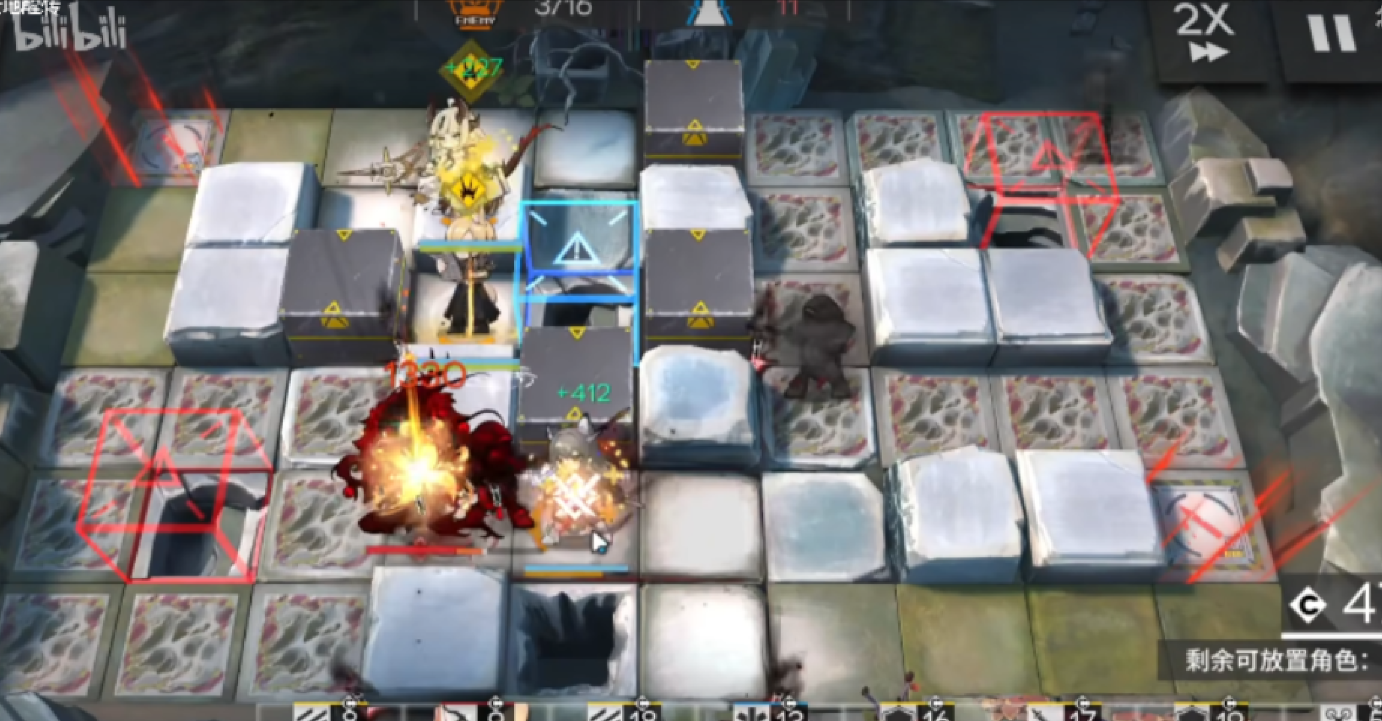
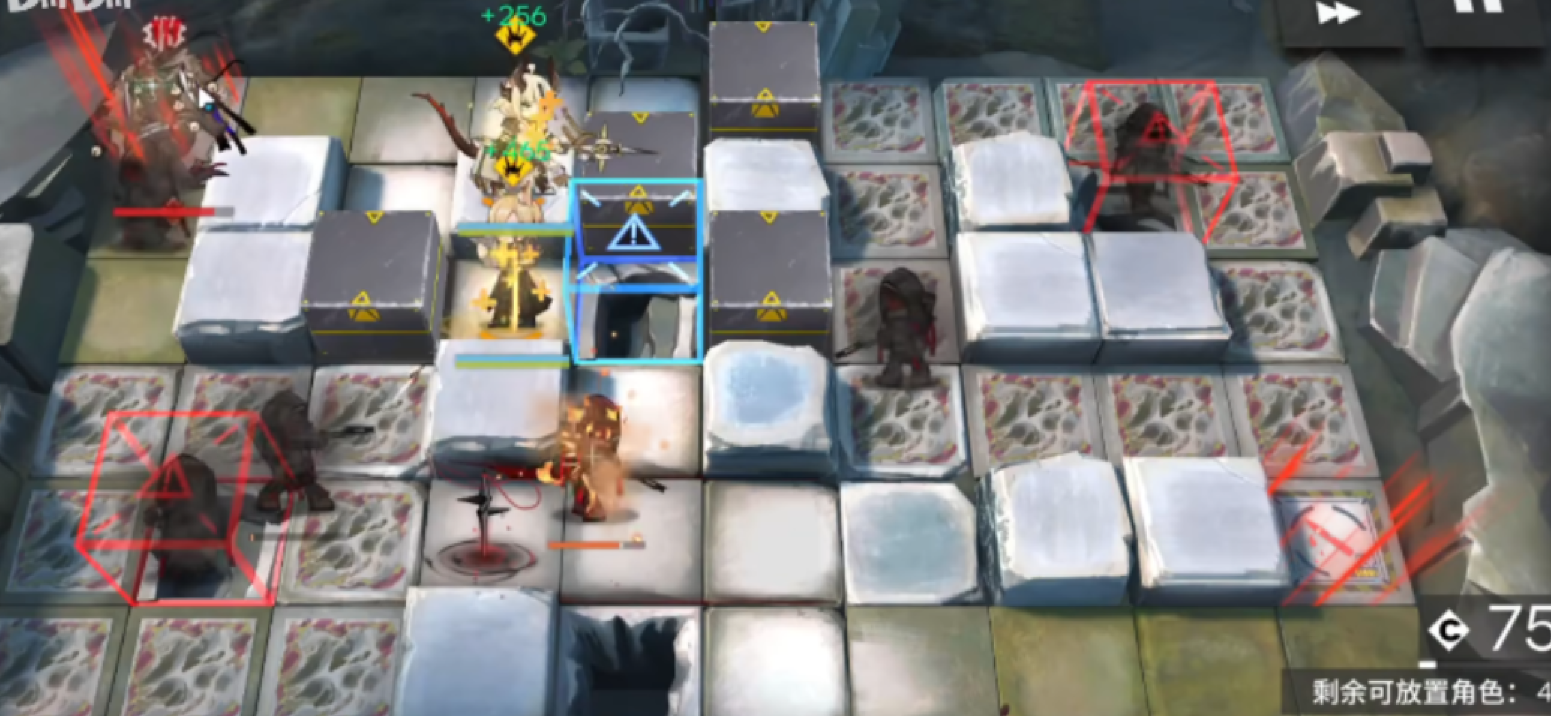
The boxes are first used to guide the boss onto the Originium tile, then the last box is used to funnel the regular enemies and the boss into a path that is free of Originium tile influence. The same strategy can be applied similarly to the other spawn permutation of this map. Damage and healing operators shown here can also be similarly replaced with your squad.
Stat-check maps
Section titled “Stat-check maps”In comparison, stat-check maps are, as their name suggests, stat checks. You are going to struggle if damage or healing doesn’t meet the requirements of the stage. A common aspect of these maps is that while the mechanics of the stage might not be difficult or relevant, they make up for having bloated enemy stats with many waves of elite enemies. Eg: Instinct Contamination, Requested Enemies Obtained, Hollow Visage, EM March of the Dead
To succeed in IS, one should always take calculated risks. Part of determining these risks against stages like these is to have an accurate judgement of your squad strength. Do you have enough damage operators to clear all the waves of enemies? Do you have enough damage collectibles to defeat the key elite enemies on the stage? Is your healing enough to sustain the healing pressure from the enemy? After assessing these risks, it really just boils down to three options:
- Tackle the stage, apply ally combat buffs if necessary
- Leave the stage, either by taking another route or changing the note to another type
- Leak troublesome enemies, capitalizing shield and lifepoints as resources
Let’s use EM March of the Dead as an example. Suppose I have the following operators:
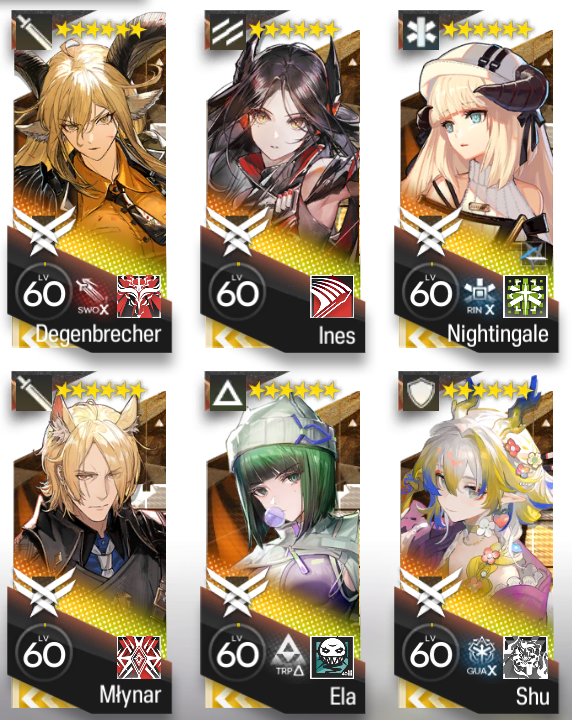

Without any damage collectibles, dealing the Colossi is going to be very tricky. The typical strategy is to have Mlynar do two skill cycles on the Colossi. Ela will handle the casters and Dublinn Cannoneer Captains from the bottom lane. Degenbrecher will clean up some of the mobs when Mlynar skill is down. Any mistake causing the top lane to fall is going to cost a significant number of leaks especially with the Colossi covering for the Flamechaser Soldiers and Elite Guards. On paper this might be a tough cookie to crack.
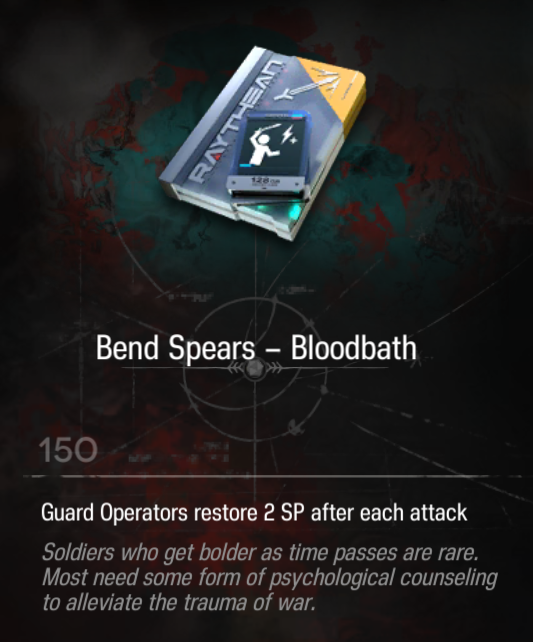
However, upon closer inspection of your collectibles, a collectible that you happen to have is Bend Spears-Bloodbath. This vastly improves Degenbrecher’s skill uptime, letting her contribute more damage to the Colossi. Moreover, her skill applies Frighten, a debuff which causes blocked enemies to be unable to perform auto-attacks. This opens up the option to stall the Colossi with her S2 as well as keeping Mlynar alive if he happens to block a Colossus. After assessing your collectibles, you come to the conclusion that your odds of clearing the stage leakless is much higher.
Adapting to the situation
Section titled “Adapting to the situation”Nobody plays perfectly, even the best IS players out there, let alone you who are reading this guide right now. But what makes the best IS players the best is not only the ability to make perfect plays, but also to adapt to the situation on the fly. This could be by making unorthodox plays to combat certain adverse conditions, or salvaging a run when a mistake is made. In essence, discussing adapting to the situation can be divided into adapting before entering a stage and adapting after entering a stage.
Adapting after entering a stage
Section titled “Adapting after entering a stage”The main importance of learning to adapt within a stage is to salvage the impossible when a mistake is made. Here are some guidelines on how to do so:
- Identify the instance when a mistake is made. Pause the game immediately. The earlier you identify when a mistake is made, the easier it is to react before it is too late.
- Assess what resources are available to deploy to deal with the situation. The main resources are any backup or on-field operators as well as the DP to deploy and execute any actions to save the run
- Slow down (pause/1x speed) your executions so that you have more time to think through any actions
Adapting before entering a stage
Section titled “Adapting before entering a stage”Some stages when comboed with certain conditional difficulties (Hallucinations/Call of We Many/Collapsal Paradigms/Epochs) can be extremely deadly. A general example would be facing stages with high opening pressure while having paradigms that impact your stage opening capabilities. A pessimistic and passive point of view would be to think that since IS is mainly RNG dependent, there is nothing that can be done when faced with what seems to be a dead end.
Yet the common saying goes “When life gives you lemons, make some lemonade”. There is never a moment when you should give up your run. If anything, beating an impossible run is material to post in the IS-general channel to show off. Moreover, the player is flexible and should take measures within their capabilities to either survive or avoid being in a detrimental scenario. This is tied deeply with your experience in IS.
An example would be when faced with March of the Dead with injury trigger, one could concord silence foldartals to summon shieldguards so vanguard operators can be deployed safely. Silence foldartal itself is a good foldartal to pick up just in case for this, and helps pass many max HP checks like Sentinel or Enter Eternity.
Conclusion
Section titled “Conclusion”And that’s it for the guide. Hopefully you picked up some tips from here to improve your IS gameplay. After reading all the tips and guidelines from here, the next step would be to apply what you learned into gameplay through practice. There is still plenty of content that is not covered, the majority of which are interactions in specific IS themes. These will be found in specific IS guides posted later.
I would like to thank especially Oyana for suggesting the guide to be written and Bait for writing sections of the guide that I do not feel qualified to write about; and the moderators of IS-central as well as the volunteers for putting in the time and effort to proofread and give feedback on the content and readability of this work.